


About
Make your own custom gift boxes to fill with any kind of gift you choose - personalised presents!
Make your own gift box from only a box (like a shoe box), wrapping paper, tissue paper and ribbon. You can make the box any size, shape or colour so it can be any theme, personalised and to fit any gift you choose! Very easy, basic wrapping skills are all that is required.
-
 angel p. favorited Homemade Gift Boxes
24 Nov 02:23
angel p. favorited Homemade Gift Boxes
24 Nov 02:23
-
 Step 1
Firstly you are going to wrap the bottom of the box neatly in the paper of your choice. Make sure before that the box will be fully covered by the paper you choose. Generally, a shoe box will fit into standard gift wrap sheets/rolls no problem.
So place the box on the sheet sitting with one of the longer sides down. Measure the length of the corner to the base of the box and then measure that distance on the paper. Place the box after that marking with equal paper to either side.
Cut from the edge of the paper to each corner (see picture). Then fold this piece into the box and tape down.
Turn the box and paper around so you have the other side and pull the paper tight around the base and repeat this to the other side of the box, cutting the length of wrap appropriatly this time.
-
 Step 2
Now to do the short side by pulling the paper up to the side and taping it into the inside of the box. It will look like the second image.
-
 Step 3
Now take each flap in turn and fold it towards the short side, flatten it there and then fold inside the box again and tape down. Do this for both sides. Now the bottom is done.
-
 Step 4
Repeat the same process with a new sheet of paper for the lid. When done cut out a piece of paper the same size as the top of the lid and fit it in the underside of the lid for a clean look.
-
 Step 5
hooray the box is done.
This box I made as a wedding present box for a friend so I am using golden white paper with white and irridescent filling, and gold and cream ribbons. You can use any theme you like. Other themes I have used that were nice were all different shades of blue and black, dark red and gold at Christmas.
-
 Step 6
Next take one sheet of tissue paper and line the box with it so it covers any remaining colour the box was originally and sticks out the sides a bit.
-
 Step 7
take the remaining tissue paper EXCEPT ONE SHEET (which is used later) and fold it short ways. Then cut thin strips that will become the filling for the box. You can also buy this if you prefer. Use any colour you like and depending on your theme/the person you can mix colours, for example I mixed irridescent with white. I have also found mixing different shades of the same colour gives nice texture (ie 3 different blues)
-
 Step 8
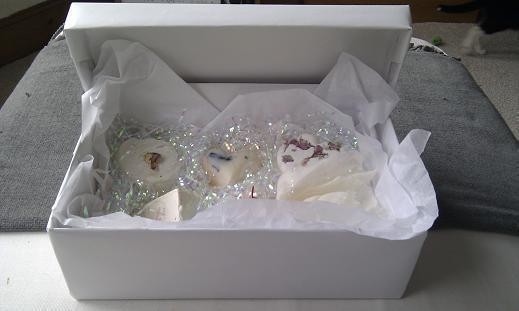
Now add your gifts carefully, displaying them nicely. This is five different lush bath products as the present is a honeymoon/wedding gift. It is a good idea to match the colour of the box and filling to the gift itself.
-
 Step 9
Now line the top with the last sheet of tissue folded to a size just a little smaller than the box. Try not to move the box too much now and do NOT turn it upside down or your display will be ruined. If you are going to post it or expect it to be moved a lot I advise to get a lot of bubble wrap and fold it to the size of the inside and place on top of the tissue so everything stays in place.
-
 Step 10
Finally wrap and secure the box with ribbon. Here I took a thick cream ribbon and placed two lengths around the box, taping them down in the same place. I chose to put the meet off-centre. The I took two lengths of cream curling ribbon and followed the lines by crossing them over underneath. Once the ribbon was tied I took a soft gold ribbon and tied it around the meet of the curling ribbon in a bow and trimmed the bow ends. The I curled the ribbon and arranged it around the bow - see the main images for the detail of this.
You can decorate however you like but make sure that it is secure so the lid doesn't open prematurely. You can also stick the lid down if necessary with neatly trimmed pieces of tape.


