


About
Your digital photos can become a part of your holiday decor with this quick and easy craft project.
I love finding new life for the digital photos I take for work when I visit various craft places or fairs. Last year around the holidays, I tried out making these fun photo holiday ornaments and since then have been hooked! It's a great quick project you can use to decorate your tree, home, and is a perfect project to make with kids.
Here's a how to so you can make these fun ornaments yourself. Feel free to add your twist to using them for the holidays and beyond! All it takes is just 10 minutes
Tags
-
 Step 1
Gather your materials.
When choosing your photos, look for ones that have lots of rich color or texture from flowers, landscapes to objects, rather than going for people shots. They tend to make better ornaments. But by all means, experiment! You can try just about anything you want even mixing photos with colored or scrapbooking paper. Here I'm using a photo I took this summer at a local San Francisco yarn store, Imagiknit showcasing their hyperbolic crochet coral reef display in their storefront window. The rich colors and textures will look perfect as a holiday ornament!
-
 Step 2
Print your photo from your computer on 4 X 6 photo paper with a borderless print setting. Using your exacto knife and straight edge, cut the photo into 5/8" strips. (Note: when getting to the last larger strip, just eyeball it and cut it in half.) I like to make them larger to make it easier to punch holes (especially for kids), but you can make them into smaller 1" strips to make them more even and exact if you like to. The beauty with this project is that when the ornaments are finished, as the strips are fanned out, it looks great no matter what. Don't worry about being super exact.
-
 Step 3
After you have all your photo strips, make sure you have them in the right order.
-
 Step 4
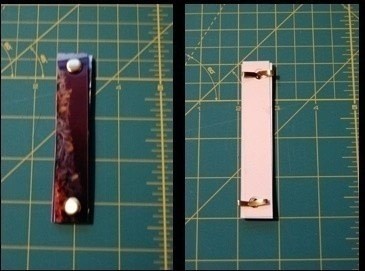
Take 2-3 strips from one direction and punch holes at the top and bottom of the strip. As you punch holes in the strips, place them in a stack continuing the right order. To keep the holes consistent, you can use your previous strip and align them to punch the new holes through.
-
 Step 5
Once you have all the strips punched, have them all in a stack and insert the paper fastener to the top and bottom of the stack. (Note: Don't fasten them too tightly or it will be hard to fan out our photo later on.)
-
 Step 6
To hide the long ends of the paper fastener, fold each end in half towards the center of the fastener to look like a little bow.
-
 Step 7
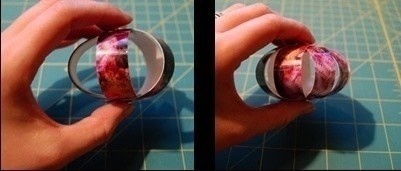
While still holding the photo stack in a semi-bent position, start to peel out one layer out all the way around. Continue to do so until all layers are peeled open and you have a round ornament. Adust the spacing of the layers more evenly to your own liking.
-
 Step 8
Cut out a piece of ribbon and twist it around the fastener once to secure it. Tie it at top into a cute bow or simple knot.
-
 Step 9
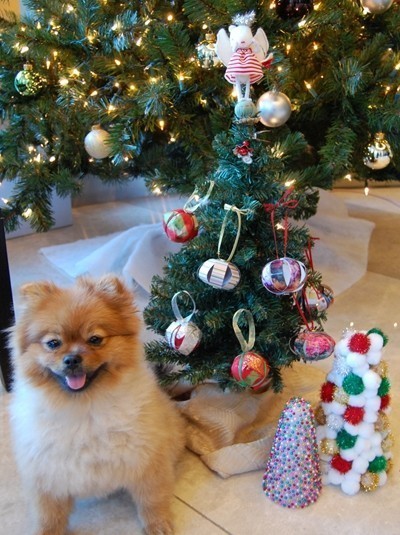
Now you have a finished ornament to place on a tree. If you don't have a tree, you can easily line them up to hang on a string like garland, or create a ornament mobile. To vary your designs, you can use scrapbook paper, create your own designs on the computer to print out, or photocopy patterns, textures, or typography you like.
It's a simple, fun project that everyone enjoys even little puppies like Lulu here!


ha and now onto the ornament. Very cool project. I like how colorful they are and how easy