


About
A heat mask for migraines, congestion and relaxation.
I've always suffered with migraines. At one point my doctor told me to try a heating pad on low over the top half of my face to block out the light, while the heat and weight would help witth the pain. Well, I didn't like how if you layed down the pad would fall off, and the normal rice heat packs did the same. So the heat pack mask was born!
I've found that the heat help with congestion and just helps you relax. So lay back in whatever position you want, since the heat will move with you!
-
 Roughwaters44 favorited Heat Pack Mask
08 Jul 03:30
Roughwaters44 favorited Heat Pack Mask
08 Jul 03:30
-
 Jessica N. favorited Heat Pack Mask
10 May 01:40
Jessica N. favorited Heat Pack Mask
10 May 01:40
-
Step 1
You will need:
-Fabric, any kind will do as long as it has a tight weave and isn't polyester. Polyester can and will melt if it gets too hot.
-a sewing machine and all the necesities that go with it
-plain dry rice. The long cooking rice works better than the 5 minute stuff.
-1/2 inch wide elastic for the strap.
-
 Step 2
Draw out the shape of a sleep mask on a piece of paper or cardstock. Add about an inch and a half on all sides. This makes it so you have plenty of room for the rice and seams.
Size it up on your face. It should come over your forehead and around to your hairline. The length down your nose and cheeks is up to you. I like mine to sit on my cheek bones and the bridge of my nose.
-
 Step 3
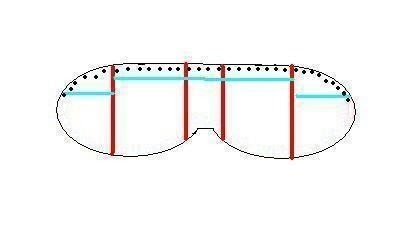
Place right sides of the pieces together with the elactic centered on the far edges (red on the image). Stitch from an inch above the elastic around the bottom half of the mask (blue dots on image). Go back and go over the elastic a few more time to make sure it's secure. If you are using a fabric that frays easily, zigzag the egges of the seam you just made.
Turn right side out.
-
 Step 4
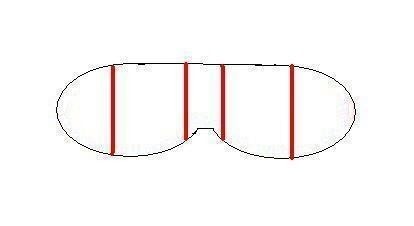
Sew vertical lines to make 5 pocket. (red lines on image) Stop about half an edge from the top to to leave room for closing.
-
 Step 5
WORK ONE POCKET AT A TIME FROM HERE ON! REPEAT THIS STEP AND STEP 6 WITH EACH POCKET.
Start at one end, fill pocket with rice. On the end pockets, stop when you get to the seam line from step 3. On the middle 3 pockets, stop when you are half an inch from the vertical seams. DON'T PACK IT IN!
-
 Step 6
Fold down each side of the opening towards eachother. Straight stitch across opening, making sure to backstitch the start and end of each pocket. Go back to step 5 and repeat with the next pocket.
On the 2 ends, start the stitch by overlapping the seam that is already there.
ALWAYS OVERLAP THE BACKSTITCH FROM THE POCKET BEFORE! I didn't on my first try and that was where the seam broke first.
-
 Step 7
And you are done!
To heat it up, place it in a microwave with half a cup of water (in a glass/mug) for 30 seconds. Repeat if needed until warm. NEVER MICROWAVE IT FOR MORE THAN A MINUTE AND 30 SECONDS! If you over heat it the rice can smoke and catch fire. Something no one wants! You can also place it in a sealed plastic bag then boil it for 5 minutes or until warm.
Make sure it isn't too hot, since burns are no fun, then place on your eyes.
You can also place these in the freezer for a nice cool pack as well. They don't get hard like the gel masks can.


Jet, I did know that! I can't believe I forgot to add it.
smart!!!! thank you for sharing this, and.... great tute as well.
i had found out as well to use devided parts , thank you!!!!, i'M sure i will make one myself.
Did you know when you set in the microwave a half cup of water they will stay longer useable.!!!
Perhaps you can add this note in your tute as well. i didn't know that with a bought one and.... after less then 6 month he was not useable anymore.
so this is a smart trick to know i think;-D LOL