


About
Bead a heart.
A beadweaving design by Julie Bell of MoonBell Creations.
I originally asked you to contact me if you wanted to make this pattern to sell, because that's generally just the request I see a lot of designers make (and one I would have unequivocally granted). But I've thought about it, if you can make money by selling these, go for it. What better way to be happy about creating something than knowing other people benefit from it? If someone asks, I'd sure appreciate you telling them where you got the pattern.
Tags
-
 Sequoia R. favorited Hearts Of Lily
20 Jan 22:11
Sequoia R. favorited Hearts Of Lily
20 Jan 22:11
-
 Kathy S. favorited Hearts Of Lily
13 Jan 06:18
Kathy S. favorited Hearts Of Lily
13 Jan 06:18
-
 tyler t. favorited Hearts Of Lily
10 Jul 05:39
tyler t. favorited Hearts Of Lily
10 Jul 05:39
-
 Dawn B. added Hearts Of Lily to Beaded shapes
30 Mar 00:54
Dawn B. added Hearts Of Lily to Beaded shapes
30 Mar 00:54
-
Dawn B. favorited Hearts Of Lily
30 Mar 00:54
-
 Nicole Twyla added Hearts Of Lily to Jewelery
15 Mar 04:39
Nicole Twyla added Hearts Of Lily to Jewelery
15 Mar 04:39
-
 Susan L. added Hearts Of Lily to Wishlist
23 Feb 15:13
Susan L. added Hearts Of Lily to Wishlist
23 Feb 15:13
-
M F. added Hearts Of Lily to Ideas
16 Feb 03:16
-
 candy.elektraspam added Hearts Of Lily to beading
28 Jan 18:54
candy.elektraspam added Hearts Of Lily to beading
28 Jan 18:54
-
candy.elektraspam favorited Hearts Of Lily
28 Jan 18:54
-
 Step 1
From left to right, string 1 A, 1 B, 1 A, 1 B, 1A, 1 B onto wire. The first seed bead is colored red in each image.
-
 Step 2
Pass the left end of the wire through the last B you placed on the wire so that the wires cross through this bead, keeping the beads centered on the piece of wire. Pull taut.
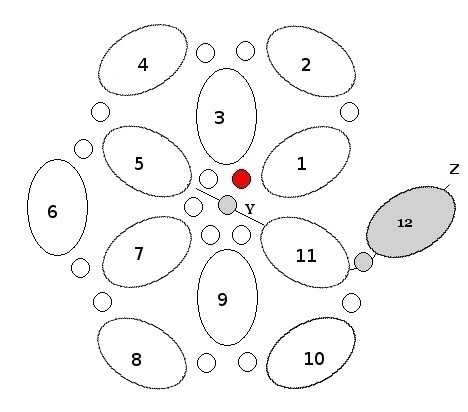
The end of the wire toward the center of the flower will be referred to as wire end Y. The end of the wire that is on the outer edge of the flower will be referred to as wire end Z. This is for simplicity's sake, so you're not trying to figure out which one was originally the left or right end of the wire, you can just look at the shape of the flower and know which is currently Y or Z (because since you cross wires, the left and right ends switch each time).
-
 Step 3
String 1 A on wire end Y. String 1 A, 1 B, 1 A, 1 B on wire end Z. The newly added beads are colored gray in each image from here forward.
-
 Step 4
Pass wire end Y through the last B added, crossing wires through the last B bead.
-
 Step 5
Repeat Steps 3 & 4 three (3) more times. You will work the flower counter-clockwise. Your piece should like this image at the end of the last repeat.
-
 Step 6
String 1 A on wire end Y. String 1 A, 1
-
 Step 7
Pass wire end Y through B bead #1, string 1 A, then pass through last B (#12) added onto wire end Z, crossing wires through the B bead. Pull taut.
-
 Step 8
String 1 A, 1 B on wire end Z. String 1 A, 1B, 1 A on wire end Y.
-
 Step 9
Pass wire end Y through B bead #13, crossing wires through this bead. Pull taut.
-
 Step 10
(This is a repeat of steps 3 & 4) String 1 A on wire end Y. String 1 A, 1 B, 1 A, 1 B on wire end Z. Pass wire end Y through the last B added, crossing wires through the last B bead four (4) more times, this time working around the flower clockwise. This image is how your piece will look at the end of this step.
-
 Step 11
String 1 A on wire end Y. String 1 A, 1 B on wire end Z
-
 Step 12
Pass wire end Y through B bead #14, string 1 A, then pass through last B (#23) added onto wire end Z, crossing wires through the B bead. Pull taut.
-
 Step 13
Repeat of Steps 3 & 4, working counter-clockwise. String 1 A on wire end Y. String 1 A, 1 B, 1 A, 1 B on wire end Z. Pass wire end Y through the last B added, crossing wires through the last B bead.
-
 Step 14
String 1 A on wire end Y. String 1 A, 1 B on wire end Z
-
 Step 15
Pass wire end Y through B bead #10, string 1 A, then pass through last B (#26) added onto wire end Z, crossing wires through the B bead. Pull taut.
-
 Step 16
String 3 A onto wire end Z
-
 Step 17
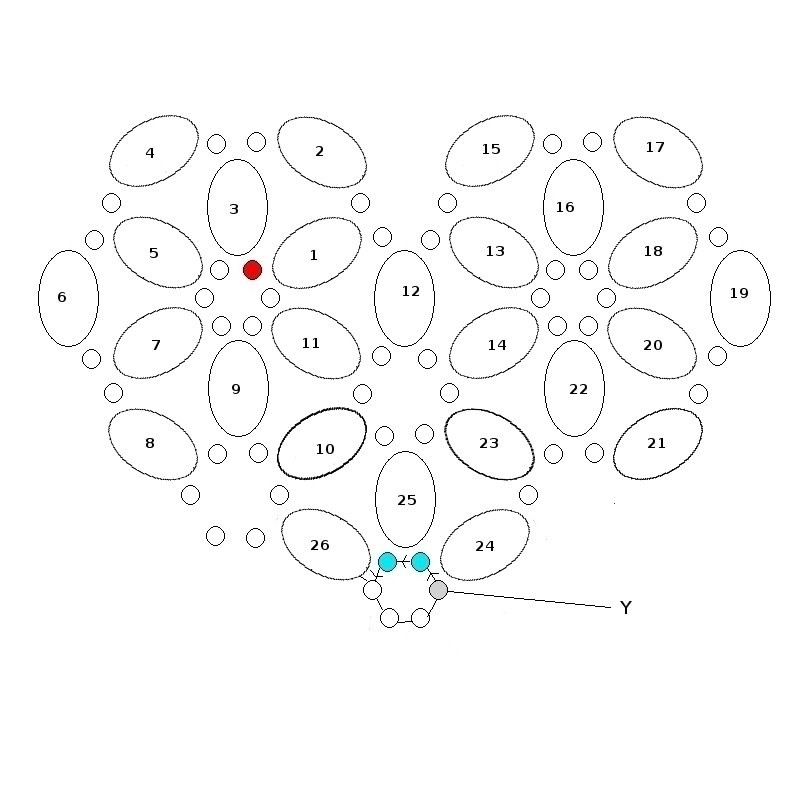
Pass wire end Z through the other 3 seed beads as shown (in blue), pull taut. Make as many passes as the bead holes will allow (without breaking them). To end off, wrap wire somewhere around this circle, trying your best to hide it, ending on back side. Cut wire and use pliers to push the pointy end away from where it would contact any skin.
-
 Step 18
String 4 A onto wire end Y
-
 Step 19
Pass wire end Y through the other 2 seed beads as shown (in blue), pull taut. Make as many passes as the bead holes will allow (without breaking them), ending the pass-through in the last seed bead added (shown in gray).
-
 Step 20
Pass wire end Y through B bead #24. String 3 A on wire end Y
-
 Step 21
Pass wire end Y through the other 3 seed beads as shown (in blue), pull taut. Make as many passes as the bead holes will allow (without breaking them). To end off, wrap wire somewhere around this circle, trying your best to hide it, ending on back side. Cut wire and use pliers to push the pointy end away from where it would contact any skin.
-
 Step 22
You're done! Use a jumpring, bail, or get inventive as to how you're going to attach the hearts to your jewelry pieces. Also, if you want to make a 2nd heart, and use beads in between the layers around the perimeter, you can weave the two hearts together and make a 3-D pendant!
-
 Step 23
Alternately, I have made a loop to easily put a jumpring or bail on by completing the seed bead circle in the same manner as the other circles, just weave the wire up there, add 2 seed beads and complete it to make another 6 seed bead circle.


thanks for the great tute and sharing;-D