


About
diy handpainted signs the way YOU want them.
My sister is a big decorator, and frequents yuppie little shops with overpriced handcrafted boring things. She made me tag along to a place called "The Beachhouse" once, and I saw all these boards and signs with screenprinted things on them such as "<-- TO THE BEACH". I though "dude, I could do way better." and set about doing so.
-
 Karen D. favorited Handpainted Signs
06 Oct 00:38
Karen D. favorited Handpainted Signs
06 Oct 00:38
-
 karmy_2683 favorited Handpainted Signs
30 Aug 09:46
karmy_2683 favorited Handpainted Signs
30 Aug 09:46
-
 Orla H. favorited Handpainted Signs
28 Sep 22:14
Orla H. favorited Handpainted Signs
28 Sep 22:14
-
 kinkhey favorited Handpainted Signs
13 Aug 20:23
kinkhey favorited Handpainted Signs
13 Aug 20:23
-
 Step 1
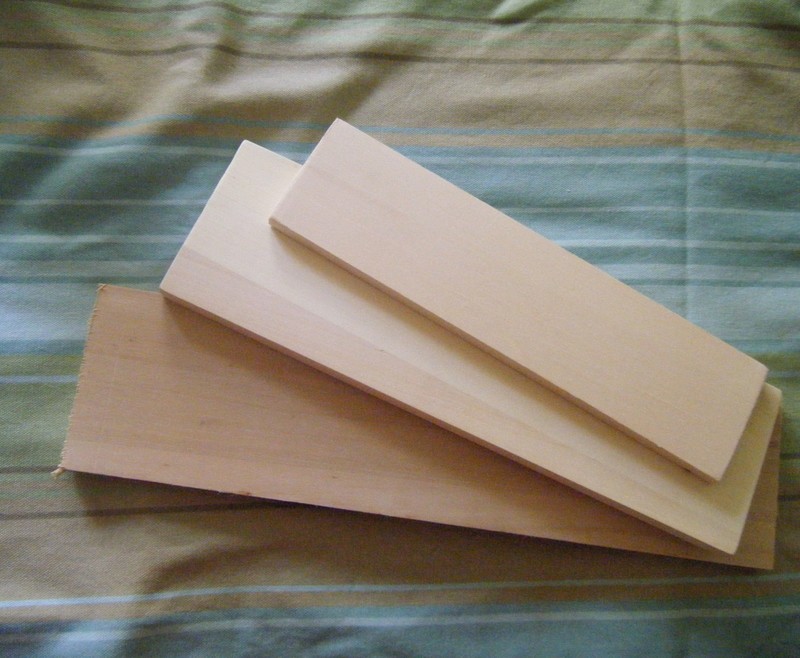
First, get your board and saw off the length you want. You can buy short lengths of thin wood plank at any hardwarde store. They're fairly inexpensive, between a dollar or 5 depending on size and quality. For a rustic look, pine is nice. Personally, I like aspen. While you're at the hardware store, be sure to pick up a small packet of screw eyes.
Sand everything down nice and smooth. When that's finished, screw in the eyes either on the top or diagonally into the back. Be sure to measure so the eyes are spaced symmetrically into the board.
-
 Step 2
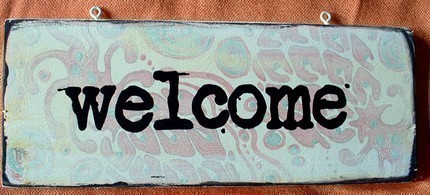
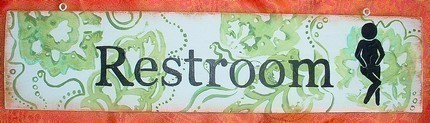
Next is my favorite part. First, I always start with a base coat of white paint. No, I don't prime it. The paint sinks ever so slightly into the wood so the natural woodgrain shows through. It looks lovely.
Next, paint a background motif of your choice. You can make it easy and use foam stamps (I often do this and add freeform lines and dots around the stamps, as in the top board), or you can paint something simple, such as swirls or dots, or if you have some painting experience, a motif of your choice (like my coffee cups :)
After that, I usually paint a glaze of white paint over my design. You don't want anything to take away from the words. If you want, you can rub some dark paint around the edges for an aged effect. This makes the board pop.
-
 Step 3
This part's easy. On your computer, find a font you like! My favorites are typewriter fonts. Make sure the font you choose is more on the simple side. Too complicated and you'll drive yourself nuts. ;)
Match up the size to the board you chose. I usually have success with a font between 110 and 140 pts.
print. it might take two tries. fortunately it's okay to use both sides of the paper.
-
 Step 4
Now, place the paper(s) on your board so the baseline of the text in nice and straight. A t-square might help, but I never use one. Slip a piece of carbon paper, carbon side down, under the paper. Tape down the printer paper so it doesn't slip around, and trace the outlines of each letter with a pencil or anything pointy. Remove the paper.
-
 Step 5
Now you have letter oulines! Fill them in neatly with your paint pen (I always use black, I've found it ALWAYS looks best. For an antique look I just swipe across it with sandpaper a few times)
Now spray varnish and let dry! Wire and hang, or wire and give.


Comments


