

Handbag Candy
Extract from Kanzashi in Bloom: 20 Simple Fold-and-Sew Projects to Wear and Give • By Diane Gilleland • Published by Potter Craft

About
Kanzashi look so cute dangling from your handbag or tote!
This flower-charm is designed to be easy to move from bag to bag as the mood strikes you. It also makes use of a fantastic design technique you'll be learning here: layering two Kanzashi together to make one elaborate flower.
Before You Begin
- Depending on the size and shape of your handbag, you may opt to shorten or lengthen the chain a little.
Skill Level
Intermediate
Best Petal Styles
Round, Pleated, Pointed
Best Number of Petals
8–10
Best Square Size
You can use any size you like, depending on the design of your flower. I've used 31/4" and 11/2" squares here.
-
 Luna D. favorited Handbag Candy
24 Apr 16:24
Luna D. favorited Handbag Candy
24 Apr 16:24
-
Lucy B. favorited Handbag Candy
13 Feb 17:20
-
Alecia B. favorited Handbag Candy
01 Aug 16:59
-
Geralyn E. favorited Handbag Candy
18 Feb 21:32
-
 katydog56 favorited Handbag Candy
19 Sep 22:33
katydog56 favorited Handbag Candy
19 Sep 22:33
-
Katy T. favorited Handbag Candy
12 Aug 10:09
-
 sweetstuffbymisty favorited Handbag Candy
07 Jul 06:03
sweetstuffbymisty favorited Handbag Candy
07 Jul 06:03
-
 Step 1
Making a Layered Flower
Fold and assemble two flower. One should be at least 1" smaller in diameter than the other. Don't put any centers on them just yet.
-
 Step 2
Take the larger flower and gently adjust its shape so that its top surface is fl at. If your larger flower is made with Round petals, then you won't need to do this step; but Pointed or Pleated petals are taller at the center than at the ends, so they tend to be domed in the middle and require a little adjustment. Once you've completed this step, the back of your larger flower will be slightly dome-shaped.
-
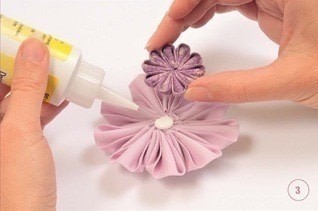
 Step 3
Now that you have a fl at front surface on the larger flower, you can glue the smaller flower on top of it. Apply fabric glue to the center of the larger flower and gently press the smaller flower on top. Allow the glue to dry. Then use embellishment glue to add a center to your flower.
-
 Step 4
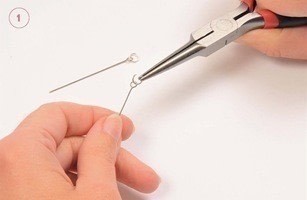
Making a Bauble
Using needle-nose pliers, carefully open a jump ring. String one of the eye pins onto it and close the jump ring. Do the same with the other eye pin and jump ring.
-
 Step 5
Cut a 2"-diameter circle from wool felt. Apply a thick ring of embellishment glue to the felt, keeping the glue about 1/4" from the edges. Position the two eye pins on the felt, as shown. The eyes should stick out just beyond the edge of the felt, and the bottoms of the pins should meet but not cross. You may need to trim your eye pins a little before you glue them to get them into this configuration.
-
 Step 6
Press the felt to the back of the flower. Make sure that the eye pins and jump rings are positioned so that they are on either side of the topmost petal of your flower. Allow the glue to dry completely before proceeding.
-
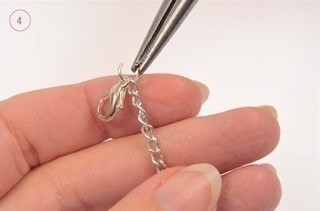
 Step 7
Cut a 3" length of chain. Using needle-nose pliers, open a new jump ring. Thread the ring through the end link of the chain and then through the lobster clasp. Close the jump ring.
-
 Step 8
Reopen the left-hand jump ring that's attached to the back of the flower, thread it through the other end link of the chain, and reclose it.
-
 Step 9
To attach this bauble to a handbag, simply wrap the chain around one handle or strap and fasten the lobster clasp to the jump ring.


It would be great if you could add a step on how to make the basic flowers too.