


About
First quilt and it's a doozy! :)
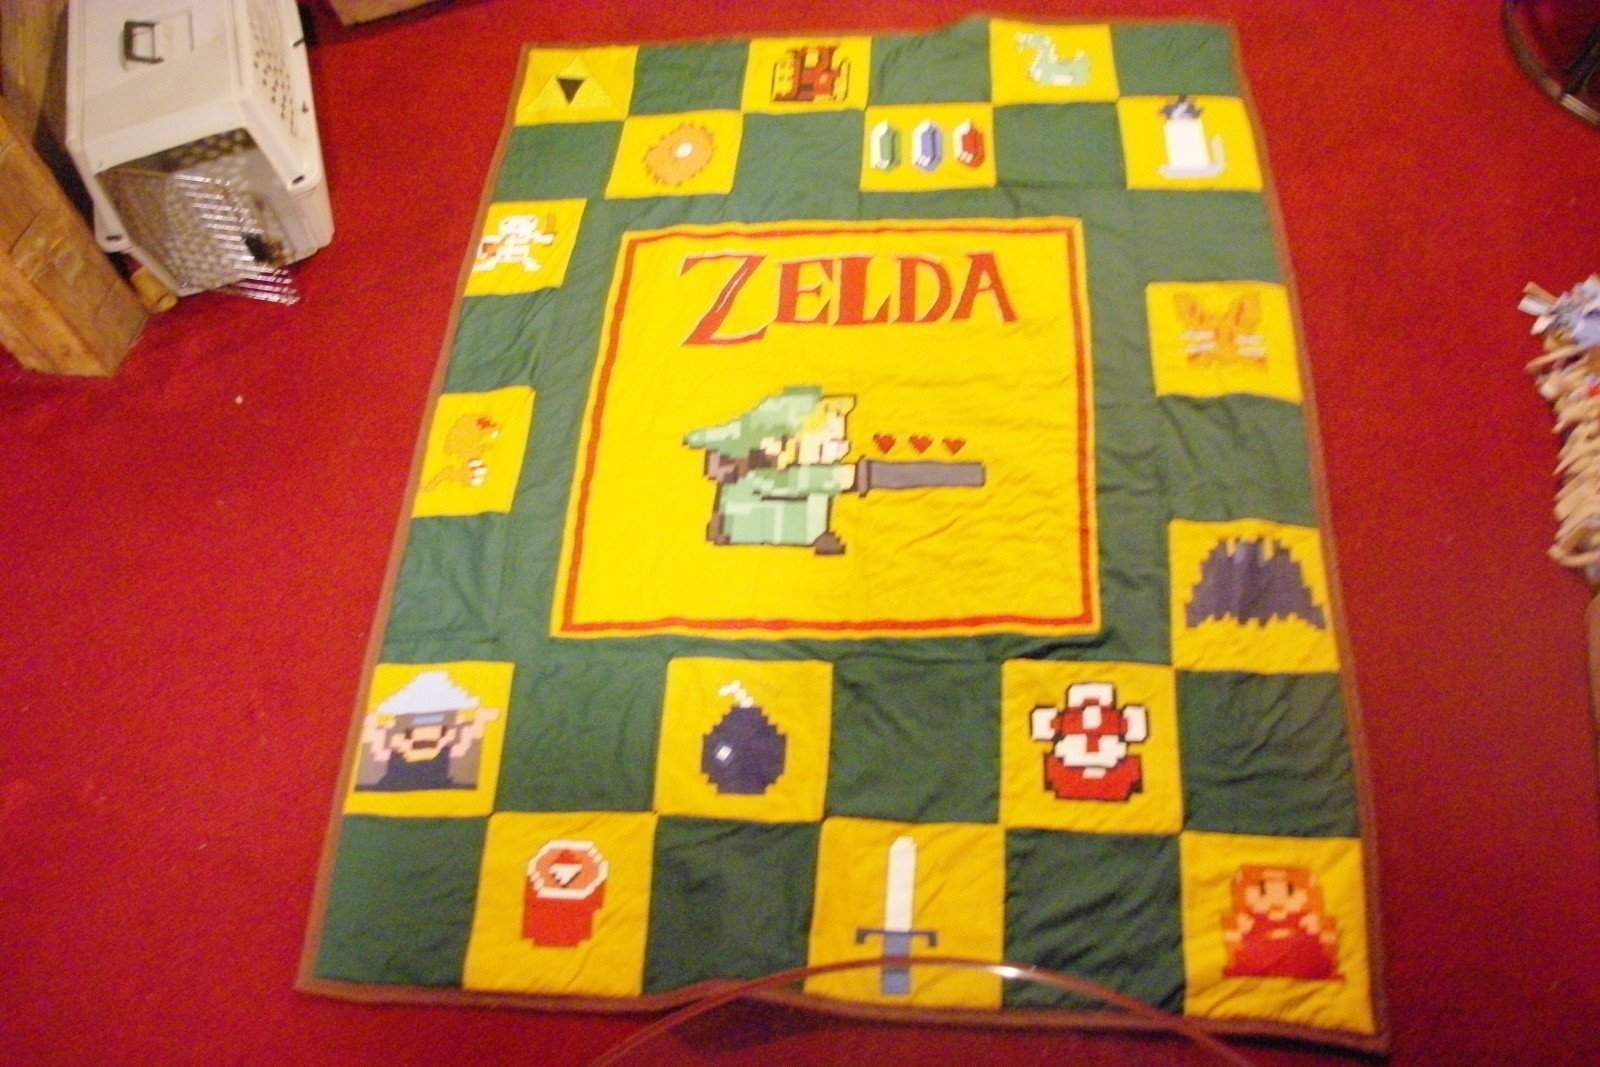
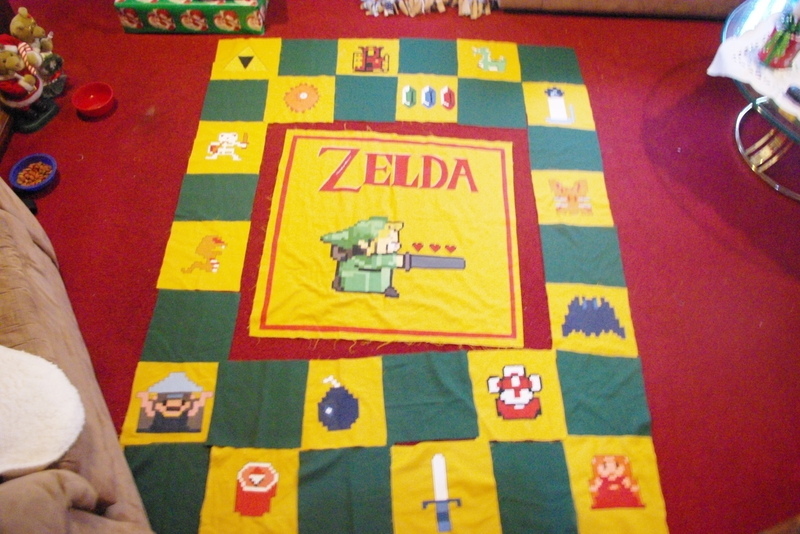
I made this as an intended graduation (actually ended up being Christmas) present. Took lots of time AND it's my first quilt!! Let me know what you think.
Tags
-
 Cindy S. favorited Hand Painted Zelda Themed Quilt
13 Aug 02:04
Cindy S. favorited Hand Painted Zelda Themed Quilt
13 Aug 02:04
-
 Conner W. added Hand Painted Zelda Themed Quilt to fashion
28 Jun 19:51
Conner W. added Hand Painted Zelda Themed Quilt to fashion
28 Jun 19:51
-
Conner W. favorited Hand Painted Zelda Themed Quilt
27 Jun 15:57
-
 Natt V commented on Hand Painted Zelda Themed Quilt
19 Mar 19:41
Natt V commented on Hand Painted Zelda Themed Quilt
19 Mar 19:41
-
Natt V favorited Hand Painted Zelda Themed Quilt
19 Mar 19:39
-
 jolene.flynn favorited Hand Painted Zelda Themed Quilt
18 Oct 08:40
jolene.flynn favorited Hand Painted Zelda Themed Quilt
18 Oct 08:40
-
 Tia B. favorited Hand Painted Zelda Themed Quilt
12 Aug 01:46
Tia B. favorited Hand Painted Zelda Themed Quilt
12 Aug 01:46
-
 fishywilleatchu added Hand Painted Zelda Themed Quilt to Clothes
18 Jun 21:59
fishywilleatchu added Hand Painted Zelda Themed Quilt to Clothes
18 Jun 21:59
-
 Laura N. favorited Hand Painted Zelda Themed Quilt
31 Jul 13:31
Laura N. favorited Hand Painted Zelda Themed Quilt
31 Jul 13:31
-
 Stephanie T. favorited Hand Painted Zelda Themed Quilt
23 Jul 21:30
Stephanie T. favorited Hand Painted Zelda Themed Quilt
23 Jul 21:30
You Will Need
-
Step 1
I can't remember how much material I gathered..but the front is yellow and green patterened while the backside is brown fabric.
-
 Step 2
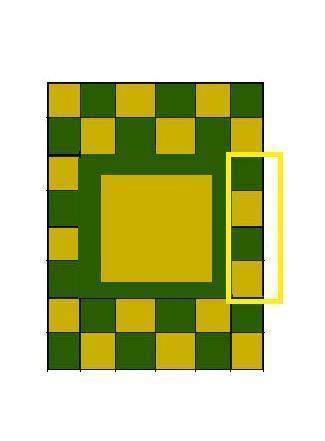
This was the digital draw out file of the meausurements of my blanket.
The four strips are a border around the center peice.
The 16 yellow/green were 10.5" x 10.5"
I wasn't too picky about staying exactly true to the 60 x 80 final, as mine ended up being 59 by 75. As long as you keep the seams even, it will look good. :)
-
 Step 3
Paint all your squares!
*lots of time later*
lay them out how you'd like your quilt to be put together so you don't get things messed up!
--------
METHOD OF ATTACHING SQUARES BELOW! -
 Step 4
Attach the first row of squares to eachother so you have a row, like so--highlighted in yellow.
-
 Step 5
Do the second row the same way as the first.
-
 Step 6
Attach the first and second row horizontally so you have one peice two wide and six long.
-
 Step 7
Then repeat steps 4, 5, and 6 with the bottom two rows.
-
 Step 8
Attach the highlighted yellow squares together...so you have a peice that is one wide and four long.
-
 Step 9
Do the same thing to the other 4 lose squares.
-
 Step 10
Then take the middle yellow section and attache two of the 4 green peices to opposite ends, ex. take the bottom and top green and attach or take left and right and attach. Then do the opposite two. So you have a bordered yellow square.
Make sure that one of your sides overlaps the other.
-
 Step 11
Then you have 5 separate pieces!
Attach 4 to the left side of piece 5.
Attach 3 to the right side of piece 5.
Attach 1 to the top of piece 453.
Attach 2 to the bottome of piece 453.Ta-da! Your front piece is done!
-
Step 12
Trim all your edges of the front piece to make sure it's even all the way around.
Take your back piece and measure the same measurements as the front piece.
Take your batting and do the same as above.
-
Step 13
Layer all three pieces as you'd want your final quilt to look.
-
 Step 14
Now my batting was way thin, but if you have a thicker batting here's an easy no-sew way of making it look puffy!
After all your layers are lined up, start from the back with your needle&yarn, go through the front, then the back.
I can give more help with the knot if you need.
You could even put the fray in the front for a decorative touch!
-
 Step 15
Now all your layers are attached! Yay!
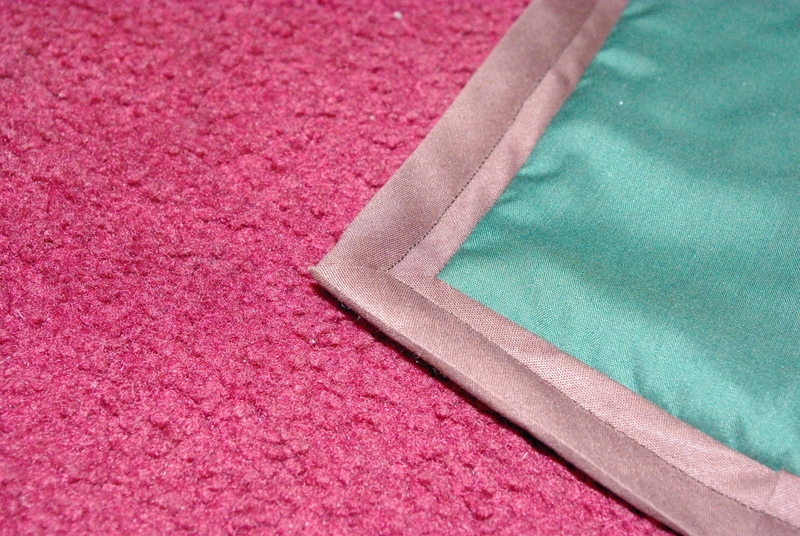
Time for bias tape!
I bought the double sided pre-made bias tape. Brown to match the back. Since I'm no good at explaining how to do it, and this was my first time using it, here is the link I followed: http://smashedpeasandcarrots.blogspot.com/2011/01/how-to-sew-bias-tape-tutorial.html
There is even a mini tute in this link showing you how to do corners!
-
Step 16
AND YOU'RE DONE!! :)
See main pics for final result!!
Goodluck and happy crafting!


Comments

