

Halloween Candy Corn Earrings
Extract from The Polymer Clay Cookbook: Tiny Food Jewelry to Whip Up and Wear • By Jessica Partain and Susan Partain • Published by Potter Craft

About
Make some clay candy corn earrings for Halloween.
Every year, the first appearance of candy corn in the grocery store signals the true beginning of fall, which means it’s time to start seriously planning our Halloween costumes. My personal favorite from childhood was the year I was a superhero, complete with shiny handmade cape and nifty boots. Of course, I kept having to tell people that, no, I was not Superman; I was Super Jessie. For this project we’ll create a piece of candy corn a bit smaller than the real kind.
Yield: 1 piece
From the book, The Polymer Clay Cookbook by Jessica & Susan Partain. Read our review here.
Tags
© 2024 Jessica Partain / Potter Craft · Reproduced with permission.
-
 Barbara M. favorited Halloween Candy Corn Earrings
25 Mar 12:15
Barbara M. favorited Halloween Candy Corn Earrings
25 Mar 12:15
-
 Key West Witch added Halloween Candy Corn Earrings to Jewelry Earrings
30 Jun 13:37
Key West Witch added Halloween Candy Corn Earrings to Jewelry Earrings
30 Jun 13:37
-
 Ms Dorito favorited Halloween Candy Corn Earrings
12 Jun 00:29
Ms Dorito favorited Halloween Candy Corn Earrings
12 Jun 00:29
-
Luna D. favorited Halloween Candy Corn Earrings
25 Apr 05:49
-
C.J. M. added Halloween Candy Corn Earrings to Clay
15 Feb 21:19
-
C.J. M. favorited Halloween Candy Corn Earrings
15 Feb 21:19
-
 Kaitlynn L. favorited Halloween Candy Corn Earrings
01 Sep 14:37
Kaitlynn L. favorited Halloween Candy Corn Earrings
01 Sep 14:37
-
 Bethany A. favorited Halloween Candy Corn Earrings
06 Jun 08:48
Bethany A. favorited Halloween Candy Corn Earrings
06 Jun 08:48
-
 bemeself favorited Halloween Candy Corn Earrings
14 Dec 20:27
bemeself favorited Halloween Candy Corn Earrings
14 Dec 20:27
-
 MandyCip_93 favorited Halloween Candy Corn Earrings
07 Jan 12:13
MandyCip_93 favorited Halloween Candy Corn Earrings
07 Jan 12:13
-
 Step 1
Start with nice warm clay. Not sticky or mushy, but warm, so the three layers of color will bind together. Start by stacking very smooth balls of the white, orange, and yellow clays, making a snowman shape.
-
 Step 2
Holding the stack as shown, gently press it halfway flat.
-
 Step 3
You don’t want it completely squished, just gently flattened.
-
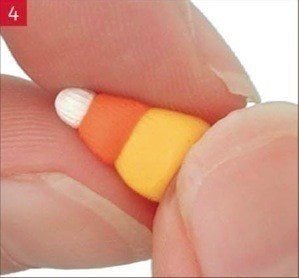
 Step 4
Rotate the flattened corn 90 degrees in your fingers. It should look a little bit more like candy corn
now—the rounded edges of your spheres of clay should be flattened a bit and starting to merge into
the next layer of color. -
 Step 5
Flatten the corn again, just as you did before.
-
 Step 6
Turn it another 90 degrees. Your corn should look even smoother and the layers more fused together.
-
 Step 7
Keep repeating the flattening and turning until your corn is completely smooth and the layers are nicely bound together. The edges should be slightly rounded. Don’t worry if the layers aren’t completely straight and even—real candy corn isn’t perfectly straight and even either!
-
 Step 8
Decide which side of your candy corn is your favorite, and place it facedown on your baking tile.
This side will be the front of your earrings. If you have fingerprints on the surface, don’t worry—they
will be mostly eliminated when you press the flat pad of your ear post into the back of the corn to
create an indentation -
 Step 9
Remove the ear post, then use a needle tool to create a rough surface inside the indentation. This
creates more surface area for the glue to bond, making for stronger earrings. -
Step 10
Bake for 15 minutes at 275° F (135° C).
-
 Step 11
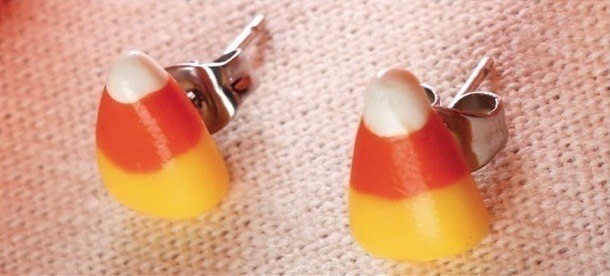
To Make Candy Corn Stud Earrings
1. Make two matching candy corns.2. Rub the front of each earring post pad over sandpaper to rough it up.
3. Rub the indentation in the back of each candy corn and the pad of each ear post with a cotton swab dipped in rubbing alcohol to remove any residual surface oils and metal flecks.
4. Add a drop of cyanoacrylate glue to the front of each ear post pad, then press the pad into the
indentation in the candy corn. Wipe off any extra glue using a toothpick (not your fingers!). Let set
overnight, or for at least 6 hours.5. If you’d like to glaze the candy corn, glaze them after they have been glued onto the posts.


Comments


