


About
an adorable and versatile apron
This apron is a little bit girlie with the gathers but still functional. You could wear it in the kitchen or while you're crafting. You could modify this pattern by making the corners rounded (if you do that, make sure you cut the binding on the bias; if you don't know what bias means, then you should stick with the square apron). It's easy to personalize this too.
NOTE: You can click on any of the photos to make them larger to see the needed detail for this tutorial.
Tags
-
 Inger Marie K. favorited Half Apron
18 Mar 04:05
Inger Marie K. favorited Half Apron
18 Mar 04:05
-
 MisfitsKid favorited Half Apron
27 Mar 11:25
MisfitsKid favorited Half Apron
27 Mar 11:25
-
 curious cat favorited Half Apron
17 Dec 20:15
curious cat favorited Half Apron
17 Dec 20:15
-
 Miss_Fit added Half Apron to Aprons
29 Mar 11:22
Miss_Fit added Half Apron to Aprons
29 Mar 11:22
You Will Need
-
 Step 1
Prepare your fabric -- press and cut the following
You may use all the same fabric or contrasting fabric like I did for a cute patchwork effect.
1 piece: 10" x 25" for the apron body (mine is the pink/green polka dot)
I piece: 6" x 25" for the apron pocket (mine is the green dot)
I piece: 14" x 3" for the waistband (mine is the pink floral)
2 pieces that are 18" x 3" for the ties (mine is the pink floral; it should be the same fabric as the waistband)
a total of 72" of 2" wide fabric for the binding (mine is the dark green) -- if you want to use store-bought binding instead, use the 1/2" double fold bias tape. You will need to sew the strips together to get 72".
-
 Step 2
The next few steps are how to prepare and use the binding. If you use purchased binding, skip to step 5.
First, press the strip in half length-wise so that it's 1" wide.
-
 Step 3
Unfold the strip and press each of the ends into the center (one at a time). You use the line that you pressed into the fabric in the previous step to know how far to fold the ends in.
-
 Step 4
Re-fold the fabric in half length-wise along the line that you previously pressed. Press again for good measure and to ensure that the fold line is bold.
-
 Step 5
Unfold one edge of the binding tape so that the raw edge lines up with the raw edge of the top of the pocket (the long side of the pocket is the top). You should be pinning the binding to the right side of the pocket.
-
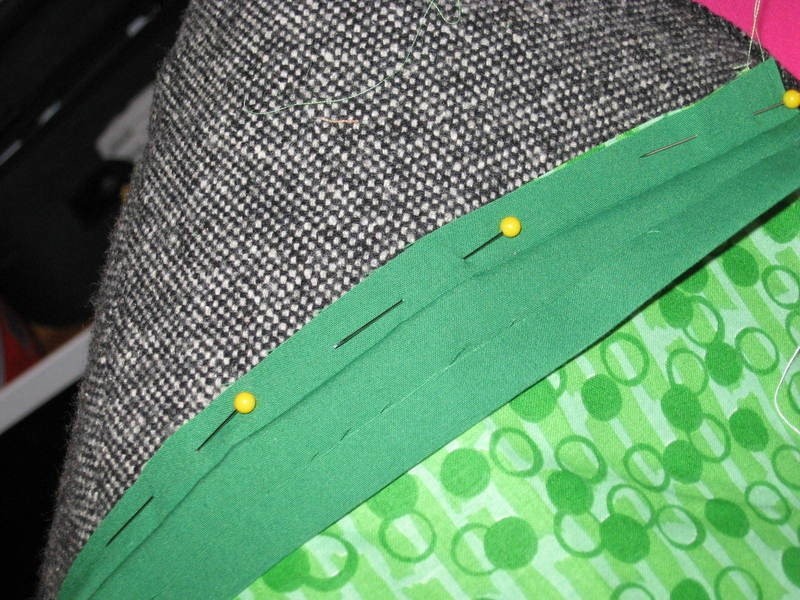
 Step 6
Sew the binding to the pocket piece with the stitches nearly in the fold line. Click on the small image to see the large version if you don't understand what I mean.
-
 Step 7
Fold the binding around the back and pin in place. The raw edge should still be folded under so that the clean edge is showing on the back. Cut the binding when you reach the other edge of the pocket (you'll use the rest later).
-
 Step 8
Sew the binding to the back side of the apron with a 1/8" seam from the binding edge.
-
 Step 9
If you want to add any decorative touches to the pocket do so now. I made mushroom applique by using fusible web to iron the pieces to the apron pocket. I really should have applique stitched around them at this point also. Instead, I want to use puffy paint to ensure that the mushrooms don't peel off. If you want to sew on patches or anything else, now is the time to do it.
-
Step 10
Pin the pocket to the apron piece. Both of the right sides should be facing up.
-
 Step 11
Repeat steps 5-8 to sew binding around the edge of the apron.
-
 Step 12
Divide the apron into thirds (mark this point, you'll need it now and in the next step). Sew the pocket to the apron along those lines to make the giant pocket into three smaller pockets. Be sure to backstitch where the pocket joins the apron as this will have the most stress on the stitches.
-
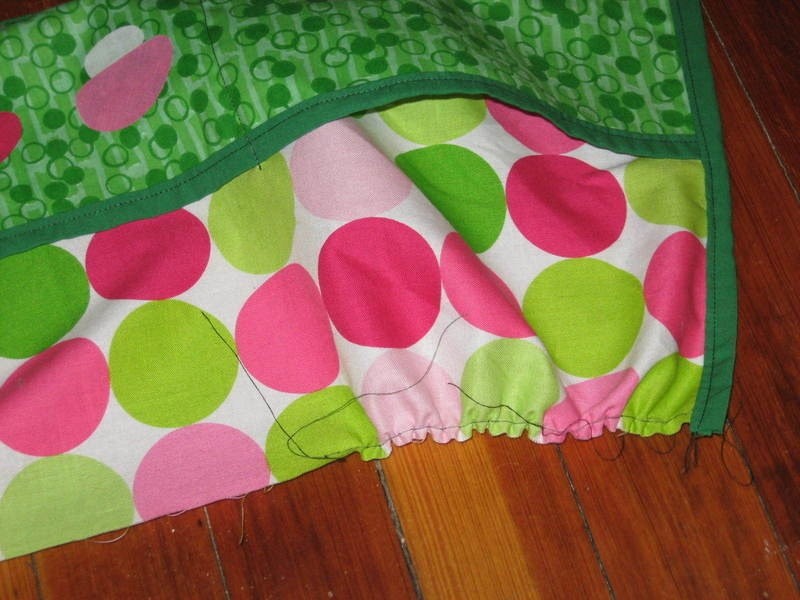
 Step 13
Gather the top edge of the apron on the outer two-thirds of the apron (leaving the center flat). To gather, set your sewing machine on the longest stitch you have. Make sure you leave a long tail at the beginning and sew along the edge with an 1/8" seam. Leave a long tail at the end too. The fabric will gather itself because of the long stitches. You shouldn't have to pull too much except to even out the gathering so that it looks pretty.
-
 Step 14
Sew the tie pieces to the waist piece. Press the seams.
-
 Step 15
Press the tie pieces in half length-wise, right sides together. Don't press the waist section in the center.
-
 Step 16
Sew the ties into tubes with a 1/4" seam. Again, don't sew anything on the center waist section.
-
 Step 17
Turn the tubes inside out and press with the seam along the bottom edge. To turn the tubes inside out easily, put a safety pin in the end and feed it thru itself.
-
 Step 18
First, mark the center of the apron and the center of the waistband with a crease. Line up those creased and pin the waistband section to the top of the apron. The right side of the waistband should be against the wrong side of the apron. This is the trickiest part. You may need to pull the gathers a little bit to make the apron shorter to fit the waistband. It will fit, trust me, just adjust as needed.
-
 Step 19
Fold the waistband over to the front. Turn the edge under 1/4" and pin to the front. Sew along the edge as close as possible.
-
Step 20
Turn the ends of the ties under 1/4" and sew along the ends to hide the raw ends.
-
 Step 21
Here's a close-up of the finished mushrooms with puffy paint. My swap partner loves kawaii so I made cute little faces too.


I made a guy friend a apron out of fabric with motorcycles and flames on it. He calls it the "Apron of Vengeance"