


About
Make a guitar backpack!
I know, I took a lot of pictures. My dearest sister was kind enough to take some loverly photos of me, modeling my backpack. !
This is a pretty tricky thing to do, but I PROMISE, PROMISE, PROMISE that it will be totally worth it when it's finished! But it is a big big thing, so make sure you have all the tools you'll need. And there is no way you can do this without a sewing machine. Make sure you have thick fabric that will hold its shape. Read the tutorial through before embarking, and leave a comment if you have any questions, or something isn't explained very well. Best of luck!
(A musician friend pointed this out: the guitar goes on your back, and sticking right up from it is the neck, and attached to it is the peg head! Get it? Wow, guitars really are just a ripoff of a woman. Wow.)
Tags
-
 Key West Witch added Guitar Backpack to Guitar Everything
19 Mar 07:47
Key West Witch added Guitar Backpack to Guitar Everything
19 Mar 07:47
-
Krystal W. added Guitar Backpack to Purses, Totes, Backpacks...
18 Mar 16:22
-
Krystal W. favorited Guitar Backpack
18 Mar 16:21
-
 Keziah M. favorited Guitar Backpack
29 Mar 20:38
Keziah M. favorited Guitar Backpack
29 Mar 20:38
-
 Lesley D. favorited Guitar Backpack
21 Feb 18:28
Lesley D. favorited Guitar Backpack
21 Feb 18:28
-
 Aishwarya Purohit favorited Guitar Backpack
22 Nov 05:21
Aishwarya Purohit favorited Guitar Backpack
22 Nov 05:21
-
 Conner W. added Guitar Backpack to fashion
18 Aug 21:41
Conner W. added Guitar Backpack to fashion
18 Aug 21:41
-
 OverlordSayo favorited Guitar Backpack
16 Jun 05:27
OverlordSayo favorited Guitar Backpack
16 Jun 05:27
-
 Christa D. favorited Guitar Backpack
13 Apr 02:27
Christa D. favorited Guitar Backpack
13 Apr 02:27
-
 banu favorited Guitar Backpack
01 Feb 13:06
banu favorited Guitar Backpack
01 Feb 13:06
You Will Need
-
 Step 1
First, get a guitar to make your pattern off of.
-
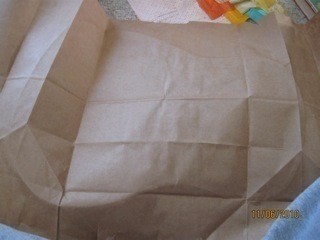
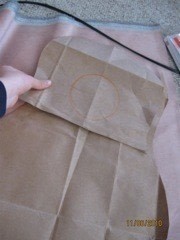
 Step 2
Place your cut open paper bag over the back of the guitar and press down on the corners of the guitar, leaving a folded outline of the shape.
-
 Step 3
This is what it will look like, if you can see it.
-
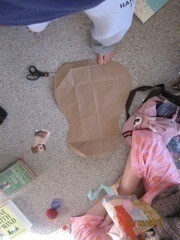
 Step 4
Cut it out.
-
 Step 5
Cut two of this shape out of your stiff main fabric.
-
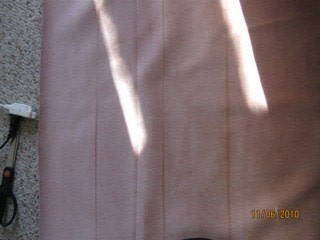
 Step 6
Using your spring foot, quilt it in some way/design. This adds stiffness. You could also try fusible interfacing. I tried that, but as it turns out, my fabric MELTS! Do NOT try to iron it if you have a sort of icky velor upholstery fabric!
This will be the back side of the guitar.
-
 Step 7
Cut out three strips of the fabric, each five inches wide.
-
 Step 8
You may have to do six, and sew them together end-to end to get three strips that will go all the way around the shape of your guitar.
-
 Step 9
Quilt these three strips together.
-
 Step 10
Sew the strips around the back of the guitar, for the 'depth' of the guitar.
-
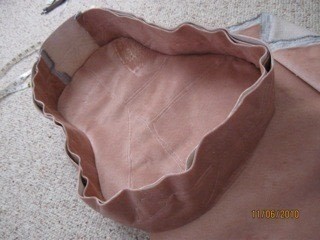
 Step 11
flip side.
-
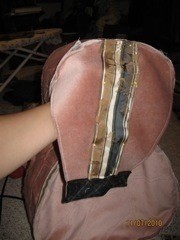
 Step 12
make another pattern of the top of the guitar. Make it go farther down than mine is here. I had to make yet another one.
-
 Step 13
Now, modify the original pattern you made, cutting out a space in the top that will be the way to get into your backpack.
This is the front of the backpack.
Cut two.
-
Step 14
quilt the front pieces together.
-
 Step 15
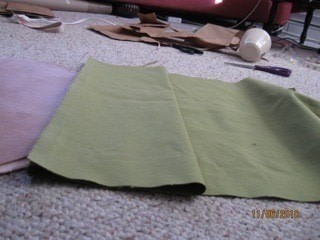
Take a rectangular piece of fabric at least as wide as the width of your guitar.
-
 Step 16
Fold it like so, so that if you reached into the left side of the fabric in the picture, you would have a big, no-sided pocket.
-
 Step 17
sew with a straight stitch the dividers for the pockets.
-
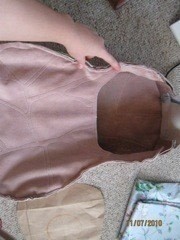
 Step 18
Place the pocket under the front piece of the backpack.
Cut it out to fit the shape.
Pin it to the front pieces (already quilted)
-
 Step 19
Sew the front piece with the pocket underneath it to the rest of the guitar. Unpin the pocket. It should now be sewn in.
(For me, this was the absolute most frustrating, time-consuming, scream-inducing part of the entire thing. If you breeze through it, I would like to study your brain when you die, and you get a gold star for being the most amazing person in the world. Please write an autobiography so that I can gain insight into your life and be more like you. Please. Share your story.)
-
 Step 20
Here's another view.
-
 Step 21
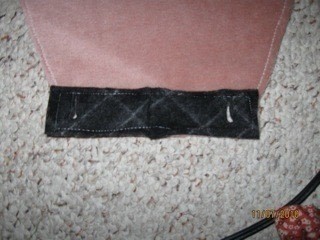
This is cut out of the top of the guitar pattern. You made a copy of the top half before, remember? Now use it. Find the place where the bridge is on the guitar. Make the bottom part as wide as the bridge. Make sure it will cover the giant hole in the top that ensures access to the contents of your backpack. Cut two and quilt together. I actually did this later, but have no idea why I didn't do it now. You will regret doing it later.
-
 Step 22
For the bridge, which contains the buttons that close the flap, I used this hideously ugly skirt that already have buttons and button holes big enough for the guitar. I can not for the life of me sew button holes, no matter how hard I try. Any tricks, anyone? Any online tutorials? If you're like me, it may be easier to find pre-existing buttonholes with buttons to match.
-
 Step 23
sew a strip (with buttonholes) onto the end of the flap you just made. This is the bridge.
-
 Step 24
Cut out the fabric behind the buttonholes in the bridge.
-
 Step 25
Sew the flap on. I did this slightly crookedly, but it's functional, if not exactly fashionable. Don't stress on getting it perfect.
Pin and sew the 'bridge and strings'. I chose a striped fabric so it gave the illusion of strings without actually doing the meticulous work of stitching individual strings.
-
 Step 26
sew on the hole of your guitar.
-
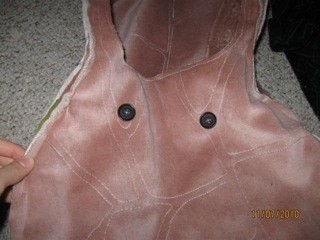
 Step 27
Sew the buttons on to the front piece of the guitar so they match up with the button holes on the flap.
-
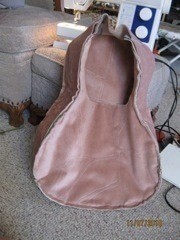
 Step 28
See? It works!
-
Step 29
For the straps, sew one uber-long strip of fabric. I chose one with vertical stripes to create the illusion of strings.
-
 Step 30
I'm really proud for coming up with this idea for folding, so no making fun, okay? And if you find a cooler way to do it, then you can just be happy and rub it in my face. That tells you how confident I am in my oh-so-original design.
Ok, so first fold it like this.
-
 Step 31
Then fold the pointy-ish side down.
-
 Step 32
pin it.
-
 Step 33
pin it to the back layer of the guitar so that the pointy-ish-but-folded-down part of the awesome folded neck thingey.
-
 Step 34
sew it.
-
 Step 35
sew the end of the straps down by the hips of the guitar.
-
Step 36
Good job! Please post your version if you make one! Feel free to change things to make it unique and interesting!


You all should definitely make one! I want to see how other ones would turn out, and what cool variations you make!
i love it =D