


About
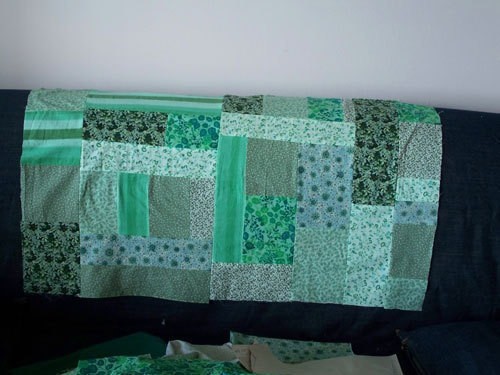
Patchy Green Spin Skirt Comes Alive for Spring
This project isn't really tricky, but just time consuming. Because I made all the patchwork it took a really long time. Plus the stripes of lace add more time too. If you want you could just make the patchwork and cut out your skirt, omitting the strips. Also you don't have to use lace but you could use any complementary fabric. I just made the tutorial to make the exact design I have here. Please don't pass the design off as your own, since I did create the whole thing myself with no pattern! ;] This is my first attempt at a tutorial. I made this last summer, so I am sorry I don't have more pictures at all the steps. Let me know if anything needs more clarity! I would say this project is good for someone with at least some sewing experience, maybe an intermediate, because a lot of my steps assume some prior experience.
-
 Kay T. favorited Green Patchy Skirt
11 Nov 08:40
Kay T. favorited Green Patchy Skirt
11 Nov 08:40
-
 veronica f. favorited Green Patchy Skirt
01 Dec 14:04
veronica f. favorited Green Patchy Skirt
01 Dec 14:04
-
 Step 1
First, cut out squares of all sizes of any type of colors you like. Sew them all together, patchwork style. I find, the best way to do this, is sew strips of squares together, then sew the strips together. Sew until you have enough patchwork fabric to make your whole skirt (about 1 or 2 yards depending on how long it is). My patches in this skirt are roughly around 5" square (give or take a little).
-
Step 2
Next measure LOOSELY around your hips. The skirt must fit over them, so take this into consideration. Add 1" to your measurement for seam allowances. Note the number on paper. Divide by two, and divide by 2 again. For example, my numbers:
39" hips + 1" seams = 40"
40"/2 = 20"
20"/2 = 10"
This is Number 1 measurement and will be the width we cut the top of your skirt from.
-
Step 3
Next decide how big you want your spin at the bottom to be. I find anywhere from 60" to 100" makes a good hippie skirt. If your fabric is stiff, don't make it too big, because it won't hang right. Divide this number by 2. And divide by 2 again.
This is your Number 2 measurement
-
Step 4
Next measure from your hips to how long you like your skirts. Mine is probably about 30", but it depends how tall you are and how long you like it. Remember there is a 2" waistband to add, and 1" to loose in the hem.
-
Step 5
Next fold your patchwork fabric in half. Use your Number one measurement to draw a line strait across for the waist. Curve this line a bit for a more comfortable waist band. The outer edge should be about a 1/2" higher that the center fold line.
Measure down how long you like your skirt at the fold. Draw a line for how wide your skirt should be at this length using the value for Number 2 measurement.
Connect the outer top line to the outer bottom line with a diagonal line. Make the diagonal line as long as the line on the fold. This will cause the bottom outer edge to be a little higher than the inner edge, thus causing your skirt to have a nice curve.
-
Step 6
Cut along the lines you have drawn. Use the cut out piece of skirt as a pattern to cut out the back of the skirt.
-
Step 7
Next use the same piece to cut front and back pieces out of a lining, if you would like a lining.
-
Step 8
Cut out long strips of fabric so that the total length at least doubles the bottom hem of the skirt. Mine are about 4" wide, but you can make them however large you like your ruffles.
-
Step 9
Next cut your front and back of the skirt into diagonal strips. Use alternating strips as pattern pieces to cut out the same size pieces of white cotton lace. Mine is pretty thick, so it held up well in the skirt
-
Step 10
Next sew the white cotton lace strips and the patchwork strips together to reform your original skirt. Use 1/4" seam allowances
-
Step 11
Next press the seam allowances towards the patchwork and topstitch them down so that you can't see the seams through the lace
-
Step 12
Sew the front and back side seams together of the skirt. Do the same for the lining.
-
Step 13
Gather the ruffle on the lining with right sides together and stitch. I find the best way to gather is to use a large basting stitch then cut the stitches and pull the treads so that the fabric is gathered. Do this all the way around the ruffle until it fits with the lining.
-
Step 14
Next use the Number 1 measurement from your hips and cut 2 rectangles of that length from the fabric you used for the lining. This will be the waistband. Mine is about 5" wide, but you can make it more or less wide if you like. Sew two button holes in the center 1" away from one of the edges on one rectangle.
-
Step 15
Sew the two rectangles together using the same seam allowance you used for the skirt.
-
Step 16
Put the lining inside the skirt with the right side facing out on both. Next pin the waistband with right sides together to the outside of the skirt. Sew all three layers together.
-
Step 17
Press down 1/2" of the waistband at the top. Fold the waistband in half towards the inside of the skirt and be sure to encase the seam from the three layers. Whip stitch the waistband shut by hand.
-
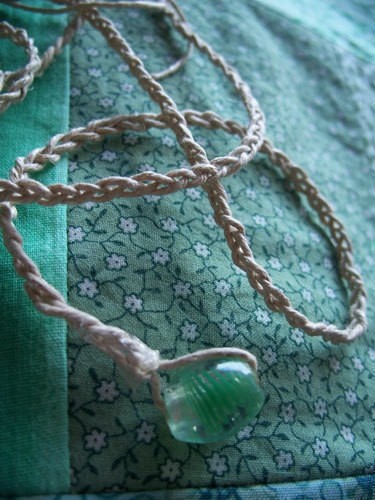
 Step 18
Next measure out three pieces of hemp, each about 4X larger than your waist. Braid the pieces. Thread the braids through the waistband through the button holes. Add matching glass beads at the end.
-
Step 19
Congrats! Your skirt is finished!! Wear it to a sweet concert or to the store!

Although... I think that a classic eyelet would compliment it better, maybe... The patchwork idea, I mean.