About
Comfy up any room with a granny square pillow cover. Guaranteed to up the cozy factor!
This project is a labor of love. If you adore crochet and granny squares in particular, this project is definitely for you. I promise you'll be rewarded with your effort when you stuff a pillow inside of this almost too gorgeous to use sham.
-
 Lee Rose added Granny Square Pillow Shams to Vardo
16 Mar 23:17
Lee Rose added Granny Square Pillow Shams to Vardo
16 Mar 23:17
-
Lee Rose added Granny Square Pillow Shams to Vardo
14 Mar 20:15
-
 Carmen favorited Granny Square Pillow Shams
08 Dec 12:26
Carmen favorited Granny Square Pillow Shams
08 Dec 12:26
-
 Bella Trix favorited Granny Square Pillow Shams
05 Nov 13:42
Bella Trix favorited Granny Square Pillow Shams
05 Nov 13:42
-
 Polina B. favorited Granny Square Pillow Shams
06 Jan 19:21
Polina B. favorited Granny Square Pillow Shams
06 Jan 19:21
-
 NancyF favorited Granny Square Pillow Shams
14 Nov 22:56
NancyF favorited Granny Square Pillow Shams
14 Nov 22:56
-
Serenity added Granny Square Pillow Shams to cool
22 Oct 20:09
-
 M.Hassevoort added Granny Square Pillow Shams to Want to make
12 Jul 20:55
M.Hassevoort added Granny Square Pillow Shams to Want to make
12 Jul 20:55
-
 Amporn K. favorited Granny Square Pillow Shams
07 Jul 01:48
Amporn K. favorited Granny Square Pillow Shams
07 Jul 01:48
-
 Libby W. added Granny Square Pillow Shams to Gift ideas for Kayleigh
22 Jun 22:32
Libby W. added Granny Square Pillow Shams to Gift ideas for Kayleigh
22 Jun 22:32
-
 Step 1
So, you've got all of your squares made up and you're ready to attach everything. Take a look at your squares. The "front" or "right" side of the squares will try to curl up. This is the pretty side you want facing out when your sham is complete.
Take all of your squares pretty side down and lay them out in front of you in the pattern you want to attach them. You're going to start working the squares from right to left, from bottom to top.
Take your furthest right squares from your last and next to last rows and push them together so that their pretty sides are touching.
Use your fingers to align the holes and corners.
-
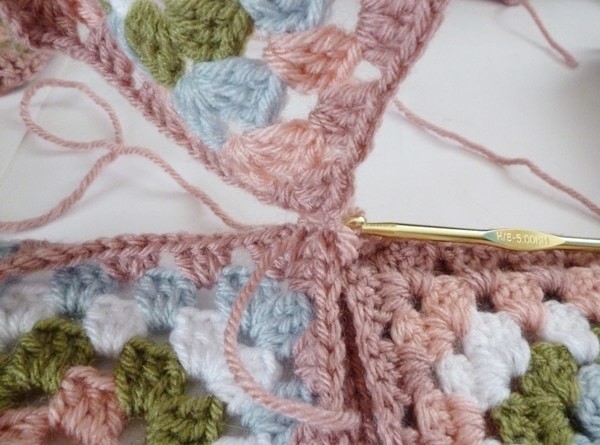
 Step 2
Take the yarn that is the same color as the last round for each of the squares and get it ready to go on your hook. Push your hook through the first corner and single crochet. Single crochet again.
Next push your hook through the loops for the first set of chains on both of the squares and single crochet. (You will have four loops on your hook before you single crochet). Continue to single crochet through the loops for the other two pairs of chains.
Now you'll reach a "hole". Single crochet through this space twice.
Continue the pattern through the chains and holes until you reach the end of the square.
-
 Step 3
Now it's time to continue your single crochets through the next two granny squares you have laid out in your pattern. Keep your yarn going from when you attached the first two squares together. Sandwich together the next two squares you have laid out and match up the holes and corners.
Place these two sandwiched squares to the left of the squares you have already attached. Push your hook through the first corner holes and continue to single crochet the same way you did for the first pair.
-
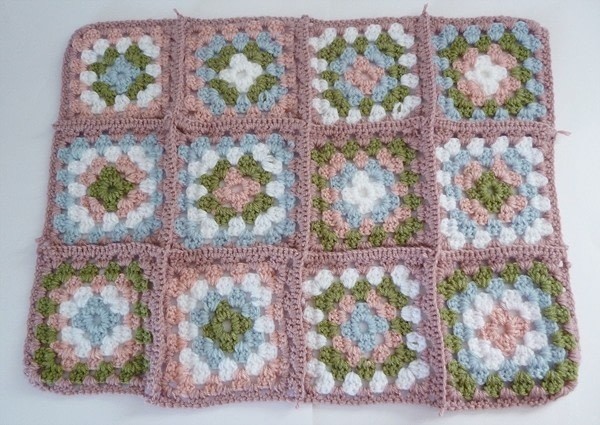
 Step 4
Continue attaching all of the squares from left to right. They will be attached horizontally, but will remain detached vertically like in the image above.
Repeat the same steps as above until you have all of your rows joined together along the horizontal line.
-
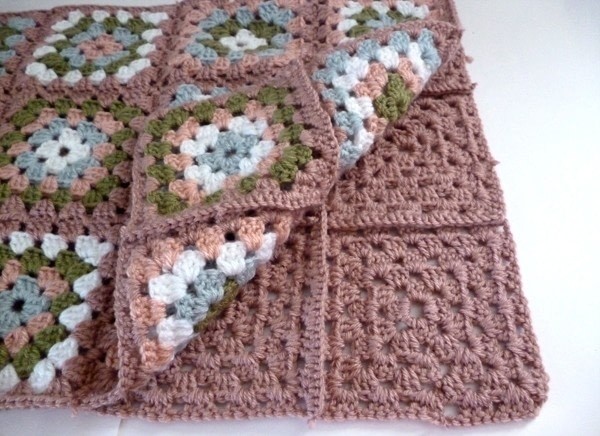
 Step 5
Turn your piece to where your unattached lines are horizontal to you. Start from the right and single crochet all the way down for each row until all are attached.
-
 Step 6
When you've finished the front, this is what the back or "wrong" side looks like... see the ridges from the single crochet between each piece?
-
 Step 7
This is what the front or "right" side looks like.
Toss the front side to the side and repeat the process for all of the backside granny squares.
-
 Step 8
With both your front and back complete, place the pieces wrong side together. If laid correctly, the ridges will be facing one another and your pretty side will be facing you.
Starting at the upper right corner, single crochet exactly as you did to piece the front and back together. Go continuously around to the bottom right corner. Leave the last, right side open to so that you can easily insert your pillow.