About
Add metallic tips to a plain pair of combat boots
***Recommended: Do this project outdoors/in a well ventilated space!***
I've been wanting to add "metal" tips to a pair of brown combat boots for quite some time, but knew I didn't want to use acrylics or spray paint. I was looking for something for metallic looking - almost chrome - that had that bright finish. Chrome spray paint would probably work, but I liked the idea of being able to control the paint with a brush. After a few rounds at my local Michael's trying to hunt something down, I came across Martha Stewart's Liquid Gilding. JUST what I needed. I chose Gold, but it's also available in Brass, Copper and Silver. Count on Martha to save the day.
Tags
-
 Mnemosyn added Gold Tip Combat Boots to Rock and roll
13 Jun 16:23
Mnemosyn added Gold Tip Combat Boots to Rock and roll
13 Jun 16:23
-
 Thaty F. favorited Gold Tip Combat Boots
24 Aug 17:33
Thaty F. favorited Gold Tip Combat Boots
24 Aug 17:33
-
 Maggie R. added Gold Tip Combat Boots to 90s Goddess
08 Mar 15:57
Maggie R. added Gold Tip Combat Boots to 90s Goddess
08 Mar 15:57
-
 dazedandbeautiful .. added Gold Tip Combat Boots to Kylie Jenner
21 Jun 15:37
dazedandbeautiful .. added Gold Tip Combat Boots to Kylie Jenner
21 Jun 15:37
-
 Marjla favorited Gold Tip Combat Boots
29 Oct 21:31
Marjla favorited Gold Tip Combat Boots
29 Oct 21:31
-
 LunaBunni91 favorited Gold Tip Combat Boots
06 Oct 17:00
LunaBunni91 favorited Gold Tip Combat Boots
06 Oct 17:00
-
 Crimsaros added Gold Tip Combat Boots to Final fantasy Tifa Lockhart
15 Sep 17:19
Crimsaros added Gold Tip Combat Boots to Final fantasy Tifa Lockhart
15 Sep 17:19
-
 rawnoodles favorited Gold Tip Combat Boots
21 May 18:24
rawnoodles favorited Gold Tip Combat Boots
21 May 18:24
-
 Maxine M. added Gold Tip Combat Boots to To-make list
13 Apr 16:09
Maxine M. added Gold Tip Combat Boots to To-make list
13 Apr 16:09
-
Stitches favorited Gold Tip Combat Boots
27 Jan 01:39
-
 Step 1
Supplies:
- Martha Stewart Liquid Gilding (About $7 at Michael's)
- Masking and/or electrical tape
- Soft bristled paint brush
- Scissors
- Combat boots, or shoes of your choice
- Scrap newspaper/magazines and popsicle stick (not shown)
- Nail polish remover and cotton swabs, optionalYou'll also need an open, well ventilated space to work in. Outside is probably the best bet!
-
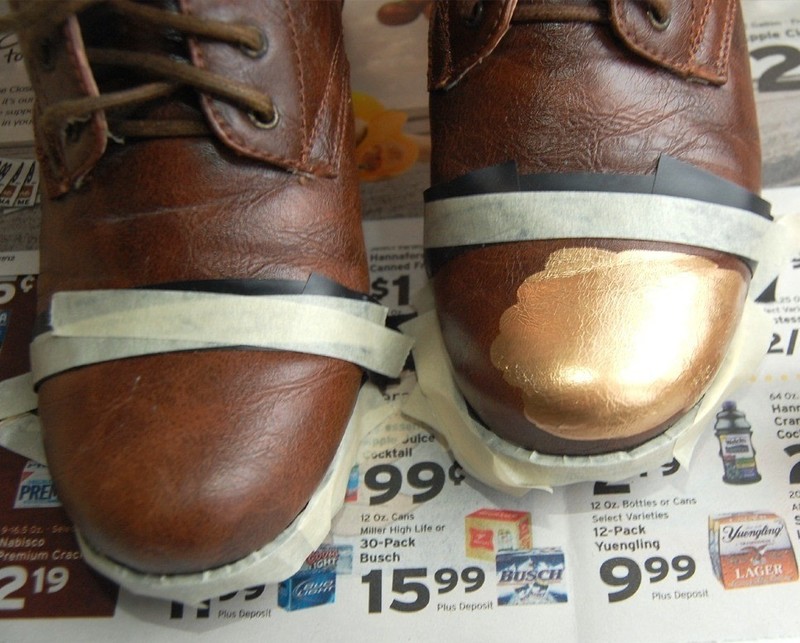
 Step 2
1) Tape off the tip of each boot. Most combat boots will probably have a seam that will guide you. You can also tape off the heel, too. I used multiple pieces of tape around the tips to work with the rounded shape of each boots.
-
 Step 3
Taping off the heel.
-
 Step 4
2) Mix the liquid gilding really, really well. Settling is natural with liquid gilding, so the metallic part will be on the bottom. I used a popsicle stick to mix mine up.
-
 Step 5
3) Firmly press down on the tape to ensure that it is adhered to the boot. Begin painting the tips in short, even strokes.
-
 Step 6
Continue painting.
-
Step 7
4) Let dry at least 24 hours, then remove the tape. In order to fix up mistakes, you can use a cotton swab dipped in nail polish remover to remove any stray liquid gilding.
-
Step 8
If possible, try not to wear your gold (or silver/brass/copper) tip boots when it's raining/snowing (I waited until it was done raining to take this picture!) - This will help keep that metallic luster of the liquid gilding.
-
Step 9
Enjoy your new autumn boots!
xo