
About
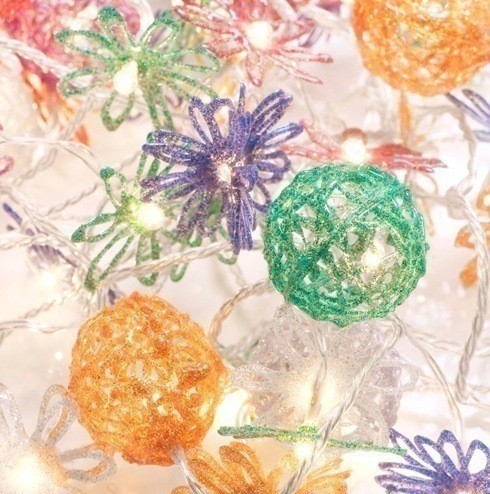
Beautiful Christmas fairy lights made using glitter glue…
For some really sophisticated Christmas fairy lights, try your hand at our string of gorgeous tree lights made from glitter glue. Pretty shades of coloured glitter glue create simple flower shapes, composite cages made from three flower shapes are glued together and finally a more complex glitter glue ball made in two halves and reassembled enclose some of the fairy lights. Take your Dremel Glue Gun in hand and simply follow our step-by-step guide using our images to inspire you!
You can check out more fantastic projects on the Dremel website.
-
 Florence B. favorited Glitter Glue Xmas Fairy Lights
06 Sep 07:10
Florence B. favorited Glitter Glue Xmas Fairy Lights
06 Sep 07:10
-
 Jenee Nicole added Glitter Glue Xmas Fairy Lights to Home Decor
28 Apr 08:45
Jenee Nicole added Glitter Glue Xmas Fairy Lights to Home Decor
28 Apr 08:45
-
 Amy C. added Glitter Glue Xmas Fairy Lights to wanna
31 Oct 21:15
Amy C. added Glitter Glue Xmas Fairy Lights to wanna
31 Oct 21:15
-
 Laurie F. favorited Glitter Glue Xmas Fairy Lights
26 Aug 00:43
Laurie F. favorited Glitter Glue Xmas Fairy Lights
26 Aug 00:43
-
 judy.laurie.9041 added Glitter Glue Xmas Fairy Lights to Fairy lights
08 Feb 18:30
judy.laurie.9041 added Glitter Glue Xmas Fairy Lights to Fairy lights
08 Feb 18:30
-
 Belle W. favorited Glitter Glue Xmas Fairy Lights
02 Jul 13:21
Belle W. favorited Glitter Glue Xmas Fairy Lights
02 Jul 13:21
-
Mignon D. favorited Glitter Glue Xmas Fairy Lights
20 Jan 22:27
-
 jevinav87 favorited Glitter Glue Xmas Fairy Lights
29 Nov 07:13
jevinav87 favorited Glitter Glue Xmas Fairy Lights
29 Nov 07:13
-
Katy B. added Glitter Glue Xmas Fairy Lights to Lights
17 Jun 12:00
-
 deb.mathenia favorited Glitter Glue Xmas Fairy Lights
21 Feb 19:28
deb.mathenia favorited Glitter Glue Xmas Fairy Lights
21 Feb 19:28
-
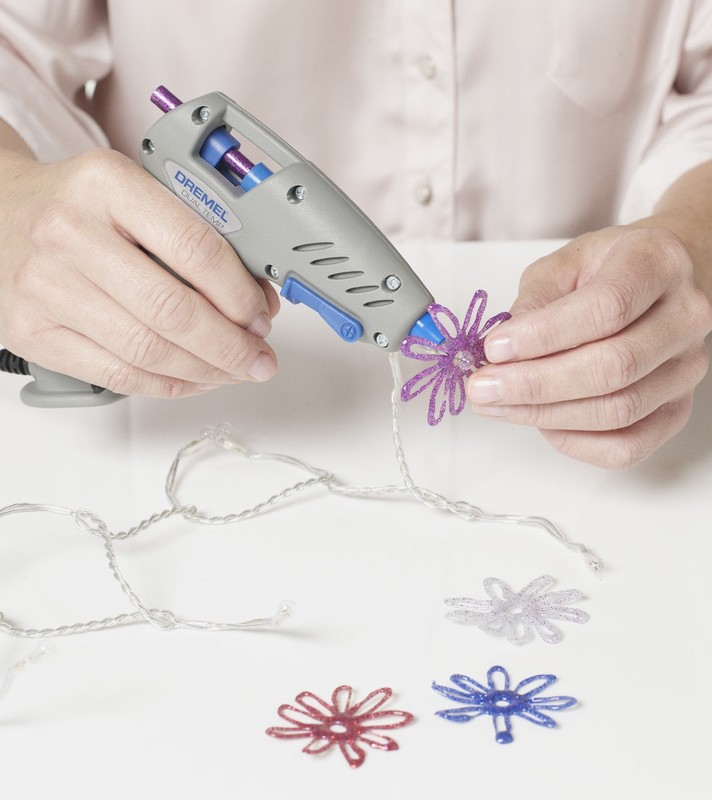
 Step 1
Making the simple flower shapes - easy
For the simple single flower shades, use a marker pen to draw a number of circles approximately five centimetres in diameter on a piece of the parchment paper. Mark a point in the centre of each circle. Flip the baking parchment over. Fit a 7mm Dremel glitter glue stick in your Dremel Glue Gun and set the gun onto the cool heat setting. Use your Glue Gun and glitter glue to ‘draw’ a circle of glue approximately the diameter of the fairy light bulb in the middle of the large circle.
-
 Step 2
Using the picture as a guide, take your Dremel Glue Gun and 7mm glitter glue stick and make a flower shape by ‘drawing’ petals that extend out from the inner circle with the tips touching the larger circle marked. ‘Draw’ a number of flowers. Allow the glue to dry, then peel the flowers off the baking parchment.
-
 Step 3
To complete a single flower shade, gently push a single flower over an LED bulb and using your Glue Gun and glitter glue stick, apply a small dab of glue at the back of the flower to keep it in place just behind the bulb. If the diameter of the circle is a little too small to allow it to fit comfortably over the bulb, enlarge it by using small scissors to make a series of snips radiating out from the centre.
-
 Step 4
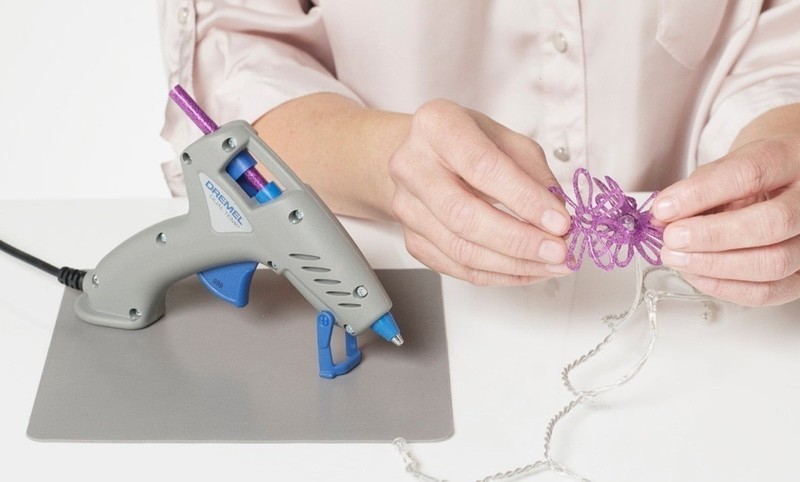
Making the composite flower cages – fairly easy
For the composite flower shades, make the flowers in multiples of three as described in steps one and two. Pass a single flower over a bulb as described in step three and use your Glue Gun and glitter glue to apply a small dab of glue at the back of the flower to keep it in place just behind the bulb. -
 Step 5
Apply a dab of glue along one petal and immediately press the second flower to it, lining up the centre hole of the flower against the bulb. Apply a further dab of glue along the other side of the same petal and press a third flower to it as before. Apply a final dab of glue between the second and third flowers to create a 3D flower that encases the light bulb.
-
 Step 6
Making the glitter glue balls - intermediate
To make the glitter glue balls, first draw a line around a table tennis ball to divide it into two hemispheres. Cut a square of baking parchment and place the ball in the centre, drawing the ends around and twisting them together to contain the ball snugly; ensure that the line dividing the two halves is clearly visible. Secure the paper with a rubber band. -
 Step 7
Repeat on the second ball. Then, on one half of each ball, use your glue gun to ‘draw’ a thin line of glitter glue around the line marked. Apply more lines at random angles over the upper half of the ball only to create a mesh. Allow to dry while repeating the process on the second wrapped ball.
-
 Step 8
When dry, carefully remove the glue half from each of the paper-covered balls by pushing and rolling the edges gently to release them; the glue is flexible so should remain unharmed.
-
 Step 9
Using your Dremel Glue Gun and glitter glue, apply a dab of glue to the edge of one of the hemispheres and lay one of the bulbs across it so that the bulb sits centrally within it. Apply a further dab of glitter glue at the point where the wire crosses the hemisphere and position the second hemisphere on top of the first to make a globe. Ensure that the two hemispheres align, then apply a line of glitter glue around the equator to join the two halves.