Girl's Fantasy Journal
Extract from Mixed-Media Journals: Creatively Chronicling Your Life • By Katherine Duncan Aimone • Published by Lark Crafts


About
By artist Linda Waryln
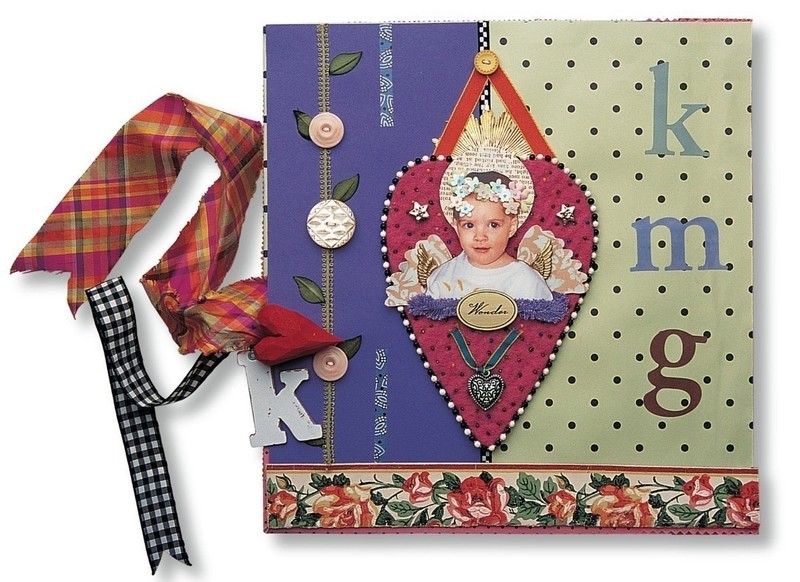
"When I finished this book for my granddaughter, I decided it looked like a big chunk of candy! But that sweetness seems very appropriate. She is almost a teenager now, but this "little girl's" book is a way of remembering her at various ages. Each page is embellished with a variety of vintage objects, mixing the old with the new. And finally, the back cover contains an old-fashioned letter-shaped pouch for hiding private keepsakes." - LW
What young girl wouldn't be "wowed" by this handmade book brimming with color and texture! The unique cover features an antique bisque doll in a shadowbox frame. The doll hold small images of the artist's granddaughter, previewing what's to come inside. Vibrant papers, trims, felts, buttons, bows and embellishments complement photos on the lavishly decorated pages that fold out in an accordion configuration.
From the book Mixed-Media Journals by Katherine Duncan Aimone, read our review here.
-
 Kinhime Dragon favorited Girl's Fantasy Journal
01 Aug 01:28
Kinhime Dragon favorited Girl's Fantasy Journal
01 Aug 01:28
-
 WerewolfCas favorited Girl's Fantasy Journal
27 Dec 03:45
WerewolfCas favorited Girl's Fantasy Journal
27 Dec 03:45
-
 Oonagh B. favorited Girl's Fantasy Journal
29 Jan 13:02
Oonagh B. favorited Girl's Fantasy Journal
29 Jan 13:02
-
 Lilly M. favorited Girl's Fantasy Journal
25 Dec 18:44
Lilly M. favorited Girl's Fantasy Journal
25 Dec 18:44
-
 Emily Z. favorited Girl's Fantasy Journal
24 Dec 18:28
Emily Z. favorited Girl's Fantasy Journal
24 Dec 18:28
-
 ktull329 favorited Girl's Fantasy Journal
12 Sep 03:42
ktull329 favorited Girl's Fantasy Journal
12 Sep 03:42
-
 Alecia B. favorited Girl's Fantasy Journal
01 Aug 16:58
Alecia B. favorited Girl's Fantasy Journal
01 Aug 16:58
-
 crazycatlady added Girl's Fantasy Journal to up-cycle
10 May 22:46
crazycatlady added Girl's Fantasy Journal to up-cycle
10 May 22:46
-
 Lauren C. added Girl's Fantasy Journal to Art
25 Apr 19:10
Lauren C. added Girl's Fantasy Journal to Art
25 Apr 19:10
-
Lauren C. favorited Girl's Fantasy Journal
06 Feb 21:05
You Will Need
-
 Step 1
Use spray adhesive to cover the front and back of the mat board pages with scrapbook papers to serve as a decorative background. Embellish one side of each page with photos and all the decorative elements you've collected. Punch holes in the pages and insert eyelets.
-
 Step 2
Decorate the front cover with a variety of papers, trims, studs, or appliques. Linda had an antique doll she liked a lot, and she found it fit perfectly into a shadowbox frame. She glued reduced pictures mounted on small pieces of paper to a wire strung between the doll's hands. Adhere scrapbook papers to back cover.
-
 Step 3
Embellish the pages with photocopies of images and bits and pieces from your arsenal of saved "stuff". In other words-go crazy! Linda's images helped determine her content, and she choose to put them in chronological order on the pages. On the last page, she added an envelope-shaped pouch for holding "secret stuff".
-
Step 4
After the inside pages are decorated, place them on top of one another to determine the book's thickness. Cut two pieces of binding fabric for the spine, several inches wider than the thickness of your book, so you'll have plenty of room for enclosing your pages and enough width to attach the fabric to the cover. Turn under the raw ends of each piece of fabric, and place the two strips together facing one another to conceal the turned-under edges. Tack the pieces together with a bit of glue.
-
Step 5
Lay your covers flat, with space between them that is slightly more than the height of your book, and glue the spine to the inside of your front and back covers.
-
 Step 6
After adhering the spine, glue the ends of two ribbons to the outside edges of the cover for the purpose of tying the book together. After doing this, decorate the inside of the front cover, covering the edges of the ribbons. Adhere some nice paper inside the back cover, because you'll eventually glue down the last page of your book here to hold the connected pages in place.
-
Step 7
With your pages stacked so each decorated page faces the next and there is one decorated page on top, begin tying them together with ribbons to bundle them in an accordion-like fashion. When you are done, glue the last page faceup, with the eyelets and ribbons on the left side, to the back inside cover.