


About
Make yourself a squashy friend for a comfy place to hang out :)
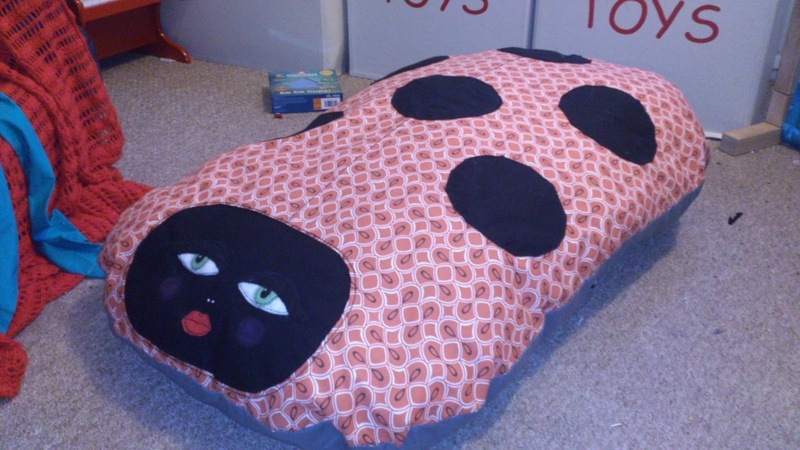
I'm redecorating my son's room in an animal/rainforest/nature (you get the idea) theme, and a few days ago while looking on pinterest together he asked for a giant ladybird floor pillow from ikea. As they didn't deliver that particular item (typical!) and I live in the middle of nowhere and have no clue how to even find my nearest store ( which is several miles away anyway) I had no choice but to DIY or say no. The fabric I ordered looked more red than the orange colour it turned out to be, and it bears absolutely no resemblance whatsoever to the ikea version (which was an inflatable pillow with a cover, mine doesn't even look like a ladybird- more like a slug hence the name!), however, my little Mr loves it which makes it totally perfect :)
*quick note about the time it takes- my sewing machine was last used to stitch the sails for a boat, resulting in a blunt needle. As a consequence I sewed this by hand which took roughly 20 hours total, factoring in all the usual mummy stuff/distractions. If you did it by machine it would be much quicker. (Apologies for the poor photo quality, I took a lot of these at night).
Tags
-
 Asherah Arts (formerly Lee Rose) added Giant Squishy Spotty Ladyslug Pillow to suess
21 Sep 02:52
Asherah Arts (formerly Lee Rose) added Giant Squishy Spotty Ladyslug Pillow to suess
21 Sep 02:52
-
 CreativeGirl79 favorited Giant Squishy Spotty Ladyslug Pillow
17 May 04:57
CreativeGirl79 favorited Giant Squishy Spotty Ladyslug Pillow
17 May 04:57
-
Lee Rose favorited Giant Squishy Spotty Ladyslug Pillow
28 Mar 00:56
-
 Ariel commented on Giant Squishy Spotty Ladyslug Pillow
22 Mar 07:24
Ariel commented on Giant Squishy Spotty Ladyslug Pillow
22 Mar 07:24
-
 maggie.holden.90 added Giant Squishy Spotty Ladyslug Pillow to I love these
17 Feb 04:25
maggie.holden.90 added Giant Squishy Spotty Ladyslug Pillow to I love these
17 Feb 04:25
-
 Anna J. favorited Giant Squishy Spotty Ladyslug Pillow
13 Jan 19:36
Anna J. favorited Giant Squishy Spotty Ladyslug Pillow
13 Jan 19:36
-
 Taylor.Boles53708 favorited Giant Squishy Spotty Ladyslug Pillow
06 Jan 06:37
Taylor.Boles53708 favorited Giant Squishy Spotty Ladyslug Pillow
06 Jan 06:37
-
 Taylor P. favorited Giant Squishy Spotty Ladyslug Pillow
06 Jan 00:52
Taylor P. favorited Giant Squishy Spotty Ladyslug Pillow
06 Jan 00:52
-
 Step 1
I did this pretty much freehand, no template, I just folded my patterned fabric into quarters drew a curved line and hoped for the best :) So basically do as I did, fold your fabric and draw your curve as close or as far from the outer edge as you like. Closer will mean a bigger pillow, so have a think about the size you want. Repeat the process for the plain fabric, using the patterned piece as a template. Voila!
-
 Step 2
Now take some fairly sturdy paper and draw your face shape, do whatever suits you, don't worry about the features at this point. Take another sheet of paper and draw a circle- cut out, here you have your templates. (Apologies for the blurry picture)
-
 Step 3
Lay your template onto your fabric, pin in place and cut round it so you have a border of about 1.5cm- don't worry about being too neat. Now, fold the overlapping fabric over, all the way round your template and pin. You may need to make some folds and tucks if your shape is curved like mine. Do the same for your circles, iron to fix the edges.
-
 Step 4
Remove the pins and the paper from your shape, see how neat the edges are? Pin in place on your fabric and secure using neat little stitches. This will take some time so don't rush!
-
 Step 5
Once you have everything in place you can start to add other details. I stitched a line right down the middle of my fabric and through the central dots to give the impression of wing casings. I also added stitching around the face to give definition.
-
 Step 6
Next- the fun bit! Design your face, I went for pouty lips and big bold eyes with long eyelashes, but anything goes really. Cut your shapes and pin in place. Felt is best for this because it holds its shape without fraying like other fabrics. Just be sure to pick wool not synthetic as you may need the iron after you've stitched the face and synthetic felt doesn't react so well to heat.
-
Step 7
Stitch your pieces in place, I used black thread for contrast and French knots in white thread for the nostrils and to make the eyes look a little more alive. Again, that's just me, do whatever you feel works for you.
-
 Step 8
To add a little colour to the cheeks you could use circles of pink felt, I considered stitching spirals of pink thread too but in the end I opted for a blush effect by building up layers of colour using wax crayons in pink and red. First I lightly added colour where I wanted it, I then took a piece of grease proof paper and ironed over it. I continued adding colour and heat until I got the look I wanted. I also added definition to the eyes by adding some blue shading above the eyelids.
-
Step 9
This bit isn't as daunting as the size of the thing makes it look, simply pin your two pieces together right side in and stitch, remember to leave an opening at the back for turning the right way and stuffing. If you do this by machine and your confident with it, it won't take long at all.
-
 Step 10
Nearly there! Once you've stitched it up turn it back the right way round and begin stuffing! I used flame retardant filling because it's for a child's bedroom but you could use fabric off-cuts, old toy stuffing, anything goes so long as its soft and cuddly. Pack it quite tight but not so tight you're straining the seams- if this is for a child it will get jumped on, rolled on and bounced about. Neatly stitch up the opening at the back and you've done!
*one of the reasons this looks quite slug-like is I didn't add legs, you could quite easily, just make sure to stitch them so the ends you want hidden sit on the seams of your fabric, they will be sandwiched between the fabric pieces when you sew it up.
There you go!


Comments


