https://www.cutoutandkeep.net/projects/french-court-costume-shoes • Posted by Stephanie H.
I am dressing up as Marie Antoinette for Halloween this year and I needed some fabulous French shoes fit for a queen to complete my ensemble. After pricing similar shoe styles online, I decided to spiffy up a second-hand pair for a custom look to match my blue and white frock. I went to my local Goodwill and found a shoe style conducive to the look I was going for: I found a basic black leather mule, in like new condition, with a wooden block heel for comfort. I gathered all of the materials needed for this project: Because of my busy schedule, it took me two days to finish this project.


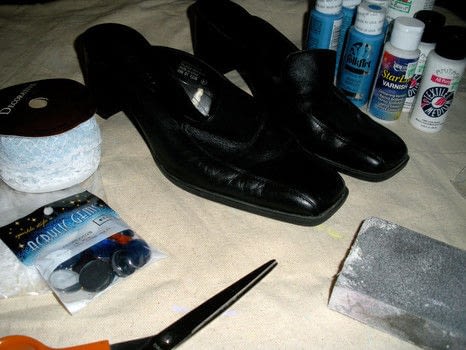


I am dressing up as Marie Antoinette for Halloween this year and I needed some fabulous French shoes fit for a queen to complete my ensemble. After pricing similar shoe styles online, I decided to spiffy up a second-hand pair for a custom look to match my blue and white frock. I went to my local Goodwill and found a shoe style conducive to the look I was going for: I found a basic black leather mule, in like new condition, with a wooden block heel for comfort. I gathered all of the materials needed for this project: Because of my busy schedule, it took me two days to finish this project.

Day 1 Step 1 - Preparation Lightly sand shoes to remove any coating and raise a small grit for the paint to adhere.

Step 2 - Priming To prime my shoes for my base color, I used a mixture of 2 parts white acrylic paint to 1 part textile medium. It is very important to use the textile medium. It will help adhere the paint to the leather. If you use only the acrylic, the paint will crack and chip off. I applied 2 coats of primer letting it dry fully between each coat.

Step 3 - Painting Once my primed coats were completely dry, I use the same 2:1 ratio for my base color mixture. I used a Pearl Blue Metallic acrylic paint for my base color. I also applied 2 coats of the base color and let it dry overnight. *Tip - if the top part of your shoe tends to flatten as you paint, place something inside the shoe to prop it up. I used small paint bottles and a sanding block. This will prevent missing any cracks in the leather.

Day 2 Before moving onto the next step, I made sure that my shoes had adequate paint coverage and were no longer tacky to the touch. I just love the metallic sheen!

Step 4 - Varnishing Next, I used a very soft brush to apply a liquid varnish. I used a glittering varnish to give the shoes some extra sparkle, but you can use a clear one if you prefer. Again I applied 2 coats to seal the paint.

Step 5 - Lace Placement and Treatment While waiting for my varnish to dry, I pulled out my roll of lace to decide placement on my shoes. After planning out my design, I measured and cut my pieces of lace.

Once my lace was cut, I soaked it in a fabric stiffener mixture (Elmer's glue and water) and let it dry. This will help my lace stand up around the edges of my shoe.

Step 6 - Attaching the Lace Once my lace was completely dry and stiff to the touch, I started attaching it to the shoe with Tear Mender Fabric and Leather Adhesive. I started with the sides of the shoe first.

Once the lace was firmly attached to both sides of the shoe, I moved onto the front. Here I attached two shorter rows of lace leaving a space at the top for my embellishments.

Step 7 - Embellishing I decided to embellish my shoes with jewels and feathers to give them a very regal look. I glued three white feathers together to get the look of one fluffy one. I then attached a blue jewel to the bottom of the feathers. Using E6000, I placed the feathered jewel in the center of the top portion of my shoe and used 2 flanking jewels rotated 90 degrees to achieve the look I was going for.

And here you have my finished Marie Antoinette Inspired French Court Shoes!