

About
The Magic Pattern Book
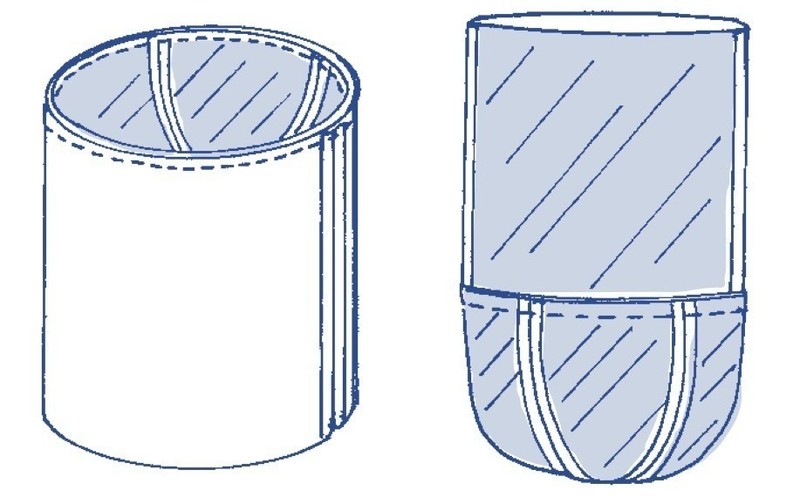
The F family of patterns transitions (ahem) seamlessly from hat to
handbag. The bag is created with four fabrics (here, in velvet and three shades of silk dupioni), all accented with a contrasting binding. For an unencumbered night out, this bag is the ideal accessory: The extra-long, narrow strap allows for hands-free, cross-body wearing.
APPROXIMATE DIMENSIONS OF FINISHED BAG
221/2" circumference at widest point; 141/2" tall from bottom point of bag to upper edge when straightened
Downloads
- 104926_2F2014-10-15-180850-Francesca_Pattern+w+Instructions.pdf 3.97 MB [ Download ]
-
 Luna D. favorited Francesca Bag
25 Apr 05:24
Luna D. favorited Francesca Bag
25 Apr 05:24
-
fei f. favorited Francesca Bag
24 Apr 14:41
-
Sharon H. added Francesca Bag to cosmetica diy
18 Feb 13:13
-
 Tally83 added Francesca Bag to Bags DIY
18 Feb 13:05
Tally83 added Francesca Bag to Bags DIY
18 Feb 13:05
-
 vicky.mcnair.1 favorited Francesca Bag
16 Feb 01:04
vicky.mcnair.1 favorited Francesca Bag
16 Feb 01:04
-
Suzi T. favorited Francesca Bag
08 Nov 16:31
-
 jana1050 added Francesca Bag to Bags Sewing
29 Oct 13:51
jana1050 added Francesca Bag to Bags Sewing
29 Oct 13:51
-
Alecia B. favorited Francesca Bag
27 Oct 05:17
-
 Julie K. favorited Francesca Bag
26 Oct 12:10
Julie K. favorited Francesca Bag
26 Oct 12:10
-
 melinda.hotte added Francesca Bag to going to make
22 Oct 18:09
melinda.hotte added Francesca Bag to going to make
22 Oct 18:09
You Will Need
-
Step 1
From fabric 1, pin and cut six F1/F4/F6 Crown/Base pieces on the F1 cutting line. From fabric 2, pin and cut six F1/
F4 Crown pieces, also on the F1 cutting line, and two F6 Body pieces. From
fabric 3, pin and cut two F6 Body pieces. From fabric 4, cut a 24" × 11⁄2" strip on
the bias for the binding. Cut a 48" × 2" strip on the bias for the strap. Cut two 26" × 11⁄2" strips on the bias for the drawstrings (these may be pieced if necessary to form this length). -
 Step 2
To make the bottom of the bag, apply the interfacing to the wrong side of all six Crown pieces cut from fabric 1.
Using chalk, transfer the large dot from the pattern piece to the interfacing on each piece. -
 Step 3
With right sides together, pin three Crown pieces together, aligning the raw edges. Beginning at the outer edge and ending at the large dot, stitch a 1⁄2" seam.
-
 Step 4
Press open seam allowances. Stitch the remaining three Crown pieces cut from fabric 1 together in the same manner.
-
 Step 5
With right sides together, stitch the two completed sections together in a 1⁄2" seam. Press open the seam allowances.
-
 Step 6
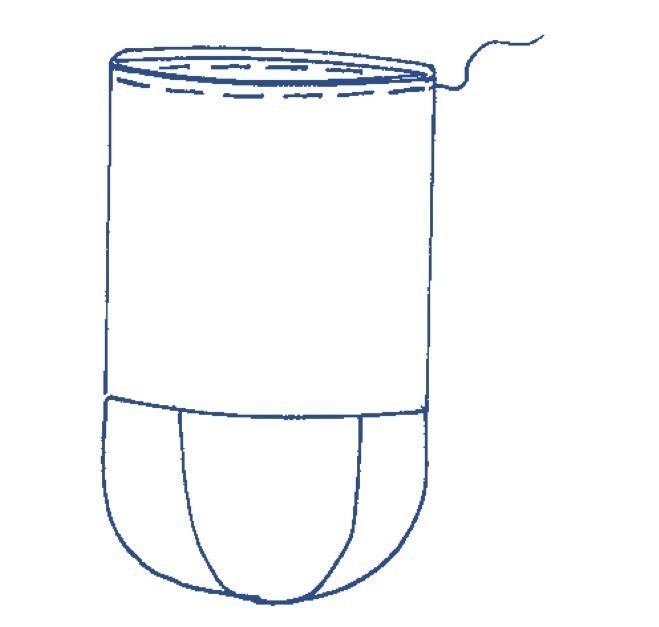
Find the center of the lower edge
of the Body pieces (both outer and lining) and mark with a single notch. See
illustration below. Apply the interfacing
to the wrong side of the two Body pieces cut from fabric 3. Using chalk, transfer the dots from the pattern to the wrong side of the fabric pieces. With right sides together, pin and stitch the double-notched edges
of these two Body pieces in a 1⁄2" seam, leaving the space between the dots open. Press open the seam allowances. -
 Step 7
Find the center of one of the six bottom pieces on the upper edge and mark. Mark the center of the piece that is
opposite also. With right sides together, align these marks with the single notches on the Body and pin them together around the perimeter of the bag. -
 Step 8
Stitch a 1⁄2" seam.
Press the seam allowance upward toward the Body.
-
Step 9
Repeat Step 2 for the six Crown pieces cut from fabric 2, which will form the lining of the bag bottom.
-
 Step 10
Using chalk or a disappearing fabric ink pen, transfer the casing stitching lines to the right side of the two Body
pieces cut from fabric 2. -
 Step 11
With right sides together, pin and stitch the double-notched edges of the Body pieces cut from fabric 2 in a 1⁄2" seam, leaving open the space between the casing lines. Press open the seam allowances.
-
Step 12
Repeat Step 6 for the lining.
-
 Step 13
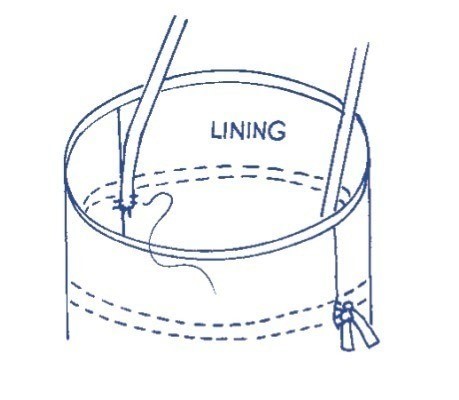
With wrong sides together, place the completed lining into the completed bag, aligning the seams and the center fronts. Pin the bag to the lining around the upper edge and baste 1⁄8" from the edge.
-
 Step 14
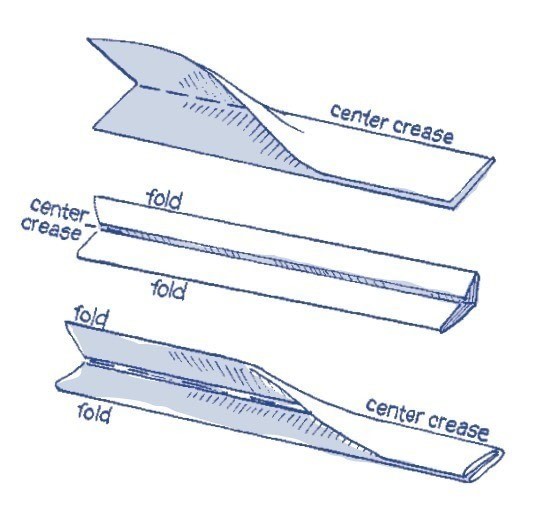
With wrong sides together, lightly press the binding strip in half lengthwise. Fold the outer edges in to
meet the center crease and press it in half again. -
 Step 15
Open out one long edge of the binding. Press under one short end 1/2". With right sides together, place this pressed-under short end at the center back of the bag and pin.
-
 Step 16
Continue pinning the binding around the bag until you come to the origination point and overlap 1⁄2". Cut off any remaining binding. Stitch a 3⁄8" seam around the top of bag.
-
 Step 17
Fold the binding to the wrong side and press. Hand-stitch the lower folded edge of the binding to the bag on the wrong side using an invisible stitch.
-
 Step 18
With the bag wrong side out, straighten the bag and the lining,
aligning the seams as much as possible. Pin the bag and the lining together around the casing. Using thread to match the outer bag and beginning at one side seam, stitch along the upper casing line. Stitch around the lower casing line. Turn the bag right side out. -
 Step 19
To form the drawstrings, press the bias piece in half lengthways with
wrong sides together. Fold the long edges in to meet the center crease and press again. Pin. Stitch close to the folds. Repeat for the second drawstring. -
Step 20
From the right side, pull a drawstring through the casing opening on one side of the bag using an attached safety pin. When you reach the same opening, pull the drawstring out and align the cut ends. The casing is open on the inside just to help you guide the drawstrings. These will be stitched closed at the end.
-
 Step 21
With a safety pin attached, pull the remaining drawstring through the
opposite side seam opening, keeping the second drawstring on top of the first drawstring. When you reach the opening again, pull the drawstring out and align the cut ends. -
 Step 22
On each side, tie the ends of the drawstring together in a knot leaving an approximately 1" tail.
Slipstitch the side seam openings in the lining to close.
-
Step 23
If necessary, stitch the bias sections together to attain the 48" length for the strap. With right sides together, pin on the diagonal and stitch a 1⁄4" seam. Press open the seam allowances.
-
Step 24
When required length is attained, with wrong sides together, lightly press the bias strap piece in half lengthwise. Fold the outer edges in to meet the center crease and press it in half again. Cut a narrow strip of sew-in interfacing the length of the strap. Slide it into the crease. You can use more than one piece if necessary to cover the entire length. Fold the strap over the interfacing and pin. Stitch close to the outer folds. Cut the short ends straight across and press under 1⁄2".
-
 Step 25
Place the pressed-under short end on the inside of the bag just below the casing, centered over the side seam. Pin and hand-stitch to secure it.
Without twisting the strap, stitch the opposite end of the strap to the opposite side of the bag in the same manner.
-
Step 26
Pull the knots straight out from the bag simultaneously to cinch the bag closed. Place your hands in the upper bag and push outward to open.
-
Step 27
Leave the top of the bag up or fold over the casing to reveal the contrasting lining.