Fox In The Bed Quilt
Extract from Sew La Tea Do: 25 Favourite Things to Sew • By Pip Lincolne • Published by Hardie Grant Books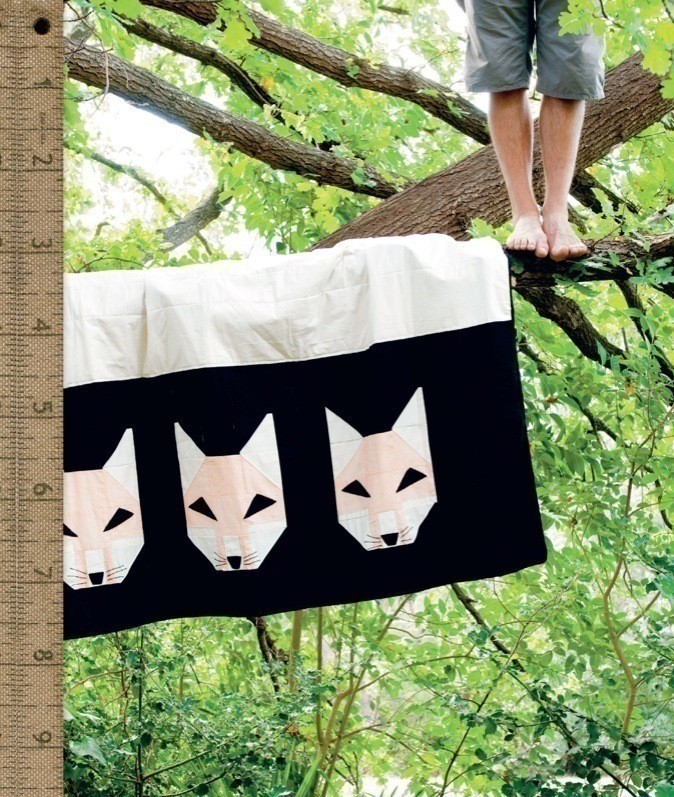

About
Keep it simple like me and Mr Fox!
I really love the work of artist Charley Harper, whose mosaic-tiled pieces inspired this simple quilt. The cutting out is half the work with a project like this, so take your time and spread it out over a few days. It’s totally worth the effort! Start off simply and work your way up to something fancy, I say. Or keep it simple like me and Mr Fox!
Fabric details
» Finished size: about 193 cm x 185 cm [76 inches x 73 inches]
» Seam allowance: use a quilter’s seam allowance of 1/4 inch (5 mm) unless otherwise stated.
» Fabric should be washed, dried and pressed before beginning to allow for shrinkage and to prevent dyes from running.
Have a quick read of the tips at the end before you begin this project. Quilting measurements are traditionally given in inches, and quilter’s accessories such as rulers and cutting mats are marked in inches, even in countries like Australia that use the metric system – so we’ve gone with inches only in the instructions.
Tags
© 2024 Pip Lincolne / Hardie Grant Books · Reproduced with permission.
-
 Catherine B. favorited Fox In The Bed Quilt
16 May 15:33
Catherine B. favorited Fox In The Bed Quilt
16 May 15:33
-
 LikeIceIsCold added Fox In The Bed Quilt to home decor
06 Aug 03:11
LikeIceIsCold added Fox In The Bed Quilt to home decor
06 Aug 03:11
-
LikeIceIsCold favorited Fox In The Bed Quilt
06 Aug 03:10
-
 The True Fox favorited Fox In The Bed Quilt
01 May 03:11
The True Fox favorited Fox In The Bed Quilt
01 May 03:11
-
 x_niccadee added Fox In The Bed Quilt to make this
21 Mar 04:45
x_niccadee added Fox In The Bed Quilt to make this
21 Mar 04:45
-
 Grace O. favorited Fox In The Bed Quilt
08 Dec 05:37
Grace O. favorited Fox In The Bed Quilt
08 Dec 05:37
-
 gina favorited Fox In The Bed Quilt
17 Nov 15:11
gina favorited Fox In The Bed Quilt
17 Nov 15:11
-
 BothAtHome added Fox In The Bed Quilt to Baby Related Projects
26 Aug 19:49
BothAtHome added Fox In The Bed Quilt to Baby Related Projects
26 Aug 19:49
-
Alecia B. favorited Fox In The Bed Quilt
01 Aug 16:29
-
 Michelle S. added Fox In The Bed Quilt to Around The Home
11 May 02:38
Michelle S. added Fox In The Bed Quilt to Around The Home
11 May 02:38
You Will Need
-
 Step 1
Cutting out
We’re making three fox head blocks. Each fox head is made up of 21 squares folded and sewn into position.
For each fox head we need the following:
From the calico, cut nine 41/2 inch squares (a total of 27 for the three fox heads); From the black fabric, cut fi ve 41/2 inch squares (a total of 15 for the three fox heads); From the orange fabric, cut seven 41/2 inch squares (a total of 21 for the three fox heads).
To go between the fox heads, cut two black rectangles measuring 6 inches x 161/2 inches.
To go beside the outer fox heads, cut two black rectangles measuring 131/4 inches x 161/2 inches.
To go above and below the fox heads, cut ten black rectangles measuring 5 inches x 15 inches.
For the top of the quilt, to go above the black fox head panel, cut the cream calico or quilter’s muslin to measure 51 inches x 73 inches.
For the back of the quilt, cut the cream calico or quilter’s muslin to measure 73 inches x 76 inches. -
Step 2
Sewing up
Make sure you sew everything nice and straight! Trim as you go to keep it all square and straight and ensure it matches up nicely -
Step 3
Make the quilt top
Look at the chart below and use it as a guide to make the fox heads. Each fox head is made from twelve assembled squares (which are made from 21 squares folded and sewn in various ways). -
 Step 4
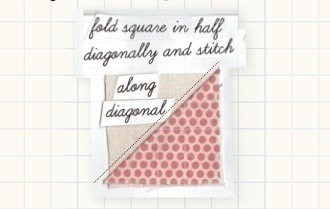
Assembling your squares: Where you see a triangle, I’ve folded the square in half diagonally, pressed it, pinned its fold to the middle of the correct-coloured square that sits beneath it (matching its point to the diagonally opposite points of the square) and stitched it into place along Where you see a skinny rectangle, I’ve folded the edges of the square under, pressed it, pinned it to the correct-coloured square that sits beneath it and stitched it into place along each folded edge. Where you see a skinny rectangle, I’ve folded the edges of the square under, pressed it, pinned it to the correct-coloured square that sits beneath it and stitched it into place along each folded edge.
-
 Step 5
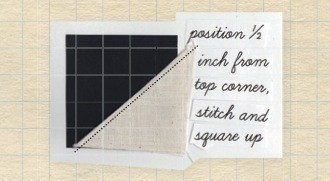
The points of the ears may get lost in the seam and be squared off. It really doesn’t matter. If you want to avoid this, sit your triangle 1/2 inch down from the top of your square before you stitch your triangle to the black square beneath.
-
 Step 6
Each 41/2 inch square is assembled according to the chart, then laid out in its correct formation. Do this slowly and carefully with a cup of tea beside you – you’ll need a hot iron too! Then it’s just a simple process of stitching each assembled square together with a 1/4 inch seam allowance. You do this by placing the squares, with right sides facing each other, and stitching slowly 1/4 inch from the raw edges. Work strip by strip and then stitch the strips together. Play close attention to squares that should match up nicely (like the foxes’ cheeks!). Then press your seams fl at, trim loose threads and sew the next square into place. Continue like this, carefully putting the squares together as illustrated. You need three fox heads. Trim them all neatly when they are done.
-
Step 7
Pin and then carefully stitch the fox eyes and noses into place, or just embroider them on along with the whiskers. You can use a running stitch or a blanket stitch. This stitching is meant to be decorative, so don’t worry about making your stitches teeny tiny. Loud and proud is the way! Either embroider straight onto each fox face in the correct position, or pin the felt shapes into place and stitch around them. Do what you like best! Make it your own!
-
Step 8
Now stitch the two black 6 inch x 161/2 inch rectangles in between the fox head blocks as shown on the chart. Stitch them right sides facing and with their pinned-together raw edges matching, making sure you are 1/4 inch in from the matching raw edges.
-
Step 9
Now attach the two 131/4 inch x 161/2 inch pieces that go beside the outer fox head blocks, again with right sides facing and raw edges even, and stitching 1/4 inch in from the matching raw edges.
-
Step 10
With the ten black 5 inch x 15 inch rectangles, make two strips to go above and below the fox heads. Use five rectangles for each strip, sewing them together along their short edges using a 1/4 inch seam allowance. Again, stitch them with right sides facing and edges matching, making sure you are 1/4 inch from the matching raw edges. Once you’ve stitched all the strips together, press your seams fl at, make sure your edges are trimmed nice and straight and trim any loose threads.
-
 Step 11
With right sides facing, sew one of these black strips along the top of the fox head panel. Press and trim loose threads. Now with right sides facing again, sew the other pieced-together black strip to the bottom of the fox head panel. Hurrah! You’ve made the bottom part of the quilt top.
-
Step 12
On your work surface, lay out the fox head panel right side up. On top of it lay out the calico quilt top piece, right side down, so that one edge matches the top edge of the fox head panel. Pin and stitch into place. Press and trim all loose threads and marvel at your quilt top!
-
Step 13
Make the quilt ‘sandwich’
Here’s where you need plenty of space. Iron the backing fabric then lay it out wrong side up. You can tape it in place with masking tape if you like. Lay your batting on top of it. Smooth it all out so that it’s nice and fl at. Now lay your quilt top on top of that, right side up.
-
Step 14
Open up all the quilter’s safety pins, because we’re going to pin this all together so it stays put. Working from the centre of the quilt outwards, start pinning your layers together with the quilter’s safety pins. Pin in straight lines, placing your pins around 5 inches apart. Smooth and pin, smooth and pin, through all three layers. You don’t want lumps and bumps, as they are tricky to sew over. So keep smoothing and make sure your fabric is taut as you pin it. Excellent work!
-
Step 15
Quilt with long rows of stitches
If you want to quilt by machine, take your safety pinned quilt to the sewing machine. We are going to stitch horizontal lines across the quilt, starting just above the fox head black border and working our way up. Your stitched lines can be at irregular intervals – but try to keep them fairly straight. You can wing it, or you can use masking tape or quilter’s tape to mark lines across your quilt top first, and then use those taped lines as a sewing guide. Note that you might need to reposition some of your safety pins when you do this, and bear in mind that it’s helpful to have someone assisting with the taping part. Alternatively, you could rule lines with tailor’s chalk or fading marker and then stitch over those, if that makes it easier. Roll your work up tightly so that it will fit through your machine.
-
Step 16
If you prefer to hand quilt instead, use a simple running stitch. Again, use tape or tailor’s chalk to mark straight lines if you like.
-
Step 17
When you are all done with the horizontal lines, remove all of the pins or tape and trim any loose threads. Trim your edges carefully so they are all straight and even, cutting through the top, batting and bottom layer at the same time. Use the edge of your table as a guide, or a very long ruler or some other lovely long straight thing. Do your best, but don’t freak out if it’s a little bit uneven!
-
Step 18
Bind the edges
Now bind your quilt. We’ll attach the first side by machine and the other side over a couple of evenings in front of the TV! Starting in the middle of one of the sides, with the right side of the quilt facing up, machine stitch the unfolded raw edge of your binding to the raw edge of your quilt top. Use the fold in the binding as your stitching guide and be sure you are stitching through all layers of your quilt. When you get to the corner, follow the below steps.
-
 Step 19
When you start a new length of binding, just stitch it onto the previous length, matching your raw edges and allowing 1 inch or so overlap.
-
Step 20
Then continue along all the other sides, repeating the process for each corner as you go. When you get to the end, leave 1 inch or so excess binding and snip off. Nice work! That was pretty zippy, despite the volume of fabric, no?!
-
Step 21
This is the part that is best done in front of a good movie; in fact I did mine in bed with a whole box set of Lark Rise to Candleford. Fold the binding over to the wrong side of the quilt and stitch its other (folded) edge down neatly, using a tiny whip stitch (see page 140). Make sure your stitches are nice and small and regular. They should be quite hard to see. Be ultra careful that they don’t show through on the right side of your quilt! Binding your quilt like this encases the raw edges of the three layers and gives a neat, durable edge to the quilt.
-
 Step 22
Fold the corners over so they sit at a nice 90-degree angle and stitch them neatly on the diagonal. When you have laboured your way lovingly all the way around, tuck your final loose binding end in and stitch into place neatly. Oh my gosh! You did it! Huge pat on the back. I am so proud of you!
Tips
You’ll need plenty of floor space and a nice clean workspace too. A big table is ideal. If your place is small, you could always pop over to a friend’s for the spreading-out bits. Make sure that every seam you sew is precisely 1/4 inch so that all your squares match up nicely. You can buy a quilter’s foot for your machine, which will make this easier, or you can use masking tape to mark a line across your machine arm 1/4 inch from the tip of the needle. We used unbleached calico (also called quilter’s muslin) for this project: it comes in wider measurements than other fabrics, which is useful when making a big quilt!Variations
* You could make one just like this, or get out your graph paper and make your own ‘blocky’ mosaic-type animal quilt!
* You can also use the instructions and the chart to size this down.
* Use cute printed fabric for the back.