


About
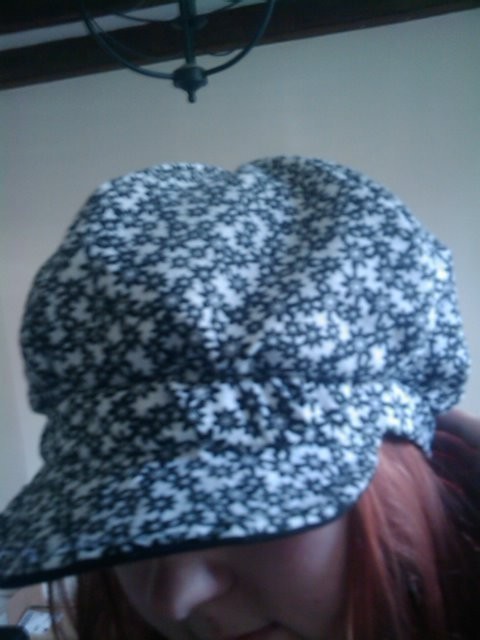
Cute Hat :)
One of my friends wanted me to make her a hat to match her outfit.
I had never made a hat before and this is my first attempt and without a pattern :D
Im really pleased with out it turned out im going to add bows and buttons to my next one. You can add what ever you like to yours!
Didn't take pics as I went along so please excuse my dodgy paint diagrams! :)
I gave it a difficulty rating of 'so-so' but there are a couple of tricky bits in there but its pretty simple pattern really.
Enjoy x
-
 Alma added Flowery Hat! to Hats & Headwear
12 Jun 16:54
Alma added Flowery Hat! to Hats & Headwear
12 Jun 16:54
-
 Mistress Nora of Madness favorited Flowery Hat!
21 Apr 01:06
Mistress Nora of Madness favorited Flowery Hat!
21 Apr 01:06
-
 Gourlay J. favorited Flowery Hat!
01 Aug 15:52
Gourlay J. favorited Flowery Hat!
01 Aug 15:52
-
 RareJewel favorited Flowery Hat!
24 May 07:57
RareJewel favorited Flowery Hat!
24 May 07:57
-
 Susan P. favorited Flowery Hat!
09 Jan 03:50
Susan P. favorited Flowery Hat!
09 Jan 03:50
-
 Samantha F. favorited Flowery Hat!
17 Nov 04:29
Samantha F. favorited Flowery Hat!
17 Nov 04:29
-
 Hannah R. favorited Flowery Hat!
31 May 16:15
Hannah R. favorited Flowery Hat!
31 May 16:15
-
Franchesca Angelou d. favorited Flowery Hat!
29 Jul 06:22
-
 bruce.helen favorited Flowery Hat!
30 Jun 21:36
bruce.helen favorited Flowery Hat!
30 Jun 21:36
-
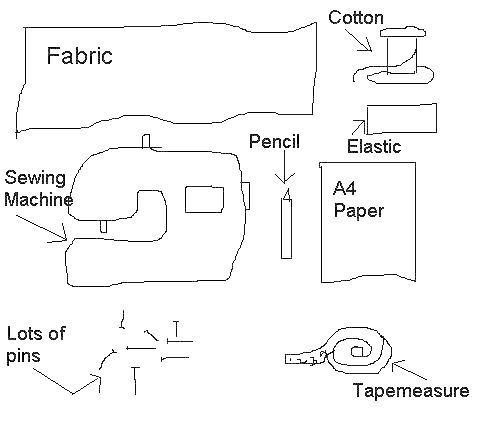
 Step 1
-> Make sure that you have all your items before you start
-> The first thing you need to do is measure your head or the persons head your making the hat for so you can work out the size for your pattern pieces
-> Make a note of the measurments
-
 Step 2
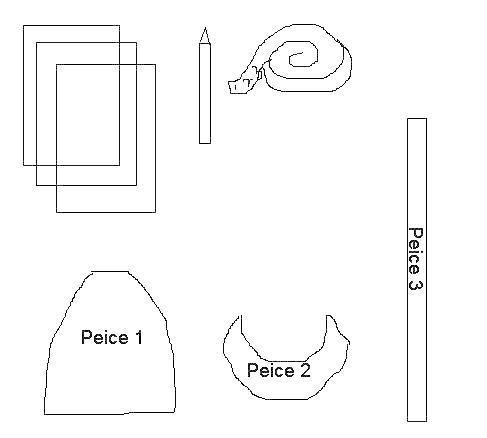
MAKING YOUR PATTERN:
-> Get your A4 Paper, Pencil and Measurements from step one.
-> You now need to draw your pattern onto the A4 paper (piece 1 & 2 only) here is how:
-> First you need to work out how wide each of your piece 1 pattern needs to be. To do this take your head measurement and divide by 5 add on 5.
(For example: If your head measurement is 50cm, divide by 5 = 10cm + 5cm = 15cm)*Tip - I would advise rounding up to the nearest cm, its better to be too big than too small.
-> Now you have this figure you can draw the first line of your pattern onto the paper. This is the bottom line of piece 1. (See the image on the left)
-> Put a dot in the centre of this line and draw a 20cm line straight up from this dot. This will take you to the top point of the hat.
-> Draw a 2cm straight line at the top of your middle 20cm line.
-> Draw a curved line from the top line to the bottom line.
-> Fold your paper in half down the centre line and cut out. This will ensure your pattern is symmetrical
-> Piece 2 is the peak of the hat. Decided how big you want your peak to be. Remember to add on 1cm seam allowance on each side. Draw this out onto your paper (see picture)
You then need to add on an extra 3cm edge to the top line of piece 2 this is so you can attach it to your hat.
-> Piece 3. You don't need a pattern piece for this as it is just a straight piece that needs to measure: your head measurement + 4cm(this is the length) and 4cm wide.
Making your pattern is the most difficult part, but if you ensure you have the right measurements and you use the fold and cut method I described for Piece 1 the this will ensure all your pieces are symmetrical :)
-
 Step 3
CUTTING OUT YOUR FABRIC
-> You will need your pattern pieces, fabric, lining fabric, pins and scissors.
-> Fold your fabric in half
-> You need to pin each of your pattern pieces to the fabric and cut out in turn.
**Remember when your fabric is folded you will get two pieces from only cutting once.
-> Quantity:
Fabric - 5x Piece 1
- 1x Piece 2
- 1x Piece 3
Lining
Fabric - 5x Piece 1
- 1x Piece 2
- 1x Piece 3-> You should now have all your pieces cut out and ready to sew :)
-
 Step 4
SEWING YOUR HAT
-> Get your 5 fabric pieces and lay them flat
-> Take two of them and pin them together with patterned sides together.
-> Take another piece and place this pattern sides together on the piece you have just pinned.
-> Keep going until you have all 5 pieces pinned together in a row.
-> Now pin the two open ends together. Pattern sides together.
-> Sew all your edges on the sewing machine.
-> When you have done this you should have a small hole at the top (keeping your hat the wrong side out) pinch the fabric and sew over a few times at the top.
-
Step 5
SEWING YOUR LINING
-> Follow Step 4 but use your lining fabric.
-
 Step 6
SEWING YOUR LINING TO YOUR HAT
-> Turn your hat the right way out.
-> Leave your lining the wrong way.
-> Put your lining inside your hat so the seams are touching.
-> Pin around the bottom of the hat.
-> Sew.
-
 Step 7
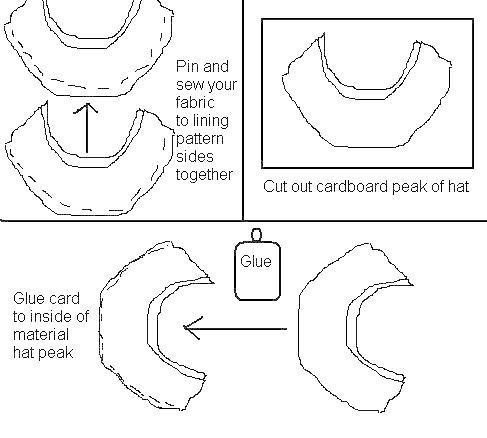
MAKING YOUR HAT PEAK
-> You now need your cardboard, fabric piece 2, lining piece 2, pins and scissors.
-> Get your pattern piece 2 you used earlier to cut out your fabric and draw around it onto the card.
-> Cut out your cardboard piece.
-> Put your fabric and lining pattern sides together and pin around the longest edge (see pic)
-> Turn out the right way.
-> Insert your cardboard into the peak between your lining and fabric.
-> Stick the fabric to the cardboard.
-
 Step 8
-> You should now have your peak made with your cardboard attached inside.
-> You need to have your lining side facing down as this is the base of your peak.
-> Cut 1.5cm cuts into the peak as shown (see pic)
-> Once you have cut them all bend them upwards.
-> These will attach your peak to your hat band in the next step.
-
 Step 9
ATTACHING YOUR BAND TO YOUR PEAK!
->Pin your two bands pattern sides together leaving a gap as show between the two green dots big enough to fit your peak in.
-> Place your peak inside the band matching the red dots as show in the pic. Ensure that the patterned fabric band is on the same side as the patterned side of the peak and the lining with the lining side.
-> Ensure the top of the band is pinned to the folds in your peak.
-> When pinned in place, sew from one end of the band to the other ensuring the peak is sewed into place.
-> Turn your band the right way out.
-> You should now have a peak with a long band attached.
-
 Step 10
SEWING YOUR HAT TO YOUR BAND
-> Get the hat part that you made in Step 6.
-> Gather the bottom as shown in the pic until it is the same size as the band you have just made.
-
 Step 11
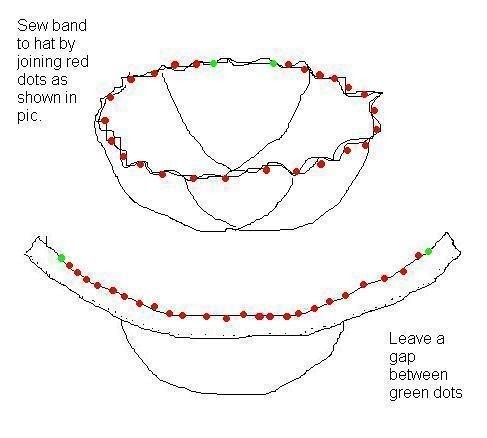
-> Pin your band to your hat ensuring that the patterned sides are together.
-> Sew around your hat leaving a gap between the green dots as show.
-
 Step 12
PUTTING IN THE ELASTIC
-> Your hat should actually look like a hat now :) and you should have two lengths of band left over.
-> Insert the elastic into one side of the band and sew well into place.
-> Stretch the elastic and sew at the end of that band leaving a 1cm gap.
-> Sew the two ends of the band together ensuring pattern sides are together.
-
 Step 13
TRICKY BIT!
-> Now you need to sew your remaining loose band to your hat.
-> Pull flat and pinch one end ensuring you have band and hat in place.
->Place under sewing machine foot and put foot down onto fabric.
-> Hold the end under the foot tight between your thumb and finger.
-> Hold the other end of the elastic, hat and band together between your other thumb and finger and pull.
-> While the elastic is stretched, sew along the edge of hat and band and secure well.
-> Finish off the inside seam, turn the band out the right way...
-
 Step 14
TA DAAAA!! One hat!! :D
I hope you all like and that my instructions were clear! xxx


I desperately want to make a hat... I have a rather small head, and all the ones in the stores around here are always like, huge... just to spite me, I think.