Floating Book Shelf

  • Completed Project: Floating Book Shelf Picture #1

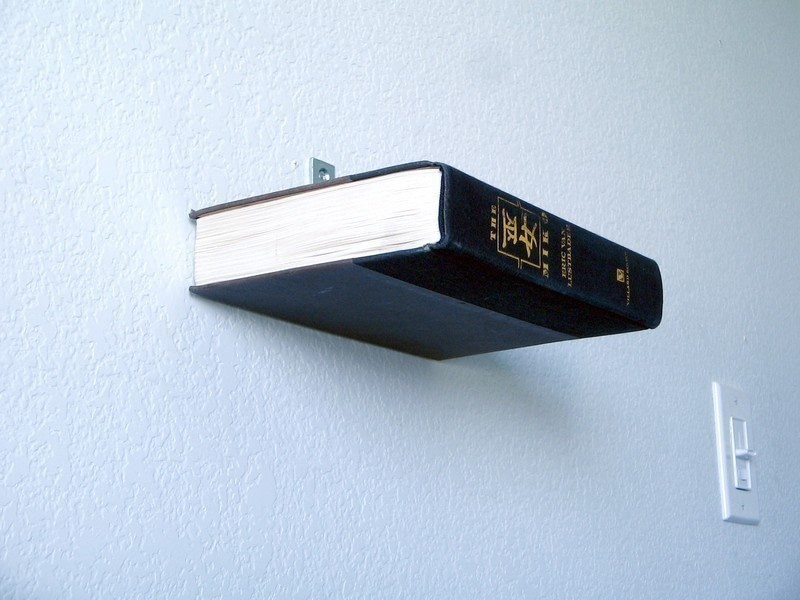
...or invisible shelf?

I don't much like reading books, but I do love how they look. I stumbled across a how-to online... not sure how I found it or what I was looking for, but I thought I'd give it a try and use the inspiration from a commment left at the bottom from someone about secret compartments :D

Created using a how-to available here

Add to Favorites Add Your Version


  1. Step 1

    Step 1

    Follow this other guys' how to.
    He's got it layed out pretty good, why re-invent the wheel? However... I didn't cut a notch in my book cover. It looks fine to me as is, and I didn't do step 4 how he did.

    If you are doing the cutouts in the book, don't complete all the steps just yet. Stop at step 4 and take your bracket out of your book. It'll make it easier to install on the wall later.

    Also, I decided to use tiny little nails (seriously... tiny - I think they were probably no longer than ½") instead of more screws in the corners because it was easier pounding a nail in through the pages while keeping everything straight. Just run your thumb up the pages to even them back out if they're mashed down too far.

  2. Step 2

    Step 2

    Now use this other guys' idea for secret compartments.

    This is where I'll show you how I did it.
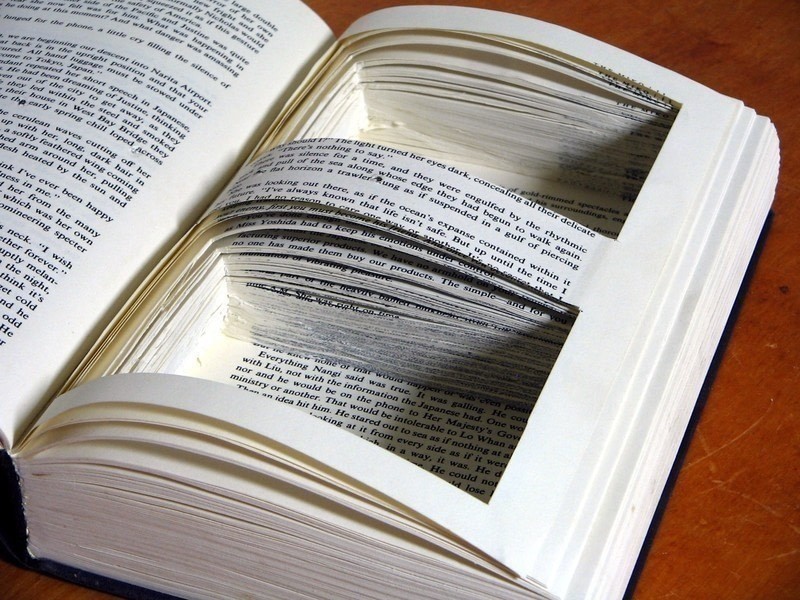

  3. Step 3

    Step 3

    Open your book and leave 10 or so pages untouched in the front.

    I know I said take the bracket off earlier... but do as I say, not as I do!

  4. Step 4

    Step 4

    Measure out where your bracket is and leave ¼" or so on either side. Decide how big you want your secret compartments to be and start cutting.

    I used the words on the page to help guide my lines, but keep in mind where your nails are in the corners of the back of the book.


  5. Step 5

    Step 5

    Admire any supportive onlookers no matter how bored they appear - they're actually enthralled in what you're creating!

  6. Step 6

    Step 6

    Cut down through the pages until you've reached a depth you like.
    I left 10-15 pages between the back pages that were cut out for the bracket and my compartments.

    This is THE most time consuming part. I think it took me about an hour and a half - maybe more. I suppose you could start off this project reading the book and cut the pages out as you go... but I didn't really care to read this book!

  7. Step 7

    Step 7

    Install the bracket on the wall...

    (aren't you glad you took it off earlier??)

  8. Step 8

    Step 8

    ...screw the book in place...

  9. Step 9

    Step 9

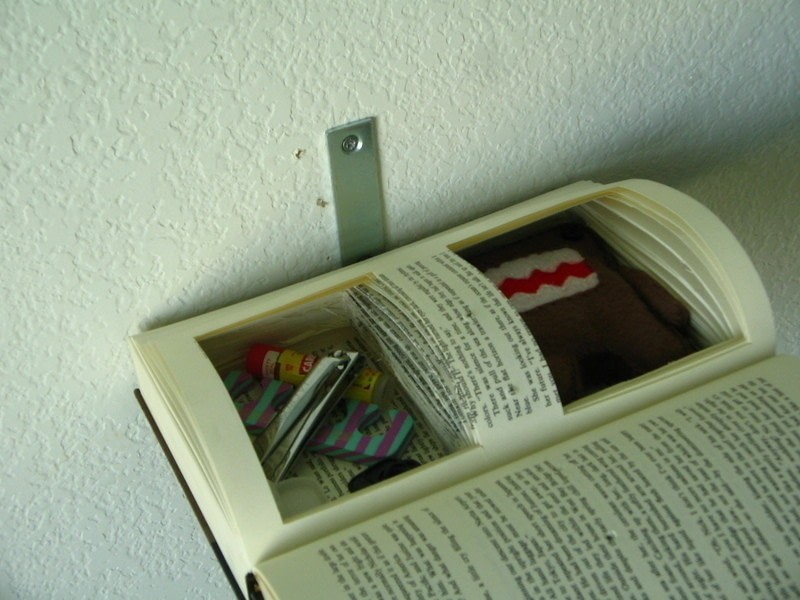
    ...hotglue the bottom flap shut...

  10. Step 10

    Step 10

    ...and hide all of your goodies :P

More from Shelving (See All »)

  • Oldschool Beer Crates To Super Functional ShelvesHow To
  • Hand Painted Heart Shaped Shelf With Vintage Buttons
  • Milk Crate Shelving
  • Milk Crate Telephone Table
  • Hand Painted Camouflage Corner Bookshelf

See more Construction

People who love this project (159)


Leave a Comment

Sorry...

You need to Sign Up and log in to leave comments


camilaustral

camilaustral

September 20th, 2008 01:25

that looks good!

Lilim

Lilim

September 20th, 2008 03:36

Aww That's cute, now I wanna go to a yard sell or something and buy some books ^^

DIS.AR.RAY

DIS.AR.RAY

September 20th, 2008 04:07

THATS SO AMAZING :D Awesome.

Kirsten B.

Kirsten B.

September 20th, 2008 04:14

Ah I'd wanted to do that too. Lol, it looks great:D

Mi.ezekatze

Mi.ezekatze

September 20th, 2008 08:02

I admire step 5! ^^

mangolicious

mangolicious

September 20th, 2008 09:03

ingenious...

Käpt´n Toasterkopf

Käpt´n Toasterkopf

September 20th, 2008 15:54

Wow, I could never do this because I my love for books is too big and I would constantly cry while cutting holes in the pages, but it looks quite intellectual + very cool.

Kalli

Kalli

September 20th, 2008 15:56

I wish i could...but I don't think I could run a perfectly good book...

Pumpkinniki

Pumpkinniki

September 20th, 2008 16:22

I saw something similar a few years ago and just loved it...but I also loved my books and couldn't bring myself to destroy one. Now, on the other hand, I have plenty of boring books and I feel it is my duty to prevent someone else from wasting their time on them! LOL

I already have another project idea in mind for the page pieces I cut out! :)

kermit

kermit

September 20th, 2008 17:52

this totally rocks!

Moon Owl (Bella J.)♥

Moon Owl (Bella J.)♥

September 20th, 2008 19:20

There's a thrift store with cheap books near my house... I might try this!!!

Moon Owl (Bella J.)♥

Moon Owl (Bella J.)♥

September 20th, 2008 19:30

On second thought... I will try this!!! For sure!!! AND I'll call my friends to come over when its done!!! Hehehe I can't wait to watch them!!!♥

Hannah

Hannah

September 20th, 2008 19:48

amazing!

Candice C.

Candice C.

September 20th, 2008 19:49

I KNEW I'd get a loct of grief for this one!
I originally found a Dracula book with a really cool spine, and I COULD NOT make myself use that one :) so I understand where everyone is coming from, but don't let the whole "ruining your books" keep you from trying it - just find crappy, good looking books. Think of it as giving new life and purpose to books that would otherwise not be loved. This isn't something you want to use your favorite reads on. I thumbed through the book I used beforehand and it SUCKED. I also bought a book titled "Out of The Box" because it was a pretty nifty title and the book looked good on the outside - it's about strategies for achieving profits today and growth tomorrow through web sevices... who the crap cares??? :P They were both begging to be cut up ;) It's best to find books that have something wrong with them - maybe missing pages or water damage, but definitely not Dracula :D

Pumpkinniki, please do share a project with the leftover pages! I can't figure out what to do with all mine... I feel bad throwing them away when I KNOW someone else knows what to do with them :D

PENNY V.

PENNY V.

September 21st, 2008 04:14

Hey, this looks sooo clever! I will hit the local thrift store and find just the right books for 25 cents each. I am thinking about an old set of encyclopedias that would look fine.
thanks for the inspiration!

Katti!

Katti!

September 21st, 2008 09:03

niceeee!

Violinagin D.

Violinagin D.

September 21st, 2008 21:09

There are a ton of books that are bound and useful for a year at most. I got saved a lot of books that my friend's dad (who is a lawyer) couldn't do anything with and he kept getting updated ones every year and was just going to throw the old ones away. I used those!

But I'd never do this with the books in my library. @_@ I had to search out books to use!

mariah s.

mariah s.

September 21st, 2008 23:01

my fam thinks this is crazy-cool! we are sooooo gonna make this project. thanks for sharing.

Kenneth O.

Kenneth O.

September 22nd, 2008 03:12

I love your kitty and just step 5. That's an awesome step.

This is also a great idea! I must do this sometime...now to find the books....

Melissa M.

Melissa M.

September 23rd, 2008 03:14

You could always make plates! I was looking through a crafting book and it had clear plates and on the back of them they had used a mixture of glue and water I believe to brush on the pieces of book they cut up in pieces. They finished it off with a glaze of some sort so it could be hand washed. I have the craft book packed up and can't get to it until next week, but I'd be glad to send you some more info on it if you want.

k!m

k!m

September 24th, 2008 00:57

super amazing :D

Crystal R.

Crystal R.

October 8th, 2008 20:10

This is a super cool project and I have decided I have to do it. The left over pages you have could be decoupaged to something. I know there are projects on this site that call for book pages. You could rip the edges and then decoupage o make a cool old fashioned feeling trinket box. Aren't imaginations wonderful? :P Thanx again for posting.

RayGun UnDone

RayGun UnDone

October 12th, 2008 02:35

looks great... I have a bunch of really cool old books that would be perfect for this, can't wait to try it out!