About
Ice Lantern With Stained Glass Effect. Beautiful decoration for the holidays or other special occasions.
-
 Jess W. favorited Fire And Stained Ice Luminary
23 Feb 21:03
Jess W. favorited Fire And Stained Ice Luminary
23 Feb 21:03
-
 Shantelle t. added Fire And Stained Ice Luminary to something i'd like to try
02 Oct 06:37
Shantelle t. added Fire And Stained Ice Luminary to something i'd like to try
02 Oct 06:37
-
Laryssa B. favorited Fire And Stained Ice Luminary
23 May 17:21
-
 apple s. favorited Fire And Stained Ice Luminary
23 May 01:08
apple s. favorited Fire And Stained Ice Luminary
23 May 01:08
-
 Ada B. added Fire And Stained Ice Luminary to Smart Ideas
14 Apr 12:45
Ada B. added Fire And Stained Ice Luminary to Smart Ideas
14 Apr 12:45
-
 Jenni favorited Fire And Stained Ice Luminary
17 Mar 00:51
Jenni favorited Fire And Stained Ice Luminary
17 Mar 00:51
-
Bronwyn O. favorited Fire And Stained Ice Luminary
11 Mar 23:45
-
Raven H. favorited Fire And Stained Ice Luminary
04 Jan 17:08
-
 betty.cramer3 favorited Fire And Stained Ice Luminary
27 Dec 08:16
betty.cramer3 favorited Fire And Stained Ice Luminary
27 Dec 08:16
-
shirhen i. added Fire And Stained Ice Luminary to things i want to do
04 Dec 18:37
-
 Step 1
Ice luminaries (ice candles, ice lanterns) are nothing new. There are numerous ways to make them, both large and small. You can find dozens of DIY tutorials online, including examples of ice lanterns beautifully embellished with decorative items frozen into the ice, such as roses, greenery, cranberries, colorful marbles, etc.
I have made ice lanterns before and used food coloring to tint the water before freezing, but wasn't particularly pleased with the monochromatic color scheme.
I have really wanted to find a way to color the ice so it has a stained glass effect, but have been unable to find a tutorial anywhere on how to accomplish this.
I put on my thinking cap and came up with an idea. I suspected it might take several attempts to work out any bugs, but I was delighted to discover my idea worked perfectly on the first attempt. Yay! I'm glad I took photos to document my ice lantern experiment so I can now pass this along to other DIYers.
About 10 years ago, I purchased an ice lantern kit to make small lanterns. A really nice thing about the kit is that the container you used for freezing the lantern served multiple purposes. After freezing and removing the ice lantern, you then used the container as a stand to hold the lantern and it also functioned as a reservoir to catch the water as the ice lantern melted.
I was determined to come up with DIY way to duplicate this idea and had a moment of genius while looking for a suitable container to make an ice lantern. I spotted an empty plastic CD-canister and the wheels in my head started turning.
This tutorial will not only show you how to make a small ice lantern with a stained glass effect, but it shows you how to modify a CD-canister to serve as a mold for the lantern, and also function as a stand and reservoir to catch the water as the lantern melts.
This is a very easy craft!
-
 Step 2
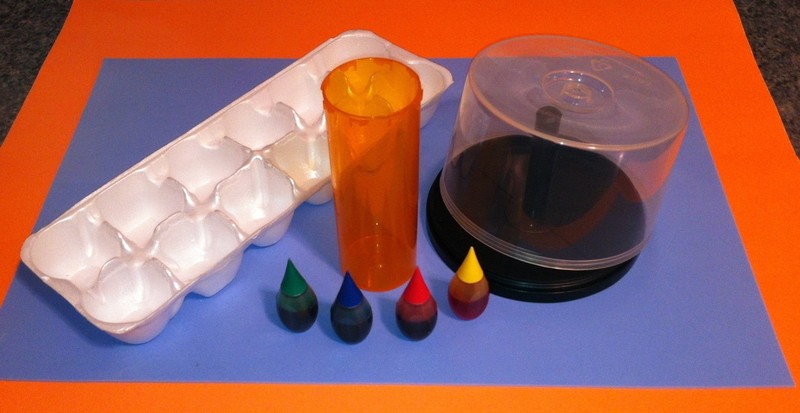
Initial items you'll need to get started are:
The bottom portion of a foam egg carton.
Plastic CD-Cansister (similar to the one pictured). The canister in this photo originally held 50 CDs.
A tall plastic canister. I used a tall prescription pill bottle. Whatever you select needs to be tall and slender, but wide enough to fit over a tea-light or votive candle.
A set of liquid food coloring.
IMPORTANT: Make sure your clothing is protected since you will be working with food coloring. Be prepared to have colored fingertips if you opt not to use rubber or vinyl gloves.
-
 Step 3
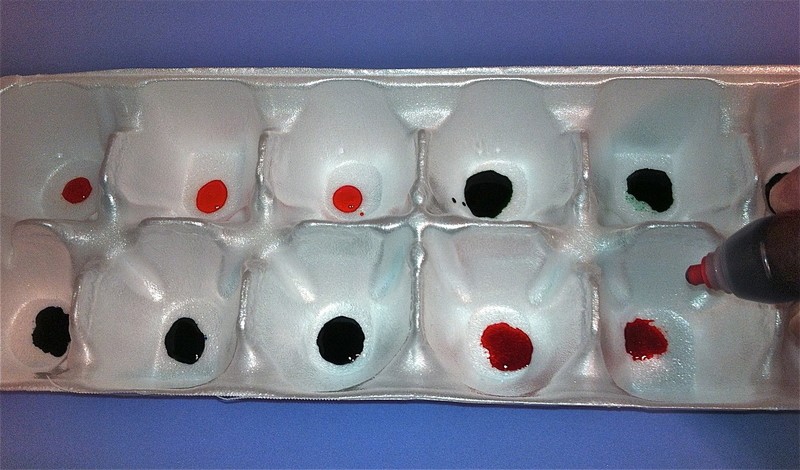
Place one drop of food coloring in each pocket of the foam egg carton.
-
 Step 4
Add approximately 1 1/4 - 1 1/2 teaspoon of water to each pocket.
All you are trying to do is put enough water in the base of each pocket to result in a slim wafer of colored ice.
You will need to make up several batches of ice wafers. Make enough to loosely fill about 3/4 of the CD-canister lid.
-
 Step 5
You can use other items besides a foam egg carton to make colored ice wafers. I also used these shallow tray inserts from a Tubberware deviled-egg carrier. You can also use plastic ice trays.
The important thing is to keep the ice wafers small so you can loosely fit a number of them inside the CD-canister lid. You also want them to be thin enough for light to pass through them once your ice lantern is frozen and is being illuminated from within by a candle.
-
 Step 6
Place the trays of colored water in the freezer.
It should only take an hour or less for the thin wafers to freeze depending on the temperature in your freezer and placement of the trays.
Make sure the wafers are frozen solid before you pop them out of their containers, otherwise you will have a runny, food-coloring mess!
Here is a photo of some finished ice wafers. (It looks like a bowl of colorful frozen fruit!) Work quickly as you pop the ice wafers out of their trays. Keep the wafers in the freezer until you are ready to mold your ice lantern.
-
 Step 7
While you are waiting on all of your ice wafers to freeze, you can start making the stand and water reservoir for your finished ice lantern.
All you will need for this is the top and bottom of the empty CD-canister. (The canister shown in the photo originally held 50 CDs).
Ideally, you should cut off the center peg on the bottom portion of the CD-canister, but I didn't have a tool on hand to do this. Cutting off the center peg is just my personal aesthetic preference, but it won't have any impact on the functionality of the final stand/reservoir.
Besides, when it is time to display the finished ice lantern, I plan to place a decorative wreath, greenery or some other item around the stand/reservoir, so you won't see it anyway.
-
 Step 8
Screw the CD-canister lid and bottom together then turn the canister upside down. (The peg portion mention above is on the inside of the canister).
While the canister is upside down, use a power drill to make holes on the bottom portion of the canister. The canister I used had about 6 sections on the bottom so I drilled 5 holes in each section, starting with a 3/16 drill bit to make initial holes, then using a 1/4 drill bit to enlarge the holes.
After drilling holes in the bottom, set it aside until later. You won't be using the bottom again until you have finished making your ice lantern.
-
 Step 9
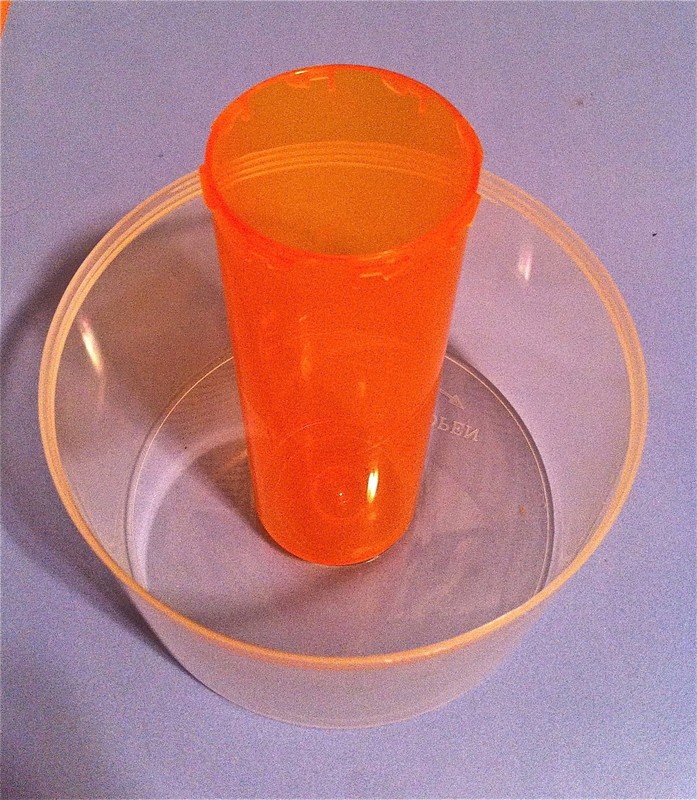
Next, you need to make the mold for your ice lantern.
The first step is to place the tall, slender canister (pill bottle) in the center of the CD-canister lid as shown in the photo.
-
 Step 10
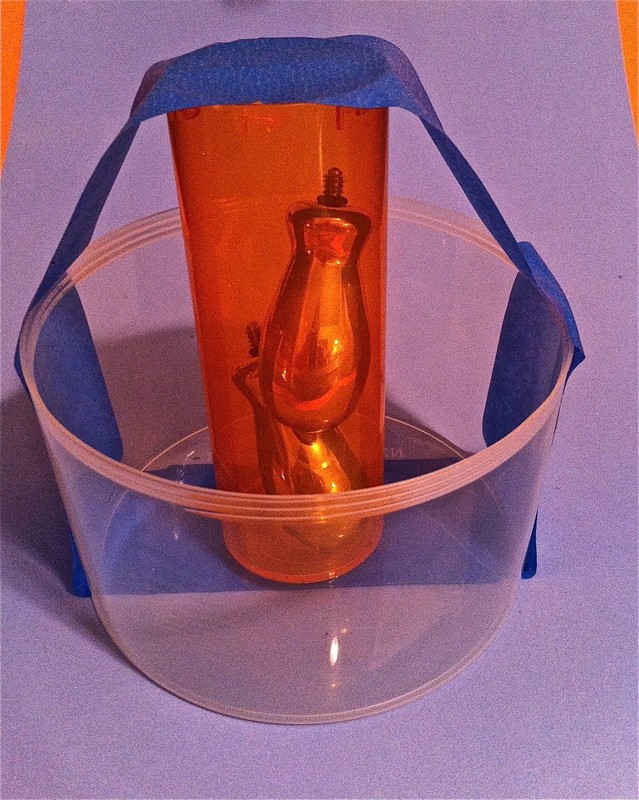
You need the bottom of the pill bottle to sit as snuggly against the CD-canister lid as possible.
Drop a few heavy objects inside the pill bottle to help keep it weighed down. Use rocks, heavy screws or bolts, a bunch of coins, or anything else you can find that will do the job. I found a couple heavy metal knobs to use. The heavier the item(s) the better!
After dropping the weighted items into the tall canister (pill bottle), secure it in place with some tape. I used some wide painter tape and it worked great.
-
 Step 11
Once you have centered the tall canister (pill bottle), fill the CD-canister lid with water until it is about 1 inch (2.54 centimeters) from the top.
Place the mold in the freezer for about 15-20 minutes to lower the temperature of the water. Stir the water periodically to prevent ice from forming on the surface.
-
 Step 12
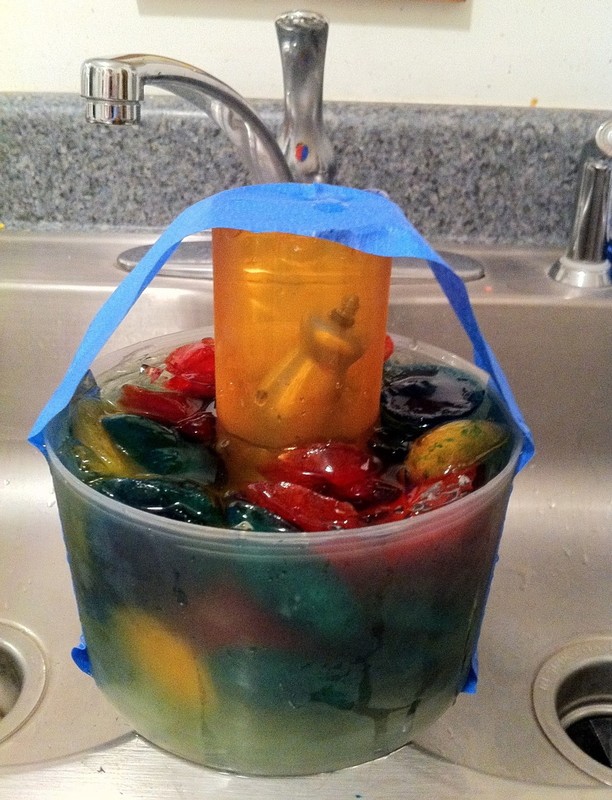
You are finally ready to drop in the molded ice wafers. Since the temperature of the water has been lowered, the ice wafers will not melt as much and shed their color when they hit the water.
Quickly drop in the ice wafers and use a knife or similar object to move them around so the different colors are well distributed within the mold.
You'll want to do this step over the sink since some of the water will be displaced as you drop in the ice wafers.
Don't pack the ice wafers too tightly, but do fill the mold with enough to evenly distribute the color from top to bottom. You need the perfect balance of frozen ice wafers to add color, but for them to be surrounded with clear, unfrozen water. If some of your ice wafers bleed off their color into the clear water, don't worry about it.
Once you've made final adjustments to the ice wafers, check to ensure the tall cylinder (pill bottle) is still centered then place the entire mold in the freezer. Make sure it is sitting perfectly level.
If there is a particular spot in your freezer where air is blowing, make sure one side of the mold is not in the direct stream of the airflow to prevent one side from freezing more quickly or expanding differently than the other side.
Allow adequate time for the ice lantern to thoroughly freeze. To be on the safe side, you should wait at least 12 hours.
-
 Step 13
After waiting 12 or more hours, it is time to remove your ice lantern from the freezer.
Let it sit on the counter for approximately 30 minutes before you do anything to it. Don't force the initial thaw. Exposing your mold to hot air or water initially may cause your ice lantern to crack or shatter. The best thing to do initially is nothing. Be patient!
-
 Step 14
Once the lantern warms up to room temperature for about 30 minutes, remove the tape and pour some lukewarm water into the tall canister (pill bottle) to help loosen it from the mold. To prevent cracking, use lukewarm water. You may need to pour the water out and repeat this step several times to loosen and remove the tall canister from the mold. Don't use force. The tall canister will slide out easily as the lantern warms.
After you have removed the tall canister (pill bottle) from the center of the mold, flip the mold over on a plate and let it sit awhile longer. The ice lantern should release from the mold by itself after it warms up a little longer to room temperature.
If you have grown too impatient by this time, you can hold the mold under a stream of lukewarm water to help it release quicker from the mold.
-
 Step 15
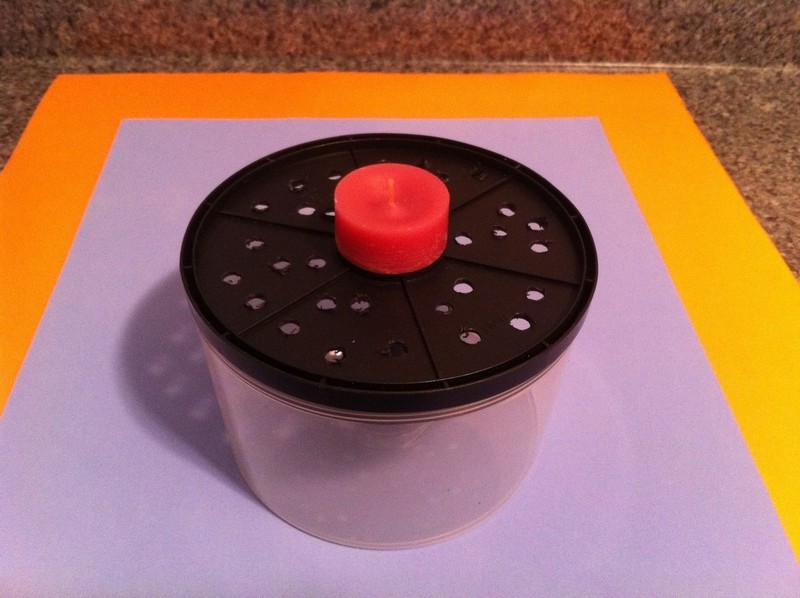
Once the ice lantern has been freed from CD-canister lid, screw the bottom back on and place it on the counter as shown in the photo.
Place a tea-light or votive candle in the center.
If you are using a tea-light, you should remove the candle from the tin. The metal will heat up and cause the ice to melt quicker.
-
 Step 16
Your frozen ice lantern should have a hole on both the top and bottom so you can place it on the stand over the candle either way.
If the hole did not form well on the side where the tall canister (pill bottle) bumped up against the lid, carefully hold the mold under a small stream of warm water and let it trickle into the opening in the middle to help open up the hole. You don't really need to widen that hole to be big enough to place over the candle, but you do need to open up a hole to allow for some air flow.
Once you have enough of an opening to allow some air flow, simply position your ice lantern over the candle on the stand using the end that has the hole wide enough to fit over the candle.
-
 Step 17
You can light the candle first and then place the ice lantern over it, or position the ice lantern first then light the candle using a long match or lighter.
-
 Step 18
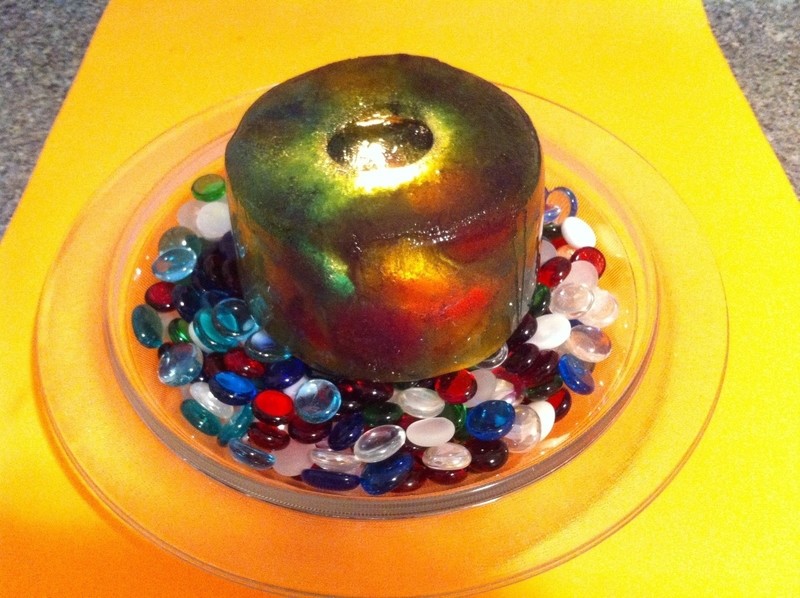
If you do not wish to use the CD-canister as a stand/reservior, you can display your ice lantern in other ways, such as in a dish filled with floral marbles as shown in the photo.
If you choose to display the ice lantern in some other way, just make sure the surface is protected from the water and food coloring.
-
 Step 19
Enjoy your beautiful fire and stained ice luminary. The lantern actually becomes more vibrant in color and beauty as it melts and the walls grow thinner.
The candle will burn for approximately 3 hours or longer.
-
 Step 20
Cold, colorful ambience. No two ice lanterns are ever the same.
-
Step 21