About
Make your own felt froggie!
A quick and easy how-to with steps inspired by and borrowed from Aranzi Aronzo's fantastic "The Cuter Book," found here: http://shop3.aranziaronzo.com/shopping.en/index10_books.html
Apologies for the poor lighting in these photographs of my felt froggie and have fun making yours!
Tags
-
 amanda.shillito favorited Felt Froggie
26 Jan 19:01
amanda.shillito favorited Felt Froggie
26 Jan 19:01
-
 robina m. favorited Felt Froggie
20 Dec 06:57
robina m. favorited Felt Froggie
20 Dec 06:57
-
 dippydiscoball added Felt Froggie to make for tree
12 Nov 03:28
dippydiscoball added Felt Froggie to make for tree
12 Nov 03:28
-
 Ana favorited Felt Froggie
09 Nov 03:35
Ana favorited Felt Froggie
09 Nov 03:35
-
 B* published her project Felt Froggie
03 Nov 06:12
B* published her project Felt Froggie
03 Nov 06:12
-
 Step 1
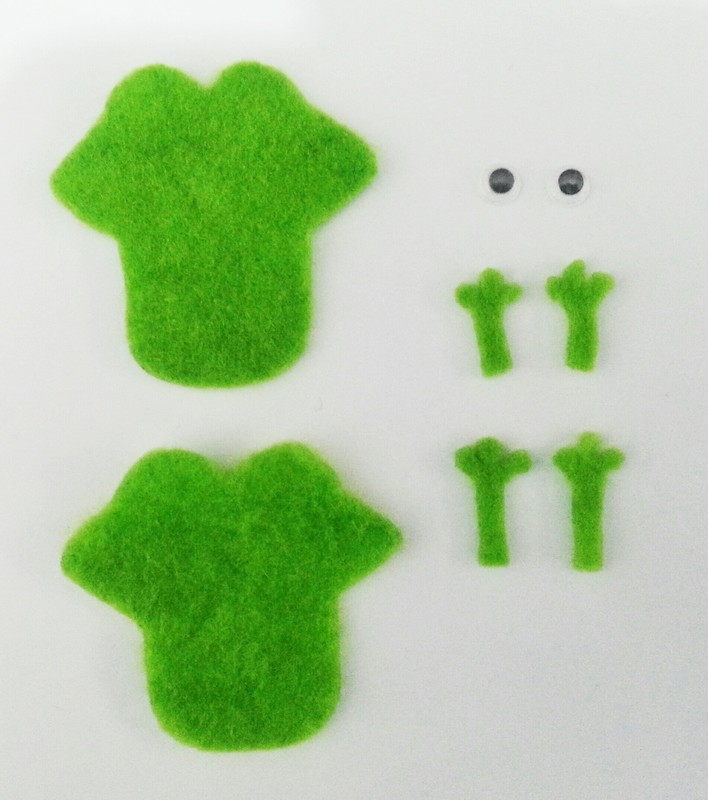
1. First, cut out two sets of the froggie's head and torso (combined here) from some lime green felt to your desired size for the front and back of your frog.
2. Also, carefully cut out two pairs of three-toed feet.
The fore limbs are slightly smaller than the hind limbs but do be careful when using your craft scissors to cut out the felt for the frog's intricate toes to form its webbed feet. -
 Step 2
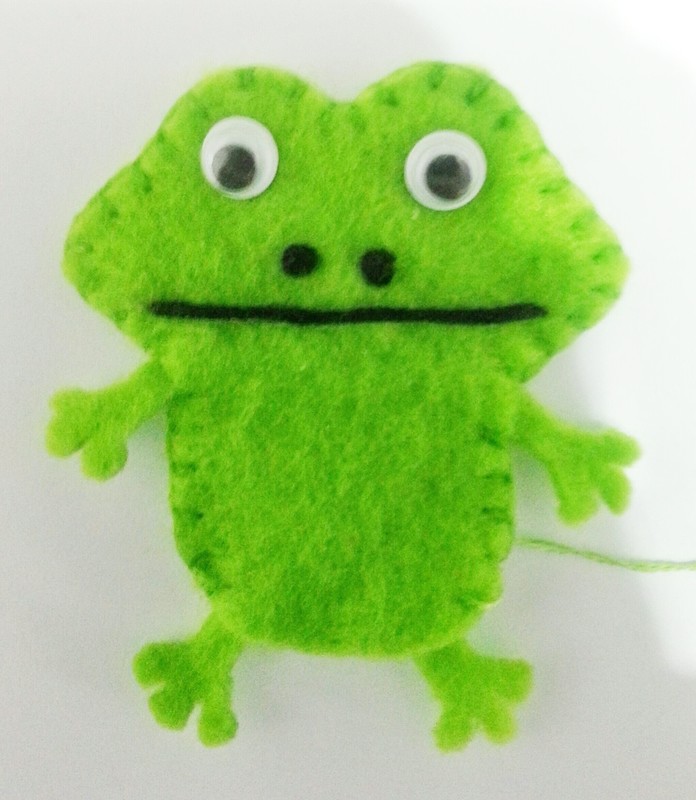
1. For the eyes, I used a pair of googly eyes to experiment with the suggestions. Position them carefully before gluing them onto the frog's face.
Alternatively, you may also use a little black felt on white felt for the eyes.2. For the nostrils, stitch two triple-French knots in black embroidery thread where you prefer the frog's nose to be.
-
 Step 3
1. For the frog's broad smile, I used one long, straight stitch in black embroidery thread. You could also use a little craft glue to affix the smile.
You could also have fun with the frog's expression by changing his smile to any preferred reaction by changing the style of the stitch. Have fun!
-
 Step 4
1. Next, glue the four limbs to fix them in position at the back of the front piece of green felt for the frog's head and torso.
2. Place the second piece of green felt for the back of his head and torso to conceal the inner side with the glued limbs so that the back of the frog looks something like the one shown here.
-
 Step 5
Now, stitch all around the head and body of the frog using the blanket stitch in matching lime green embroidery thread, taking care to secure the limbs in position with closer stitches near them.
You could also use running stitches for this step but I think the blanket stitch works wonderfully for such projects. :)
-
 Step 6
As you are nearing the end of stitching all around your frog, fill it with some stuffing (that is well spread out across his face and torso) and finish the final stitches as neatly as you can.
There, you have it - your very own felt froggie! :)