


About
Inexpensive way to "fake" embroidery and beading - especially for props and costumes
I had to create a "stunt" dress for a no-budget horror film. The real dress, which inspired this project, is a $1,000 wedding dress. In the film, the dress gets destroyed - and we didn't want to actually destroy the expensive dress, so we had to create a replica - cheap!
This is more of a tutorial on how to fake embroidery and beading - it can be used for anything - not necessarily clothing or a wedding gown.
It's fairly inexpensive to do, it just gets pricey for sheer quantity of materials used (such as glue), if you're doing a big project like this one.
I did the fake embroidery/beading on this dress in 4 days - probably about 80 hours worth of work (it was a rough 4 days). This dress had a fairly large train that had to be decorated.
Tags
-
 Linda of Nice dress! Thanks, I made it!! favorited "Fake" Wedding Dress
01 Jul 01:24
Linda of Nice dress! Thanks, I made it!! favorited "Fake" Wedding Dress
01 Jul 01:24
-
 Sara A. (as in awesome) favorited "Fake" Wedding Dress
28 Mar 14:35
Sara A. (as in awesome) favorited "Fake" Wedding Dress
28 Mar 14:35
-
 Julia V. favorited "Fake" Wedding Dress
22 Apr 22:42
Julia V. favorited "Fake" Wedding Dress
22 Apr 22:42
-
 Kitsuné favorited "Fake" Wedding Dress
12 Jan 12:12
Kitsuné favorited "Fake" Wedding Dress
12 Jan 12:12
-
 Laouen favorited "Fake" Wedding Dress
13 Dec 10:23
Laouen favorited "Fake" Wedding Dress
13 Dec 10:23
-
 Arida added "Fake" Wedding Dress to Anna of Arendelle
01 Sep 11:28
Arida added "Fake" Wedding Dress to Anna of Arendelle
01 Sep 11:28
-
 Jessica B. added "Fake" Wedding Dress to PJ Harvey
30 Jun 19:45
Jessica B. added "Fake" Wedding Dress to PJ Harvey
30 Jun 19:45
-
 Jinx added "Fake" Wedding Dress to Costume pieces
17 May 20:20
Jinx added "Fake" Wedding Dress to Costume pieces
17 May 20:20
-
 vermilia c. favorited "Fake" Wedding Dress
17 May 20:09
vermilia c. favorited "Fake" Wedding Dress
17 May 20:09
-
 Amanda S. favorited "Fake" Wedding Dress
15 May 15:04
Amanda S. favorited "Fake" Wedding Dress
15 May 15:04
-
 Step 1
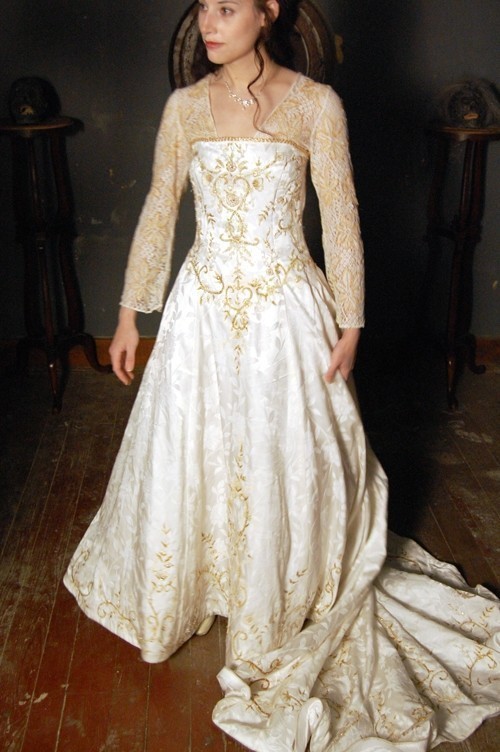
Find your inspiration piece.
-
 Step 2
Get a sense of how your inspiration piece hangs (its color, shape, etc.) so you can duplicate it as best as you can.
-
 Step 3
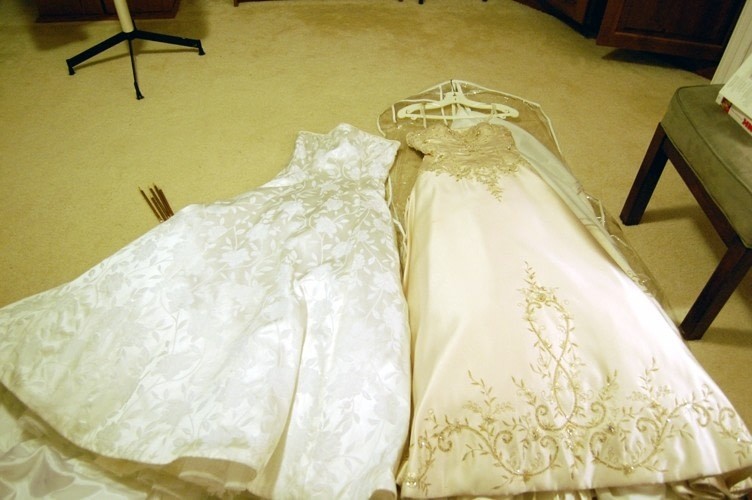
Find or build a dress similar in shape.
I found mine at a thrift store for $10. Unfortunately, the fabric had a design on it, but it would work fine for the stunt dress.
The dress to be decorated is on the left and the inspiration dress is on the right in this photo.
-
 Step 4
Using needle and thread, string your seed beads.
When you have your strands long enough for what you need, glue them to your garment.
-
 Step 5
Study the embroidery and beading on your inspiration piece and begin to sketch, in pencil, your design onto the dress you're decorating.
-
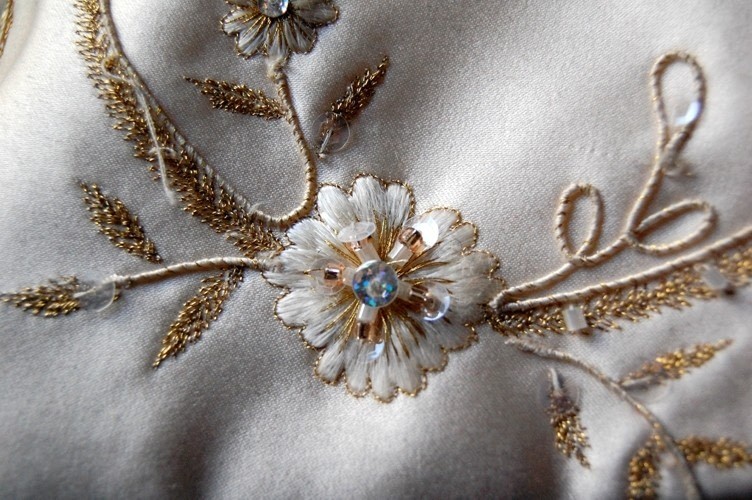
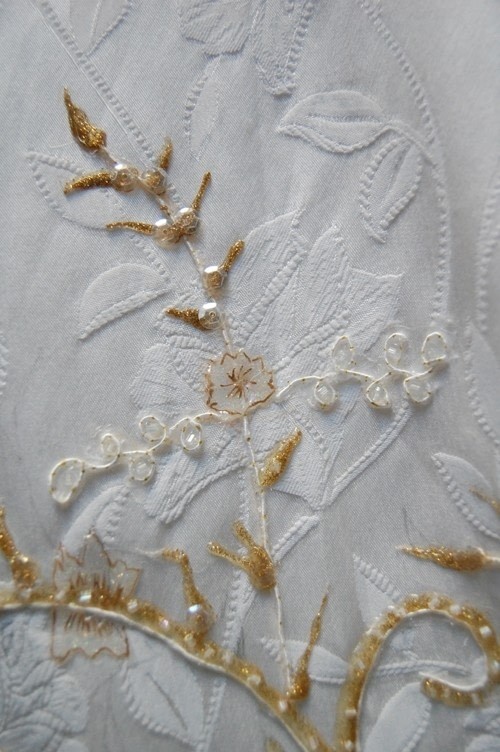
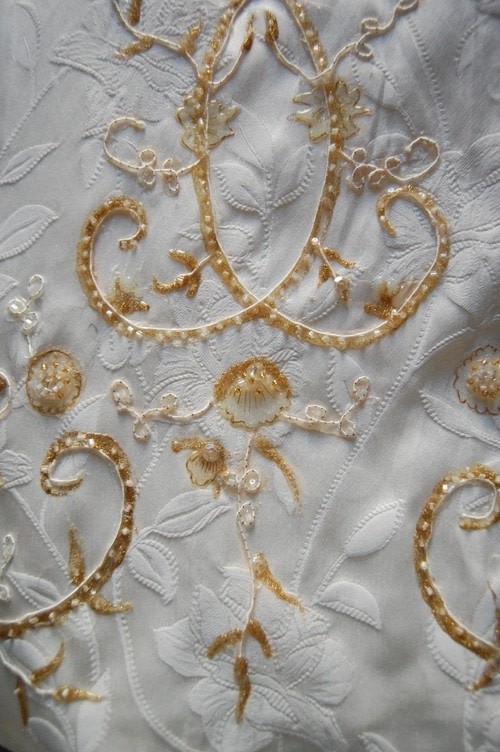
 Step 6
Look at the detail of your inspiration piece (how the string is laid out, where the gold embroidery is in relation to the string, where the beads are placed, etc.).
-
 Step 7
Note the additional details of the inspiration piece - the use of jewels and sequins.
-
 Step 8
Begin to create your design over your pencil sketch.
Though, you may want to practice on a scrap of fabric first.
-
 Step 9
With clear glue, glue your string down in the shapes you want.
Work a little at a time, so the glue doesn't dry before you have a chance to shape the string and set it.
-
 Step 10
Using the gold glue, follow the lines you created with the string, dropping seed beads in the glue while it is still wet.
Again, do a little at a time.
-
 Step 11
For the smaller points, use a toothpick to help get the effect. Add sequins while the glue is still wet.
For the flowers, use the iridescent sparkly glue and, once it's dry, add details with your gold pen.
-
 Step 12
Using your gold pen, draw tiny stitch lines on the string.
-
 Step 13
Carefully work following the pencil design you sketched onto the fabric.
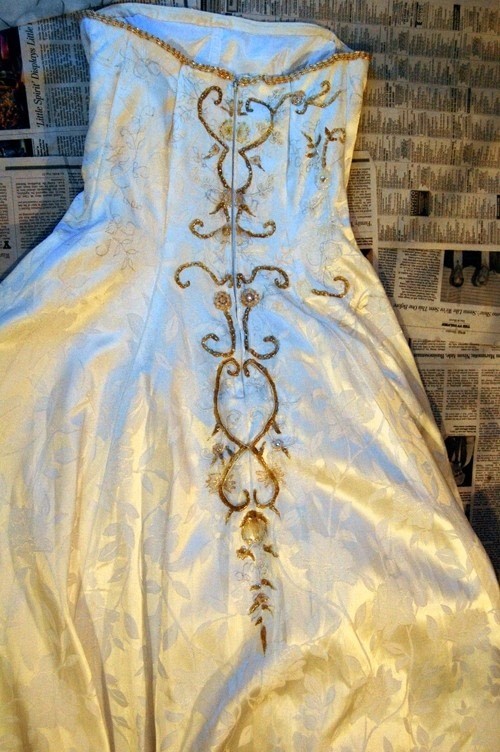
Pay special attention to the center line of the garment if it has a distinct central design like this one does.
-
 Step 14
Because of the importance of the center line of this piece, when you start on the bottom of the skirt, do the center design first - making sure it lines up with the work already done on the bodice.
-
 Step 15
Sanity Tip:
Keeping the centers lined up, work on the bodice and the skirt alternately. (This method helped it look like I was making progress, mainly to myself since this is an absurdly large project to do in 4 days.)
-
 Step 16
Work work work.
Don't forget to eat.
Don't forget to sleep.
(I didn't really do either of those two things, but I think it's a good idea if you can.)
And take a break to take pictures of what you're doing - even though you're crazy busy.
Crying is okay, too. It's a big project.
-
 Step 17
Think you're done yet?
Ha! You still have to do the back of the dress.
Please make sure that the front is entirely dry before you turn it over to work on the back.
-
 Step 18
Cry, because you still have that big train to do.
But guess what!
When you're done with that, you still have the bolero to do. Ugh.
-
 Step 19
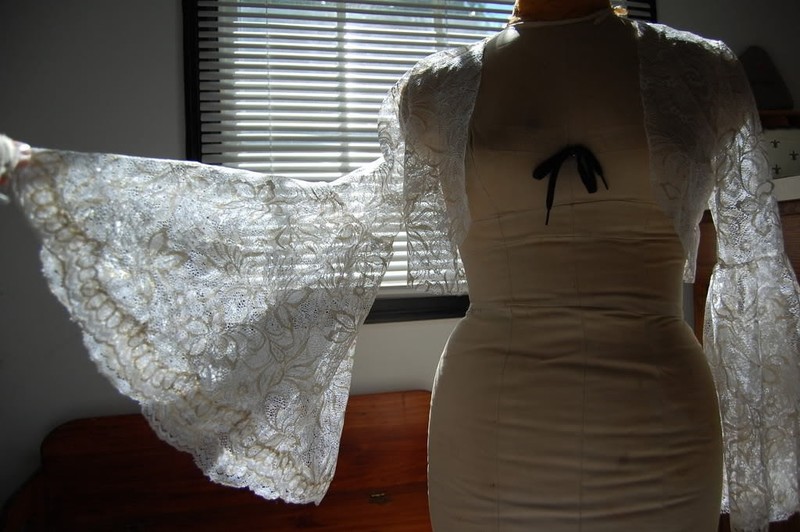
I don't have any good before or during picture of the bolero/shirt, since I was really down to the wire when I got to this step.
The bolero for the inspiration piece was lacy with gold in the fabric.
For the "stunt" bolero, I found a lacy shirt (vintage - very sorry about that - it saved my life not having to make one) for $2 at a yard sale. Using a gold pen, I carefully and lightly colored parts of the design gold to replicate the gold lace on the original.
-
 Step 20
I found a picture of the bolero that inspired the top of this stunt dress.
Unfortunately, I don't have a "before" picture of the shirt I altered. I was in a mad rush to get it done in time for the shoot.
-
 Step 21
Since the bell sleeves of the "stunt" bolero were not as full as the one we modeled it after, we made sure the sleeves of the stunt outfit got torn right away in the action of the film.
-
 Step 22
Congratulations!
You've worked very hard and now have a pretty dress that can double for the expensive one!
Only one thing left to do...
-
 Step 23
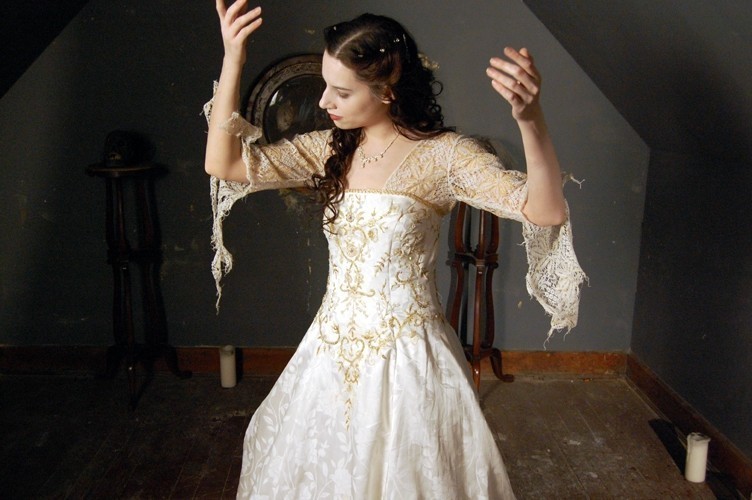
Watch your creation get destroyed for the sake of making a movie.
-
 Step 24
More and more staining and tears.
-
 Step 25
Was it worth it?
Who knows.
-
 Step 26
However, no one who has watched the film has noticed when we switched from the expensive dress to the stunt dress (happens twice in the film), so at least it was effective.


The director just released the first "official" trailer for the film. I hope you enjoy it!
I don't think you can see this dress in the trailer, but you can see other costumes that I've made for it, including the black and white ballgown.
http://youtu.be/3AgMdGQMHP4
CO + K User
i wanna see the movie too!!
it s nearly too good for destroying it.
You did an amazing job!