


About
DIY fairy wings
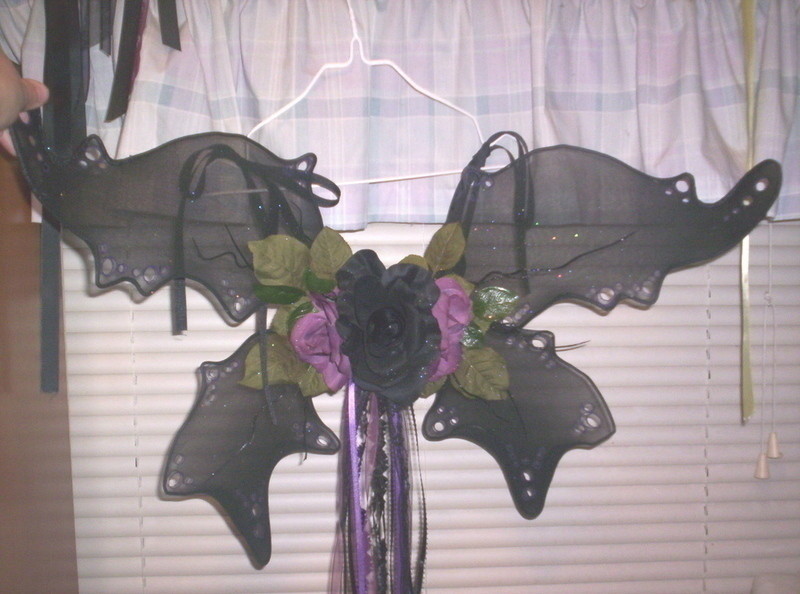
wings i have made over four years. sorry about my pictures are gone.. i well try to make more wings to show you how.
i'm sorry for not putting what gauge wire i use. it call ook wire you get it that home depot store. i use the 16 gauge wire. it the best and you buy a pack of 200 feet so you can make really big or small wings. good luck. and sorry it took me so long to find out what gauge i use. some wings i use hangers but that just for easy shaping. but hard shaping you want to use 16 gauge. for easy how to make wings check out my how to make bat wings.
Tags
-
 Key West Witch favorited Fairy Wings
28 Jun 11:22
Key West Witch favorited Fairy Wings
28 Jun 11:22
-
Key West Witch added Fairy Wings to Wings
19 Mar 12:25
-
 PixieFey added Fairy Wings to Magical
21 Jan 01:03
PixieFey added Fairy Wings to Magical
21 Jan 01:03
-
 Kay T. favorited Fairy Wings
12 Nov 17:14
Kay T. favorited Fairy Wings
12 Nov 17:14
-
 Bhevarri favorited Fairy Wings
28 Apr 19:16
Bhevarri favorited Fairy Wings
28 Apr 19:16
-
 rochelle.c.barton favorited Fairy Wings
01 Mar 20:43
rochelle.c.barton favorited Fairy Wings
01 Mar 20:43
-
 NMDZ favorited Fairy Wings
03 Jan 00:08
NMDZ favorited Fairy Wings
03 Jan 00:08
-
 GabriELLE favorited Fairy Wings
21 Oct 02:27
GabriELLE favorited Fairy Wings
21 Oct 02:27
-
 kuuko favorited Fairy Wings
19 Aug 03:54
kuuko favorited Fairy Wings
19 Aug 03:54
-
 Aieliaria favorited Fairy Wings
03 Jul 02:21
Aieliaria favorited Fairy Wings
03 Jul 02:21
You Will Need
-
Step 1
Cutting a 4-foot length of wire. Starting at one end, begin bending it into your upper wing shape, leaving 3 inches of the wire free at the beginning and the end of the shape.
-
Step 2
Wrap the 3-inch pieces at the beginning and end of your wing shape with electrical tape to close the shape off.
-
Step 3
Repeat steps 1 and 2 for the opposite upper wing shape and both lower wing shapes, making the lower shapes slightly smaller.
-
Step 4
Using one stocking for each wing shape, slide the stocking over the wire frame and wrap extra fabric around the wing base, taping the ends in place.
-
Step 5
Draw a design on each wing with invisible fabric pen.
-
Step 6
Light and blow out an incense stick, and use the glowing tip to singe small holes in the stockings wherever you'd like for a decorative, moth-eaten look.
-
Step 7
Begin painting in your penned design with acrylic paints.
-
Step 8
While paint is still wet, cover desired areas with glitter and shake excess off on a piece of newspaper.
-
Step 9
Using tweezers to pick up crystals, use a dot of fabric glue to adhere each crystal to your wings for extra sparkle.
-
Step 10
Wrap electrical tape around the 4-inch wing centers to connect the upper and lower wings together, creating a four-wing wire frame. You can now curve the wings into a more natural shape if desired.
-
Step 11
Wrap a wide ribbon around the base to cover it neatly, securing ends with hot glue.
-
Step 12
Cut four lengths of ribbon about 2 feet each and sew two ribbons to the top insides of the upper wings; then sew the other two ribbons to the bottoms of the lower wings, leaving the ribbons hanging loosely.
-
Step 13
Hot-glue an assortment of artificial flowers and foliage to your wing base.
-
Step 14
Hot-glue decorative butterflies to the wing base for the final touch.


but I use hangers