About
Transforming the dresser from my nursery into a piece fit for my mod black and white bedroom
Black and white bedrooms are sort of my jam. It's a timeless style, but how the black and white is implemented can be done in a trendy fashion. My boring and beat up white dresser was just not cuttin' it for me anymore. I've been carting around this brick from apartment to apartment for years now. It's older than I am, but unlike me, it is totally out of style ;)
Since my shopping-for-clothes addiction has not subsided and probably won't any time soon, the dresser could not be thrown out upon my move. Therefore, I decided to give it a facelift. I wanted to do this in a way that would not only give my clothes a prettier living space, but also accent the living space of my own; my black and white bedroom.
This project can be a bit tedious, but it is neither time consuming nor expensive. Enjoy!
Tags
-
 Rebecca M. favorited Facelift
24 Jun 00:12
Rebecca M. favorited Facelift
24 Jun 00:12
-
 Stacy C. added Facelift to cut out
21 Oct 08:11
Stacy C. added Facelift to cut out
21 Oct 08:11
-
Stacy C. favorited Facelift
21 Oct 08:11
-
 Chelsea.Grin favorited Facelift
26 May 02:00
Chelsea.Grin favorited Facelift
26 May 02:00
-
Mignon D. favorited Facelift
21 May 19:34
-
 Monice M. favorited Facelift
19 May 07:24
Monice M. favorited Facelift
19 May 07:24
-
 RaspberrySourZ added Facelift to Projects I want to try.
19 Apr 20:01
RaspberrySourZ added Facelift to Projects I want to try.
19 Apr 20:01
-
 Lady Grim favorited Facelift
13 Apr 17:44
Lady Grim favorited Facelift
13 Apr 17:44
-
 SvarteRoser favorited Facelift
24 Mar 22:15
SvarteRoser favorited Facelift
24 Mar 22:15
-
 Doxiedarling favorited Facelift
06 Mar 02:06
Doxiedarling favorited Facelift
06 Mar 02:06
-
 Step 1
You can really use any piece of furniture whether it's something that's been lying around and needs a makeover or something that you bought used with the intention of fixing up.
If this is a project you want to start, but don't have a piece of furniture you can use, I'd recommend Habitat Resale places or garage sale shopping. Don't buy new! These types of pieces are out there for cheap, it'd be silly to purchase a new one.
My dresser is roughly 4ft, but you can work with anything from a full sized wardrobe to a small lingerie chest.
I regret not giving it a fresh coat of paint before I started, so I'd recommend doing so. However, if you're pressed for time or lazy then forgetaboutitttt.
Here we go!
-
 Step 2
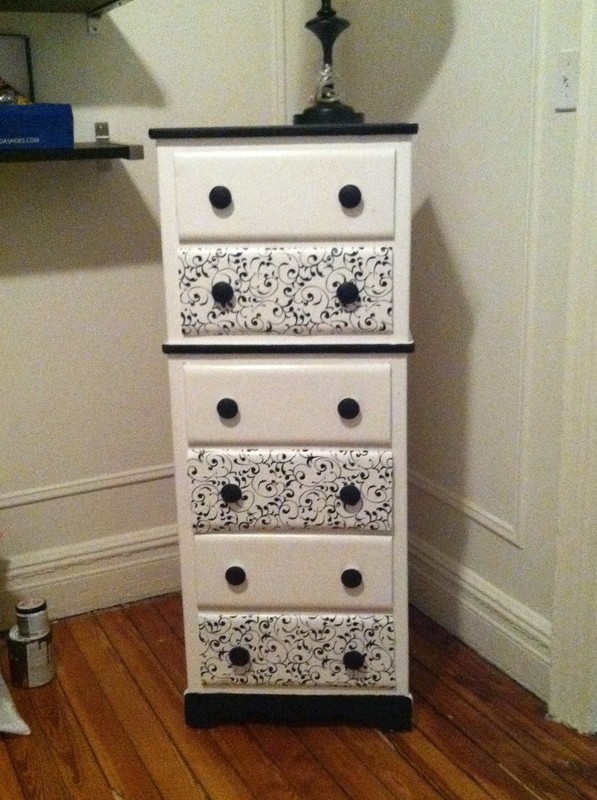
I used contact paper to line the drawers. It's easier than painting and inexpensive. Yes, contact paper is the stuff that we used to cover our soft-covered books with in grade school (anyone remember popping the bubbles?). Apparently now it comes in cool prints and colors. I purchased this roll from Home Depot for $7. It's a very handy item to have. I've used it as wallpaper before because it only has a small amount of adhesive in it which makes it removable (unlike real wallpaper) when that lease ends.
I simply cut appropriately sized rectangles and pressed it on every other drawer. You can of course do all the drawers if you'd like, but this print was a little too overwhelming to cover all six. If you're having issues applying the paper, it can be helpful to use a ruler as you remove the wax paper from the sticky side. It applies pressure and smoothes as to avoid bubbling.
-
 Step 3
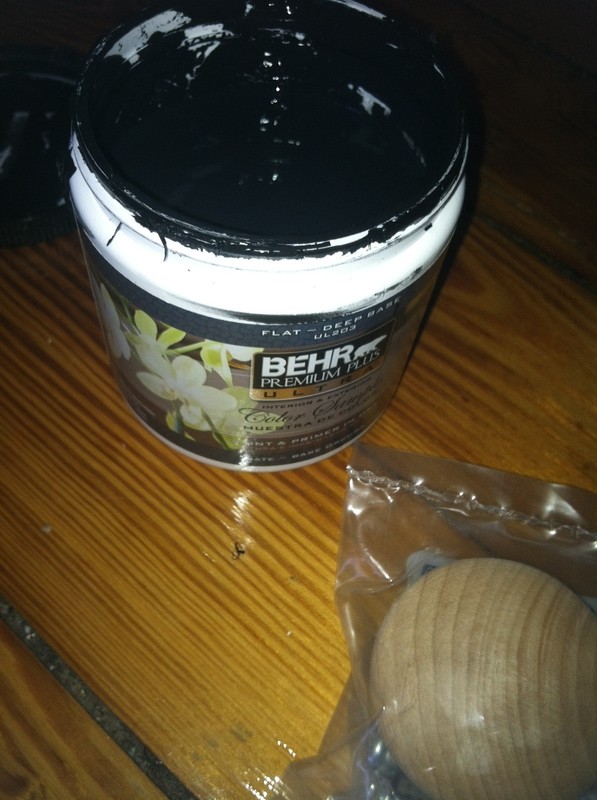
Next I focused on the knobs. Sometimes, just replacing/changing knobs on a dresser or cabinet is enough to give a piece of furniture a fresh look. In this instance, I kept my old knobs (have I mentioned I'm broke?), but gave them a paint job. I was missing a few so I picked up just plain wooden ones ($1.24) along with a sample sized can of paint (<$5). Just a quick tip on buying paint-I ALWAYS start looking at the "Oops" section. I'm often surprised with a discounted can that's premixed.
I painted each knob with a small brush and set them out on newspaper overnight to dry. Once dry, I screwed the knobs back in place.
-
 Step 4
Lastly, I painted the trim black as well. Again, not necessary, but it gave the piece a sharper and more polished look.
Since I'm not at the point where I can buy a whole new bedroom set, this was a quick and easy way to get a stylish "new" piece of furniture to enhance my B&W room.