


About
I love wristcuffs!
I made me this little wristcuff out of this adorable fabric the other day and embroidered "mama" on it and my husband (who doesn't understand) said " do you need that to remind yourself that you're a mama? bah!
I have a 2 and 5 year old and I'm 9 months pregnant!!!
I think I know I'm a mama!
men! :o)
-
 Key West Witch favorited Fabric Wristcuff
07 Aug 20:44
Key West Witch favorited Fabric Wristcuff
07 Aug 20:44
-
 Miss_Fit favorited Fabric Wristcuff
08 Jul 02:18
Miss_Fit favorited Fabric Wristcuff
08 Jul 02:18
-
 su l. favorited Fabric Wristcuff
05 Mar 13:53
su l. favorited Fabric Wristcuff
05 Mar 13:53
-
 Lauren J. favorited Fabric Wristcuff
10 Aug 18:26
Lauren J. favorited Fabric Wristcuff
10 Aug 18:26
-
 stephanie.vincent.39589 added Fabric Wristcuff to Patterns
05 Feb 22:44
stephanie.vincent.39589 added Fabric Wristcuff to Patterns
05 Feb 22:44
-
 silentband favorited Fabric Wristcuff
30 Nov 01:54
silentband favorited Fabric Wristcuff
30 Nov 01:54
-
Nicky Frazier N. favorited Fabric Wristcuff
18 Aug 23:36
-
 Rawrgrrism favorited Fabric Wristcuff
25 Jul 03:14
Rawrgrrism favorited Fabric Wristcuff
25 Jul 03:14
- Ireth primula favorited Fabric Wristcuff 17 Jul 12:01
You Will Need
-
 Step 1
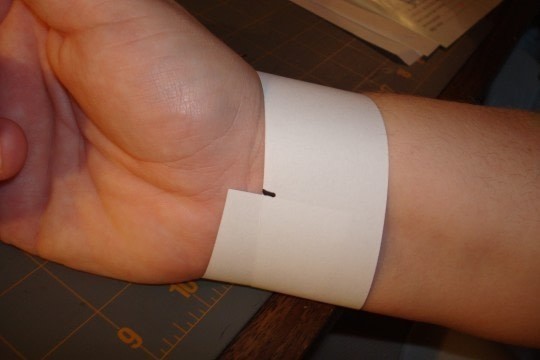
Cut a piece of paper the width you want your cuff to be but add 1/2" for seam allowance.
Then wrap it around your wrist to measure how long you will need it to be. Mark it and cut.
This is your pattern! -
 Step 2
I'm plus size so my cuff is a little larger then the average but here you can see I have my cuff measuring 7 1/2" X 1 1/2"
-
 Step 3
Here I have my 2 coordinating fabric pieces already cut out and some matching ribbons to embelish it with!
-
 Step 4
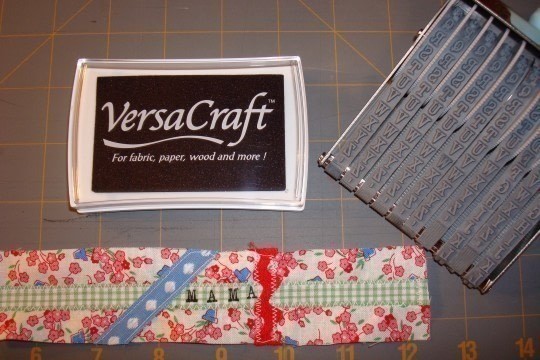
I sewed on the different ribbons and rick rack with straight stitch and zigzag stitches and then decided I wanted to put "Mama" on it to personalize it a little.
I found this cool rolling letter stamp at Michaels and used a perminant stamp pad by VersaCraft.
Some of the letters didn't stamp perfect so I touched them up with my perminant pigma pen to make them complete. -
 Step 5
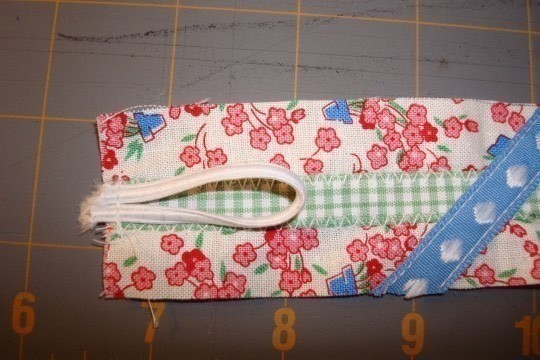
cut off a piece of elastic @ 3 to 4 inches long to make a loop that you'll attach your button to, make sure the loop faces in so when you turn it out it will be positioned right. I run a little stitch back and forth to secure it so it stays in place while I sew around the fabric.
-
 Step 6
place your other piece of wristcuff fabric on top of your embelished piece and your ready to sew 1/4" seam around the whole thing. Make sure you leave an opening in the middle of the long side for turning.
-
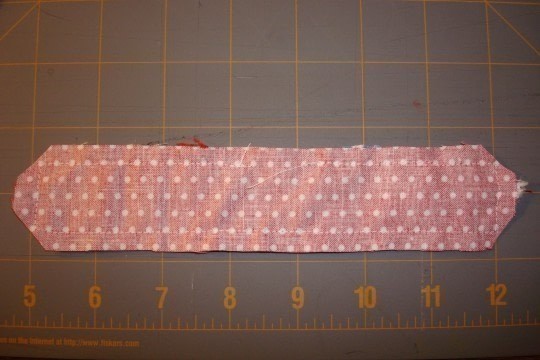
 Step 7
Here it is sewn, with an opening for turning.
Clip the corners so it lays nice and turn!If you click on the picture you can see where I leave the opening for turning, it's in the middle on the top.
-
 Step 8
Sew a straight stitch all the way around about 1/8" in from the edge, this also closes up the opening you had for turning.
You're almost done!!!!! -
 Step 9
Sew your button on with double thread and you're finished!
sometimes I don't measure right and it comes out a little too small or too big, but thats OK!
Just put it away to give as a gift or sell at a show sometime!
Have fun and make sure you post your new cool wristcuffs!!! -
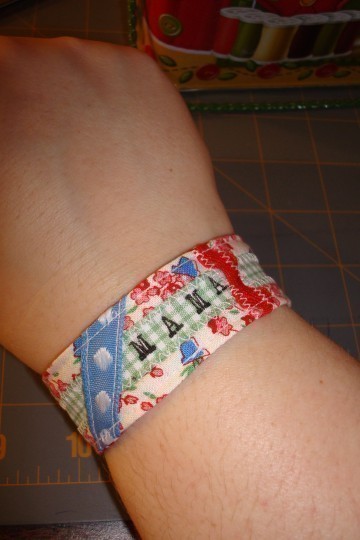
 Step 10
That's right... I'm the Mama!


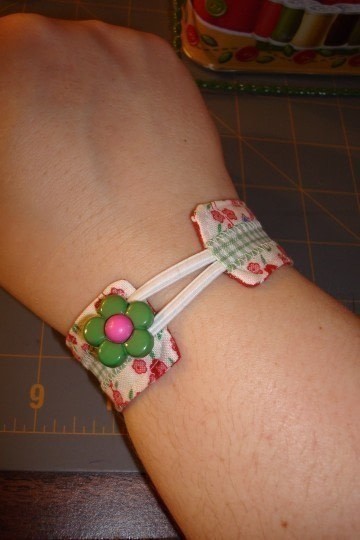


great as a gift too <3
SO CUTE!