


About
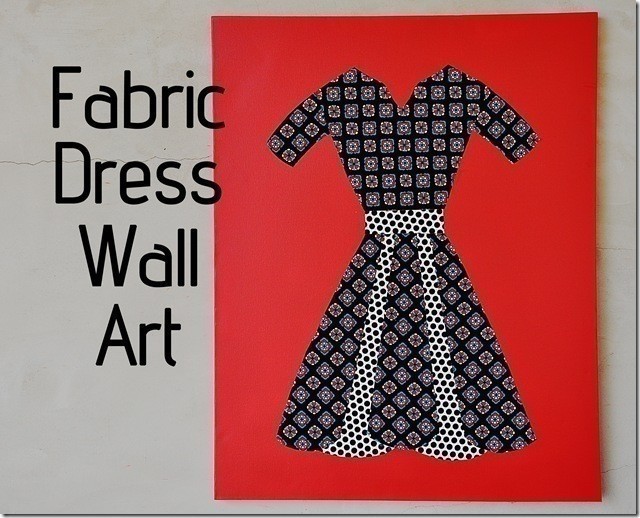
Tutorial: Fabric Dress Wall Art
I absolutely LOVE this project! I was inspired by a giclee from the Ballard Design catalog that was constructed with old book pages
.
Now, I know old book pages are all the rage right now, but FABRIC always does it for me!
You can personalize to your own taste and decor so much easier!
I made this particular piece for my office/sewing room. The colors are fab and of course, the dress fits right in!
I promise you, it’s easier than it looks
-
 Meredith A. added Fabric Dress Wall Art to Miss Piggy's Bedroom
13 Sep 00:44
Meredith A. added Fabric Dress Wall Art to Miss Piggy's Bedroom
13 Sep 00:44
-
 teni871 favorited Fabric Dress Wall Art
18 Aug 05:01
teni871 favorited Fabric Dress Wall Art
18 Aug 05:01
-
 Fani L. favorited Fabric Dress Wall Art
12 Oct 22:10
Fani L. favorited Fabric Dress Wall Art
12 Oct 22:10
-
 julie c. added Fabric Dress Wall Art to to do list
01 Sep 21:29
julie c. added Fabric Dress Wall Art to to do list
01 Sep 21:29
-
 Staci W. favorited Fabric Dress Wall Art
01 Jul 05:10
Staci W. favorited Fabric Dress Wall Art
01 Jul 05:10
-
Nikkole B. favorited Fabric Dress Wall Art
16 Dec 23:06
-
 silentband favorited Fabric Dress Wall Art
01 Dec 17:00
silentband favorited Fabric Dress Wall Art
01 Dec 17:00
-
Kelley R. favorited Fabric Dress Wall Art
12 Jul 02:50
-
 jen.l.teeter favorited Fabric Dress Wall Art
07 Jul 07:21
jen.l.teeter favorited Fabric Dress Wall Art
07 Jul 07:21
-
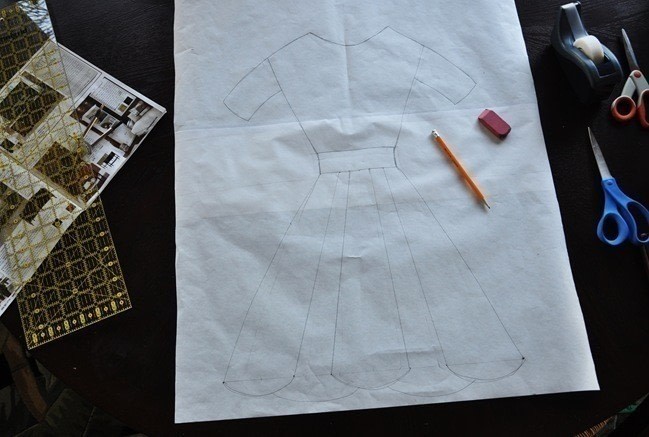
 Step 1
Begin by cutting a piece of freezer paper to the size of your canvas. You may have to tape two pieces together to achieve your size.
-
 Step 2
I used the Ballard picture as a starting off point. I loves the scalloped bottom edge so I went with that. NOTE: I am not an artist! I DO NOT DRAW! I used my ruler alot to get dimensions right. I used my eraser ALOT too, and after about a half hour, I liked the outcome. Make sure to draw on the dull side of the paper
-
 Step 3
Label all of your pieces that you will be cutting
-
 Step 4
Cut out each piece individually
-
 Step 5
After you’ve decided on a fabric combination, iron the fusible interfacing to the amount of fabric that you need
-
 Step 6
Flip the interfaced fabric over and iron on your pattern pieces to the fabric (the beauty of freezer paper)
-
 Step 7
Cut each piece out and peel the freezer paper off your fabric
-
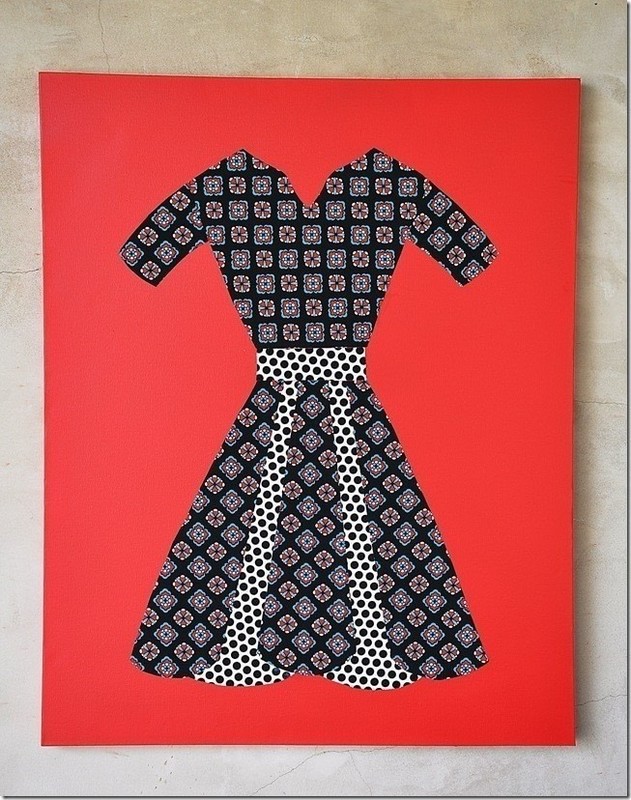
 Step 8
After you have all the pieces cut and peeled, arrange them on the canvas you’ve painted. (no pics of me spraying the canvas cause I figure you can handle that one ;) Make sure to stand back and make sure your art is straight and balanced on the sides and edges
-
 Step 9
Starting with a middle piece, I chose the waistband, apply a healthy amount of mod podge to the back of the fabric. Put the piece exactly where you took it from
-
 Step 10
Continue with each piece. Here I have the waistband and bodice mod podged down, and am starting on the arms. For the skirt, I kept the pieces in place and just lifted up the top and bottom of each piece and mod podged down.
-
 Step 11
Your finished! Are you in love?


Comments


