


About
Simple necklace with fabric-covered button for pendant. Fabric-covered buttons kit needed.
I always love colourful and big necklaces. So I got an idea of a simple necklace with big fabric-covered button as the pendant. It’s not a new idea actually, there’s already a lot of button accessories everywhere, but I love making them. I think it’s a good way of using fabric scraps that are too pretty to throw away.
The pendants are made with Japanese kimono fabrics, the colours are so vibrant and they have some kind of coated sheen over it. I use vintage necklaces for the chain. The necklaces are pretty short, so I use two necklaces and connect them together.
-
 Key West Witch added Fabric Covered Button Necklace to Jewelry Necklaces
30 Jun 13:13
Key West Witch added Fabric Covered Button Necklace to Jewelry Necklaces
30 Jun 13:13
-
Key West Witch added Fabric Covered Button Necklace to Rings
30 Jun 13:12
-
Key West Witch added Fabric Covered Button Necklace to Jewelry
30 Jun 01:06
-
 Ms Dorito added Fabric Covered Button Necklace to Cruella
12 Jun 00:54
Ms Dorito added Fabric Covered Button Necklace to Cruella
12 Jun 00:54
-
Ms Dorito added Fabric Covered Button Necklace to Cruella
12 Jun 00:48
-
 Kimya J. favorited Fabric Covered Button Necklace
04 Nov 02:57
Kimya J. favorited Fabric Covered Button Necklace
04 Nov 02:57
-
 GiftedDiva24 added Fabric Covered Button Necklace to Diy Jewelry
01 Aug 20:11
GiftedDiva24 added Fabric Covered Button Necklace to Diy Jewelry
01 Aug 20:11
-
GiftedDiva24 favorited Fabric Covered Button Necklace
01 Aug 20:11
-
 Taylor K. favorited Fabric Covered Button Necklace
01 Apr 00:56
Taylor K. favorited Fabric Covered Button Necklace
01 Apr 00:56
-
 Wania C. favorited Fabric Covered Button Necklace
14 Dec 19:20
Wania C. favorited Fabric Covered Button Necklace
14 Dec 19:20
-
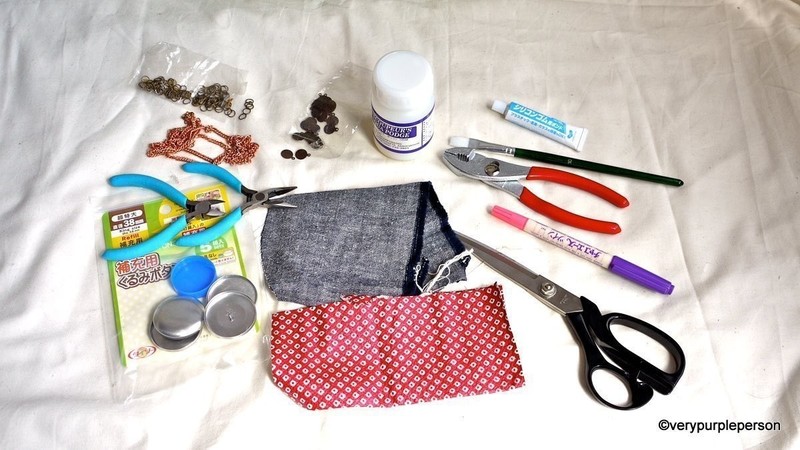
 Step 1
Supplies:
- fabric-covered buttons kit.
- scrap of fabric for front of pendant.
- scrap of fabric for back of pendant.
- fabric scissors and fabric marker.
- modpodge or its alternative. I use ‘Decoupeur’s Aqua Podge’ from Japan. You can also use thinned down PVA glue.
- small brush to use with the podge.
- silicone glue, i.e: E600. I use a Japanese brand.
- pendant bail, jump rings, chain.
- pliers. -
 Step 2
There are several types of fabric-covered buttons. The one on the left is more expensive than the one on the right. I use the one on the right because the button shank can be removed.
-
 Step 3
The kit comes with a template. Cut the template and use it to cut the scrap fabric for the front of pendant. For the back of pendant, use the button as the template.
-
 Step 4
Place fabric on the kit and place button over it.
-
 Step 5
Push the button all the way down. Arrange the fold of fabrics around the button, making sure that there’s no overlapping folds.
-
 Step 6
Place the back of button and put the pusher over it. Push until the back of button clicks into place.
-
 Step 7
A fabric-covered button!
-
 Step 8
Use a plier to pull the button shank.
-
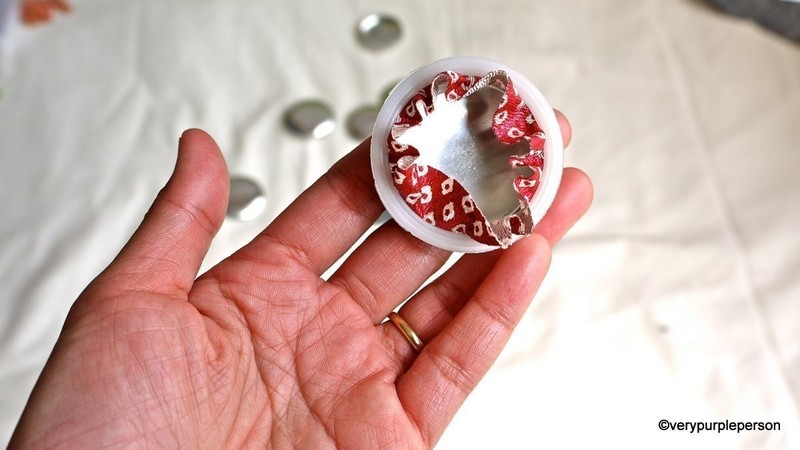
 Step 9
Using a small brush, cover the back of button with podge.
-
 Step 10
Put back fabric on the button and smooth over it. Leave to dry around an hour.
-
 Step 11
When it is dry, use the brush again to coat the fabric with podge. Don’t forget the edge of button where the fabric frays. The podge will dry clear.
-
 Step 12
There are many types of bail. I like these kind of bail tag, but since the back of button is not flat, I have to bend the bail a bit until it fits.
-
 Step 13
I use this plier to bend the bail.
-
 Step 14
Place a small bit of silicone glue on the bail.
-
 Step 15
Place the bail on the back of button, paying attention to the direction of your fabric pattern (if there’s any). Silicone glue is fast-drying and it will dry clear. Leave it to dry for several hours.
-
 Step 16
Put jump pring on the bail.
-
 Step 17
And a chain over the ring. I use chains from vintage necklaces. They are short, so I use two necklaces and put them together. You can also put clasp on the chain if you like.
-
 Step 18
A necklace!
-
 Step 19
Now make more!


Comments


