


About
perfect gift for new mommies
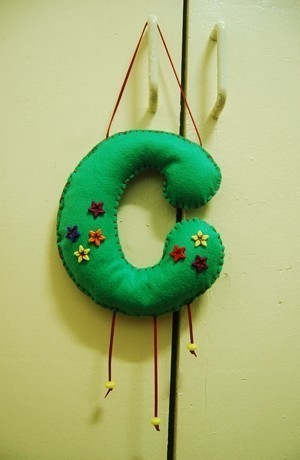
A couple of my officemates (who happen to be a couple) just had a daughter and I have been thinking about giving them a little gift. Last night, I finally figured out what to give them. Do any of you remember the big stuffed “E” in the set of the TV show, FRIENDS? It stood for Emma, Ross and Rachel’s daughter. I always found it very cute and I thought I’d make my own version for my officemates’ daughter, Rhianne Louise. Such a pretty name.
Tags
-
 Xfluffy_unitatoX favorited Embellished Stuffed Felt Letter
17 Nov 00:22
Xfluffy_unitatoX favorited Embellished Stuffed Felt Letter
17 Nov 00:22
-
 Melissa G. favorited Embellished Stuffed Felt Letter
21 Mar 00:22
Melissa G. favorited Embellished Stuffed Felt Letter
21 Mar 00:22
-
 CareyJeene! favorited Embellished Stuffed Felt Letter
18 Oct 23:25
CareyJeene! favorited Embellished Stuffed Felt Letter
18 Oct 23:25
-
 LBindigogold favorited Embellished Stuffed Felt Letter
24 Aug 13:17
LBindigogold favorited Embellished Stuffed Felt Letter
24 Aug 13:17
You Will Need
-
 Step 1
Trace or draw your letter. The size is entirely up to you but you would want a stuffed letter that you can hang nicely on a wall. Make sure that the pieces are opposites. You don’t want your pen marks to be visible.
-
 Step 2
Take the front part and start to embellish. Go crazy! Or not. Wonderful embellishment ideas are beads, sequins, pretty lace, and small toys. You may also use a particular theme or design the letter according to the baby’s gender.
-
 Step 3
Attach the handle to the back letter. You can use ribbon or string.
-
 Step 4
Now we’re ready to stitch ‘em letter parts together. We will do this using blanket stitch. I know that the one I made for Rhiane wasn’t fastened using blanket stitch. In fact, I don’t know what kind of stitch I used for that one.
Start with one end of your letter and blanket stitch by section (around 4 inches per section).
-
 Step 5
Stuff this section with fiberfill. Once the section is perfectly plump, pin the parts together to keep the fiberfill in place.
-
 Step 6
Continue stitching and filling another section (both edges of the letter). Work your way around your letter until you reach the end.
-
 Step 7
Don’t forget to leave allowance for your final fiberfill-filling. Lock it with more blanket stitch and you’re done!
-
 Step 8
HANG.


lol jk, but great idea!