About
Whimsical Elf Stocking Pattern
The perfect pattern to dress up your holiday mantel.
Tags
Downloads
- 112962_2F2016-01-15-164412-Elf-Stocking-Instructions.pdf 1.36 MB [ Download ]
-
 K2 favorited Elf Stocking By Modkid
07 Oct 12:01
K2 favorited Elf Stocking By Modkid
07 Oct 12:01
-
 Sally J. favorited Elf Stocking By Modkid
21 Dec 16:03
Sally J. favorited Elf Stocking By Modkid
21 Dec 16:03
-
 Suellen W. favorited Elf Stocking By Modkid
28 Nov 12:02
Suellen W. favorited Elf Stocking By Modkid
28 Nov 12:02
-
 Joy T. favorited Elf Stocking By Modkid
07 Sep 03:11
Joy T. favorited Elf Stocking By Modkid
07 Sep 03:11
-
 Susan M. favorited Elf Stocking By Modkid
02 Oct 21:50
Susan M. favorited Elf Stocking By Modkid
02 Oct 21:50
-
 Rebecca M. favorited Elf Stocking By Modkid
10 Jun 23:01
Rebecca M. favorited Elf Stocking By Modkid
10 Jun 23:01
-
 lleeahs favorited Elf Stocking By Modkid
29 Mar 00:56
lleeahs favorited Elf Stocking By Modkid
29 Mar 00:56
-
 Patty Y. published her project Elf Stocking By Modkid
23 Mar 09:00
Patty Y. published her project Elf Stocking By Modkid
23 Mar 09:00
-
 Step 1
Prepare Pattern Pieces:
• Print all patttern pieces at 100% (no scaling).
• Cut Pattern Pieces A1 through A4 on the outer solid line
(including the shaded areas). Overlap the shaded areas as
indicated on the pattern pieces and tape together to form your
lower “sock” pattern piece, fig. 1. This will be referred to as
Pattern Piece A going forward, fig. 2.
• Cut Pattern Piece B along the outer solid lines only (do NOT
cut along the diagonal dashed lines). -
Step 2
Cut the Fabric Pieces:
• Pattern Piece A (Sock): (2) of fabric #1, (2) of fusible fleece
• Pattern Piece B (Cuff): (4) of fabric #2, trace dashed lines onto the
wrong side of 2 of these pieces only.
• Hanging Loop (no pattern piece): Cut (1) 1.5"wide x 8"long piece -
 Step 3
Assemble:
1. Fuse fleece to the wrong side of each Sock (Pattern Piece A). Quilt your Sock as desired. Place each Sock piece, right sides together and pin, aligning all raw edges. Stitch with a 1/2" seam allowance (along the dashed line) all around the Sock, leaving the top open, fig. 3. Pivot at the toe point. Trim the seam allowance down to a 1/4" and clip into all curves. Turn the Sock right side out and use a blunt tool to get the curly toe nice and pointy, fig. 4. Press around all edges. -
 Step 4
Place the two rectangular Cuff (Pattern Piece B) pieces with the
traced lines, right sides together and stitch along the short sides with
a 1/2" seam allowance, fig. 5. Do the same with the remaining Cuff
pieces, fig. 6. Press seams open. Turn the untraced Cuff piece right
side out. Place inside the traced Cuff piece with right sides together,
fig. 7, and pin along the raw edges, aligning the side seams. Baste
1/4" along the bottom raw edge to keep these pieces from shifting.
You will now be sewing along the lines you traced from the pattern
piece. Trim off the excess fabric below the stitched lines, leaving
about a 1/8" seam allowance, fig. 8. Clip into each top peak as
close as you can without snipping through your stitches and clip
each bottom point. Turn Cuff right side out and push out each
point with a blunt tool. Press entire Cuff well. Topstitch 1/8" along
points. -
 Step 5
Fold the Hanging Loop in the same manner as bias tape. To do
this, fold the loop in half lengthwise, wrong sides together. Open
back up and press each raw edge in toward the center using the
first fold as a guide, fig. 9. Fold entire piece in half encasing the raw
edges. Topstitch along the open edge 1/8", fig. 10. Fold Hanging
Loop in half, as show in fig. 11, pin and baste to the inside of the
sock, aligning raw edges at the back seam. -
 Step 6
Insert Cuff inside the sock with the right side of the Cuff facing
the wrong side of the sock and the Hanging Loop sandwiched in
between, fig. 12. Aligning side seams and raw edges at the top,
pin and stitch with a 1/2" seam allowance all around the opening,
fig. 13. Trim seam allowance down to 1/4". Turn Cuff over to the
right side of the sock and slightly press around the opening, fig. 14.
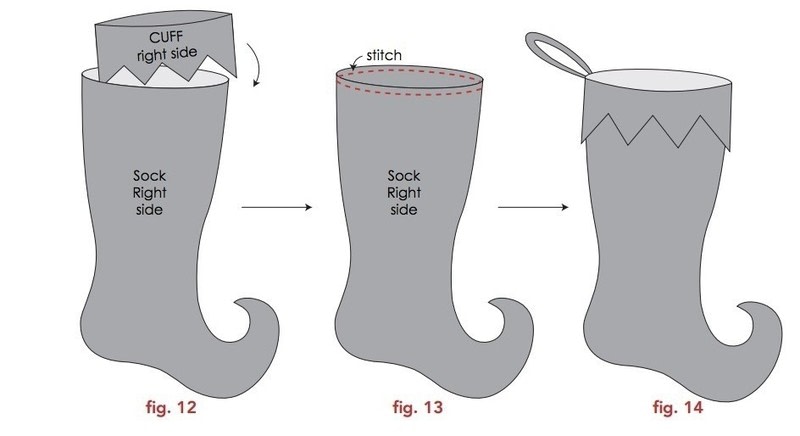
If desired, hand sew decorative ornamentation to each point of the
cuff and the toe. We used miniature jingle bells for our stockings. -
 Step 7
Insert Cuff inside the sock with the right side of the Cuff facing
the wrong side of the sock and the Hanging Loop sandwiched in
between, fig. 12. Aligning side seams and raw edges at the top,
pin and stitch with a 1/2" seam allowance all around the opening,
fig. 13. Trim seam allowance down to 1/4". Turn Cuff over to the
right side of the sock and slightly press around the opening, fig. 14.
If desired, hand sew decorative ornamentation to each point of the
cuff and the toe. We used miniature jingle bells for our stockings. -
 Step 8
Fold the Hanging Loop in the same manner as bias tape. To do
this, fold the loop in half lengthwise, wrong sides together. Open
back up and press each raw edge in toward the center using the
first fold as a guide, fig. 9. Fold entire piece in half encasing the raw
edges. Topstitch along the open edge 1/8", fig. 10. Fold Hanging
Loop in half, as show in fig. 11, pin and baste to the inside of the
sock, aligning raw edges at the back seam. -
 Step 9
Place the two rectangular Cuff (Pattern Piece B) pieces with the
traced lines, right sides together and stitch along the short sides with
a 1/2" seam allowance, fig. 5. Do the same with the remaining Cuff
pieces, fig. 6. Press seams open. Turn the untraced Cuff piece right
side out. Place inside the traced Cuff piece with right sides together,
fig. 7, and pin along the raw edges, aligning the side seams. Baste
1/4" along the bottom raw edge to keep these pieces from shifting.
You will now be sewing along the lines you traced from the pattern
piece. Trim off the excess fabric below the stitched lines, leaving
about a 1/8" seam allowance, fig. 8. Clip into each top peak as
close as you can without snipping through your stitches and clip
each bottom point. Turn Cuff right side out and push out each
point with a blunt tool. Press entire Cuff well. Topstitch 1/8" along
points.