


About
Nice and cozy. I think I'm going to live in this now...
It's as simple as it gets.
A rectangle and a zipper.
I've been wanting to make one for ages and have had a few tries to get it perfect.
Totally cozy and you can alter this with pockets on the inside if you want or make it longer by increasing the width of your cape.
I'm completely in love with mine.
You can use whatever material really.
**I've used a wool blend on the outside with a cotton lining.
If you can't be bothered I make these custom and sell them on etsy :)
-
 mar *ૢ✧ ཻུ۪۪⸙͎ ೫ favorited Easy Peasy Cape Shawl Thing
25 Oct 14:08
mar *ૢ✧ ཻུ۪۪⸙͎ ೫ favorited Easy Peasy Cape Shawl Thing
25 Oct 14:08
-
 drevanhoussen favorited Easy Peasy Cape Shawl Thing
13 May 12:55
drevanhoussen favorited Easy Peasy Cape Shawl Thing
13 May 12:55
-
 Fabi C. favorited Easy Peasy Cape Shawl Thing
26 Jul 05:41
Fabi C. favorited Easy Peasy Cape Shawl Thing
26 Jul 05:41
-
 Kristen P. favorited Easy Peasy Cape Shawl Thing
01 Jul 08:56
Kristen P. favorited Easy Peasy Cape Shawl Thing
01 Jul 08:56
-
 Cinn favorited Easy Peasy Cape Shawl Thing
26 Sep 14:05
Cinn favorited Easy Peasy Cape Shawl Thing
26 Sep 14:05
-
 Emma G. favorited Easy Peasy Cape Shawl Thing
25 Jul 07:18
Emma G. favorited Easy Peasy Cape Shawl Thing
25 Jul 07:18
-
 Flail of the flair entered their project Easy Peasy Cape Shawl Thing to The Ultimate DIY Competition
24 Aug 18:29
Flail of the flair entered their project Easy Peasy Cape Shawl Thing to The Ultimate DIY Competition
24 Aug 18:29
You Will Need
-
 Step 1
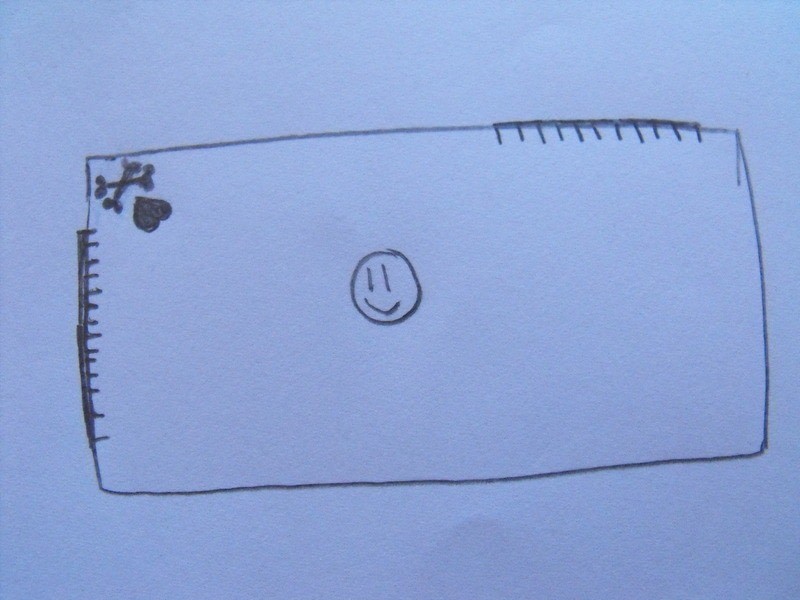
For the purpose of this tutorial.. we have the wrong side of the fabric ( sad face)
and the good side (happy face)
-
 Step 2
Cut out a rectangle of each the fabric and the lining measuring
*54 inches long
**30 inches wide
*I'm fairly average shoulder width (about 42inches around the shoulders), It's a good idea after this step to just pin it and try it on.
**if you want to increase/decrease length of the cape, alter this measurement as suites.
RE: Length.. if you increase/decrease remember change your zipper length.
-
 Step 3
At this step I added my applique.
I recommend using interfacing if you do this step.
my drawing shows teethy things.. see next step.
-
 Step 4
Place your lining and fabric good sides together and pin and place your zipper on your fabric.
Take note of where the bottom of the zipper goes.. This can be a bit tricky which one goes where..
If unsure I basted mine on stitch length 4 to see how it fit etc.
-
 Step 5
Oh yeah with the measurements I used, It was 2 inches from these corners.
-
 Step 6
Sew all the way around leaving approx 4 inch gap.
Turn your garment inside out and sew the hole shut.
TA DA. finished!


Versions


Comments


