About
Make Your Art, And Hang It Too!
Ever look at endless Hoop Art on Pinterest, and wish you could find the time?
Here's an pain-free way to get your fix: FABRIC PAINT!
No skills in Embroidery? No problem! You can still make a classy piece of Hoop Art.
Love to embroider but don't want to spend hours creating outline stitches? Use this technique to speed up the process, and fill in spaces with your desired colors and stitches.
Tags
-
 Chudames entered her project Easy Hoop Art to Ladies Of Letterpress
16 Jun 19:56
Chudames entered her project Easy Hoop Art to Ladies Of Letterpress
16 Jun 19:56
-
 MischievousRaven added Easy Hoop Art to bedroom ideas
18 May 07:59
MischievousRaven added Easy Hoop Art to bedroom ideas
18 May 07:59
-
 Libby W. added Easy Hoop Art to 2 broke girls
18 Apr 06:18
Libby W. added Easy Hoop Art to 2 broke girls
18 Apr 06:18
-
 Anne M. added Easy Hoop Art to iron on transfers
09 Feb 08:24
Anne M. added Easy Hoop Art to iron on transfers
09 Feb 08:24
-
Chudames entered her project Easy Hoop Art to Printic Contest
06 Feb 00:17
-
 Amanda M. favorited Easy Hoop Art
02 Feb 21:40
Amanda M. favorited Easy Hoop Art
02 Feb 21:40
-
 mmotse03 favorited Easy Hoop Art
04 Nov 16:53
mmotse03 favorited Easy Hoop Art
04 Nov 16:53
-
 heather r. added Easy Hoop Art to cross stitch
16 Oct 19:25
heather r. added Easy Hoop Art to cross stitch
16 Oct 19:25
-
 Penny F. added Easy Hoop Art to decorating ideas
11 Oct 12:03
Penny F. added Easy Hoop Art to decorating ideas
11 Oct 12:03
-
 Caitlin C. favorited Easy Hoop Art
21 Sep 06:05
Caitlin C. favorited Easy Hoop Art
21 Sep 06:05
-
 Step 1
Gather your supplies.
Here are some supplies you will need for this project:
- Fabric
- Iron
- Fabric Paint
- Embroidery Hoop
- Fabric Scissors
- Hot Glue Gun, or other fabric glue.
- Iron On Transfer PatternOPTIONAL:
- Embroidery Needle
- Embroidery Floss
- Fusible Interfacing -
 Step 2
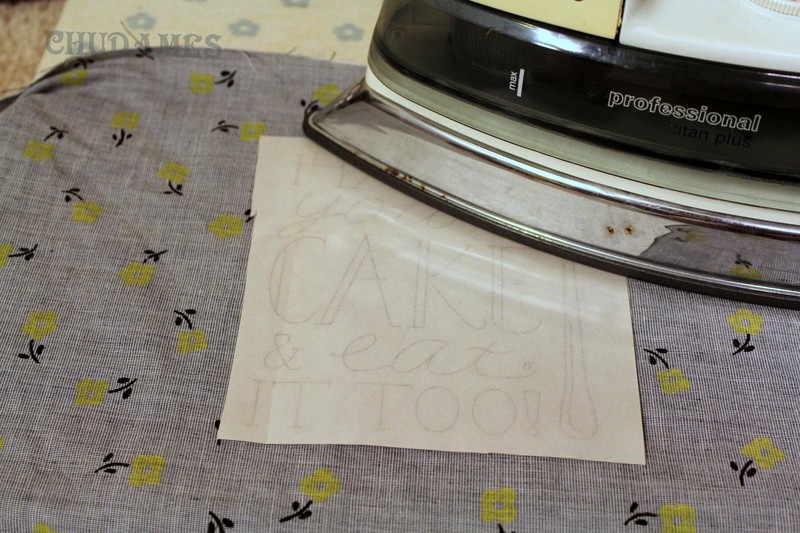
Step #1 - Preparing:
+ Iron your fabric on the wrong side to rid it of wrinkles.
+ If you plan to embroider, or would like to make a flimsy fabric stiff, cut Fusible Interfacing to size, and iron on to the Wrong Side of your fabric to stabilize it.
+ On the Right Side of your fabric, Place your iron-on pattern face down and iron until the design transfers. You may want to pin it down so you do not risk overlapping lines.
The iron-on transfer I used was "Stitcher's Revolution: SR20 Sweet Treats."
- OR - If you have your own design, draw/trace it directly onto the fabric.
-
 Step 3
Step #2 - Decorating
+ Using your desired color of fabric paint, carefully trace your design.
I used Tulip Slick in Black.
+ Let dry completely (preferably overnight to prevent smudging).
-
 Step 4
OPTIONAL - Embroidery:
Once your design is dry, fill in details with your embroidery floss.
You could also do this with another color of fabric paint, or glitter, and allow it to dry overnight.
-
 Step 5
Once your design is completed, readjust it in the hoop making sure your sides are facing the correct direction (some plastic hoops have markings that you will not want showing, such as the hoop size).
Make sure your fabric is taunt, with no wrinkles or dips.Flip over and gently fold in your edges. You may trim some excess flaps off if desired, but do not completely remove all of the fabric. You will need enough to fold in to cover the back of your inner hoop frame, and keep the front taunt.
-
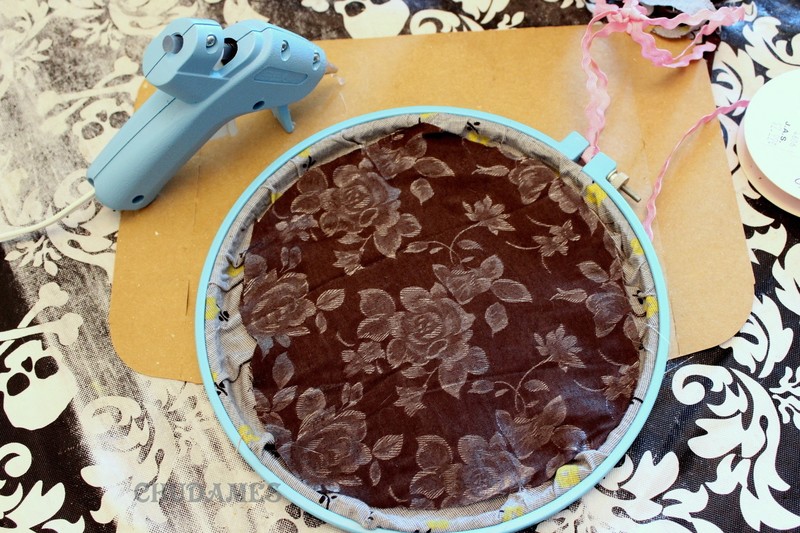
 Step 6
Gently lift your back fabric in sections, and add glue to the inner hoop frame underneath it, then press the fabric back into place. This will keep the fabric from unfolding. keep the front taunt, and keep glue-globs from showing through to the front design of your hoop.
If you embroidered, Trim another piece of fabric (or card stock) to fit inside of the back of your hoop. Glue it in to place along your folded-down excess hoop fabric. This will help hide the stitching.
-
 Step 7
Hang that beauty for all to admire!
I hope you enjoyed this tutorial, and found it helpful.
Leave me a link to your version so I can see your awesome art!
<3 - Ames