


About
A more simple way to add lacing to a shirt - no cutting or grommets required!
For this project I used an old jersey tank that was a rather terrible fit, but the same method could easily be applied to any shirt :]
This is my first tutorial anywhere, ever, I hope it's helpful to some!
Tags
-
 Cristi L. favorited Easi(Er) Laced Up Top
12 Jan 22:21
Cristi L. favorited Easi(Er) Laced Up Top
12 Jan 22:21
-
 AnA W. favorited Easi(Er) Laced Up Top
18 May 09:44
AnA W. favorited Easi(Er) Laced Up Top
18 May 09:44
-
AnA W. added Easi(Er) Laced Up Top to Shirts
17 May 13:34
-
 Katie E. favorited Easi(Er) Laced Up Top
04 Apr 10:00
Katie E. favorited Easi(Er) Laced Up Top
04 Apr 10:00
-
Naomi D. favorited Easi(Er) Laced Up Top
03 Jan 06:54
-
 Rachel B. added Easi(Er) Laced Up Top to DIY and Refashioned Top Ideas
30 Apr 04:05
Rachel B. added Easi(Er) Laced Up Top to DIY and Refashioned Top Ideas
30 Apr 04:05
-
 neimie added Easi(Er) Laced Up Top to Clothes
19 Nov 23:18
neimie added Easi(Er) Laced Up Top to Clothes
19 Nov 23:18
-
 Britty favorited Easi(Er) Laced Up Top
24 Jul 08:55
Britty favorited Easi(Er) Laced Up Top
24 Jul 08:55
-
 Roughwaters44 favorited Easi(Er) Laced Up Top
08 Jul 03:17
Roughwaters44 favorited Easi(Er) Laced Up Top
08 Jul 03:17
-
 leslie.n.hebert favorited Easi(Er) Laced Up Top
14 Jun 12:36
leslie.n.hebert favorited Easi(Er) Laced Up Top
14 Jun 12:36
-
 Step 1
This method works better on a shirt that's just a little too big, but if your garment is WAY too large for your liking, make any adjustments before you begin.
Put your shirt on and mark on each side seam where you want the lacing to finish with a pin. -
 Step 2
Lay the shirt out with the side seams flat and fold a 'lip' in the fabric to the side of the seam, starting at the top (arm hole) of the shirt. Fold the lip flat and pin in place. Not much fabric needs to be folded under, otherwise you'll finish with a too-tight shirt.
-
 Step 3
Continue folding and pinning the lip of fabric all the way to the bottom hem then repeat on the other side of the seam, keeping an equal distance between the two folded lips. As I moved down to the bottom hem, I added more distance between the two but it can be however you like :]
-
 Step 4
Repeat steps 2 & 3 on the other side of your shirt then fold it out to make sure that the folds on each side are even.
-
 Step 5
Stitch down the folds on the outside of the shirt, staying as close to the edge of the fold as possible. (you can see from the picture how good I am at sewing straight lines, don't do what I did!!)
-
 Step 6
When all the folds are sewn, lay out the shirt again with the side seams flat and mark where you want the points for your lacing to pass through. Mine were 2.5cm (1") apart, I find that any larger than this and the lacing makes the fabric bunch but the spacing is up to you.
-
 Step 7
Get your lacing material (ribbon, cord, anything that will fit through your needle) and make a stitch at the top of the shirt, through the littler lip of fabric made when the folds were sewn in step 5. I used approcimately 50cm of cord for each side of my shirt, but the amount will vary on how far your lacing goes. Pull half of the lacing through the stitch, leaving the other half free on the other side.
-
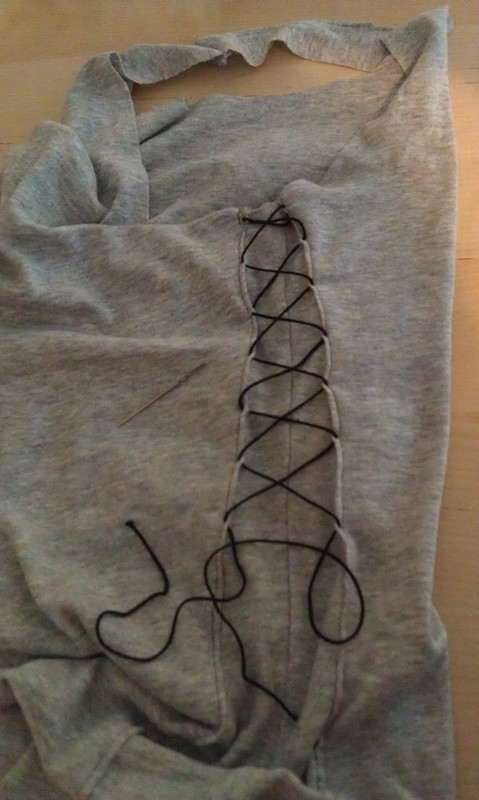
 Step 8
Stitch the lacing through the lip in a criss-cross fashion to every second dot made in step 6.
-
 Step 9
Thread the other end of the lacing through the needle and repeat step 7, completing the criss-cross lacing.
-
 Step 10
Repeat steps 6-9 on the other side then tie up the laces however you like.
-
 Step 11
Enjoy your finished laced-up top :]


Comments

