


About
Tutorial for "Dress" Kitchen Towel
Introduction
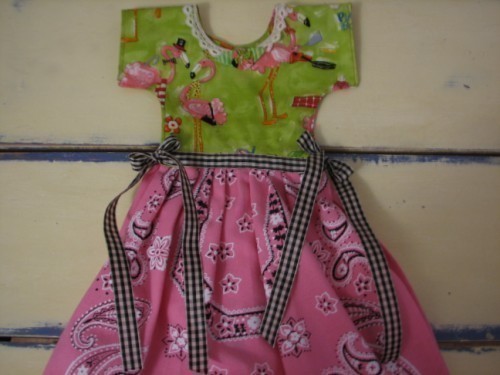
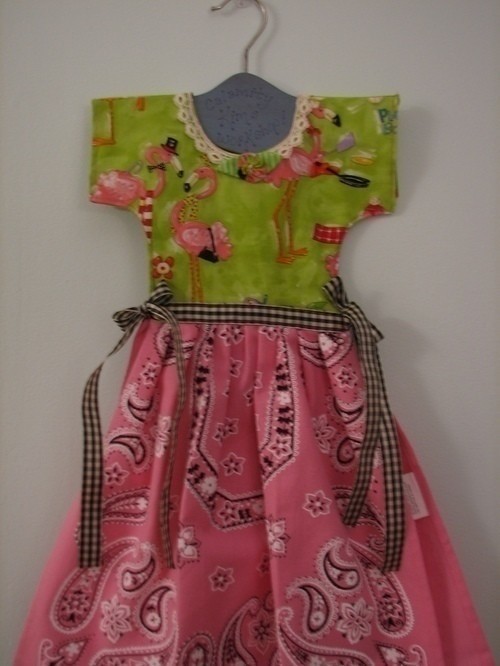
A Tutorial on creating a little dress of a kitchen towel that hangs nicely over your stove handle. This dressed up dish towel is double sided. It could even be made with two totally different sides. Imagine one side for Halloween the other side for Thanksgiving. One side for cupcakes, one side for ice cream! It can be embroidered using vintage transfers or embellished with collage or pictures printed onto fabric from your computer. It's decorative and functional- an easy to make project for a last minute gift.
This project requires less than a half a yard of fabric, one new dish towel, thread, 10-12 inches of lace or rick rack, buttons, or other embellishments like fabric yoyo's. You will also need about 1 1/2 - 2 yards of ribbon for the ties.
Tags
-
 Syreeta H. commented on "Dress" Kitchen Towel
03 Jan 04:25
Syreeta H. commented on "Dress" Kitchen Towel
03 Jan 04:25
-
Syreeta H. favorited "Dress" Kitchen Towel
03 Jan 04:22
-
Kitty S. commented on "Dress" Kitchen Towel
17 Sep 14:35
-
 Linda E. favorited "Dress" Kitchen Towel
29 Apr 20:39
Linda E. favorited "Dress" Kitchen Towel
29 Apr 20:39
-
renfro13 favorited "Dress" Kitchen Towel
23 Nov 09:54
-
 Key West Witch favorited "Dress" Kitchen Towel
06 May 01:42
Key West Witch favorited "Dress" Kitchen Towel
06 May 01:42
-
 Sandy M. favorited "Dress" Kitchen Towel
05 May 17:56
Sandy M. favorited "Dress" Kitchen Towel
05 May 17:56
-
 Sue V. favorited "Dress" Kitchen Towel
28 Dec 23:03
Sue V. favorited "Dress" Kitchen Towel
28 Dec 23:03
-
 Diane R. favorited "Dress" Kitchen Towel
20 Oct 22:50
Diane R. favorited "Dress" Kitchen Towel
20 Oct 22:50
-
 Deb W. favorited "Dress" Kitchen Towel
20 Apr 01:08
Deb W. favorited "Dress" Kitchen Towel
20 Apr 01:08
-
 Step 1
This project can be designed in many different themes. It is double-sided and each side could be made differently. You could also modify it to be reversible. Once you make one or two then the possibilities are endless. You may copy this pattern for your own personal use but please don't resell it. You may make the towels and sell them but if you use my pattern, then please give me credit.
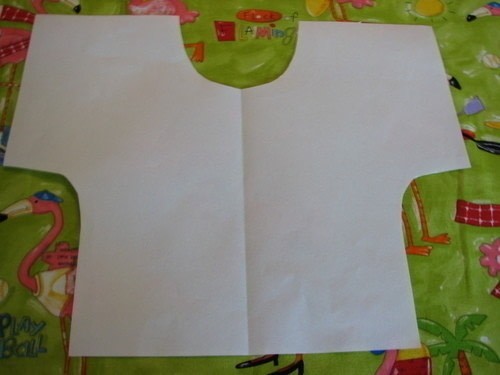
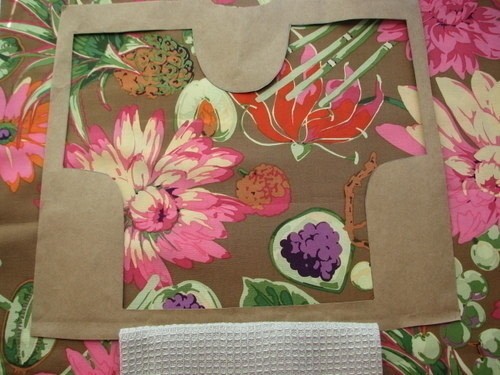
After printing out my PDF Pattern (located on my sidebar on the blog) cut it out. It already has a 1/4 inch seam allowance added to the pattern. Trace around the cut out pattern on to a larger piece of paper. I like to use a brown paper bag from the grocery store. This will give you a window to decide which section of fabric to cut your dress from. In quilting this is called "fussy cutting".
Usually I fold the fabric in half and after placing window around and finding the design I like best I put the pattern back into the cutout section then lift off the window. Then I just hold it down and cut around it.
This will allow you to cut two pieces at once. You may want to use a micropen and trace a cutting line.
You could also cut the pattern several times from freezer paper and iron it on and then cut it out. -
 Step 2
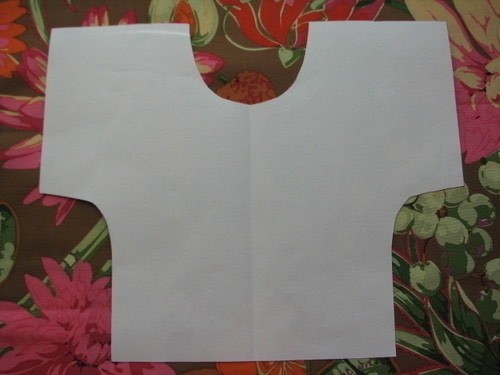
Using the "window" or negative of the pattern helps to see the design you will have when the dress is cut out. You can move it all around till you see what you like. It is often better to have the designs off set instead of smack in the center. Your eye should wander around the design and rest in the blank spaces.
-
 Step 3
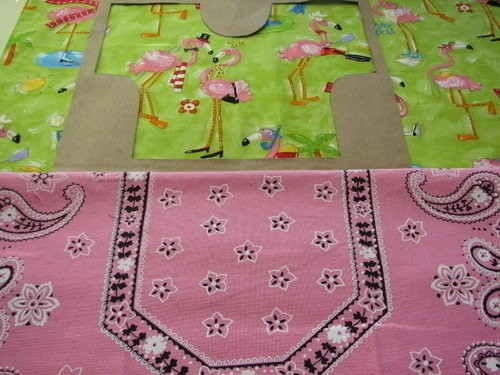
To begin your project pick out color coordinated dish towels and theme fabrics. For this example I used a Martha Negley for Rowan & Westminster and a sage green dish towel and a Nancy Wolff fabric with flamingos and a bandana linen towel by Martha Stewart for Kmart. This is a great project for repurposing those old linen dishtowels or secondhand linen dresses. I have used chenille and embroidered tea towels and denim and flannel for the "dress" part. This is so easy you might want to make one for every season to or to match your kitchen or bath or as a gift to your favorite chef, hairdresser or dog washer!!
-
 Step 4
You will need two sets of the dress section. I cut out two at a time with the fabric folded in half with the wrong sides together. Once I pick a design I like then I just cut and don't really mind what the bottom fabric looks like. You will only see two sides not all four. Although you could probably make this pattern reversable if you wanted to.
-
 Step 5
Once you decide on a view then place the cut out (or positive) of the pattern back in the empty hole and then lift off the (brown paper) window. Either trace around and cut fabric or just hold and cut. You will need to do this twice. Less than a half yard of fabric is required. [You could use groovy old pillowcases too!]
-
 Step 6
This is for a friend of mine who collects flamingos and just painted her kitchen and used pink bandanna fabric for curtains.
-
 Step 7
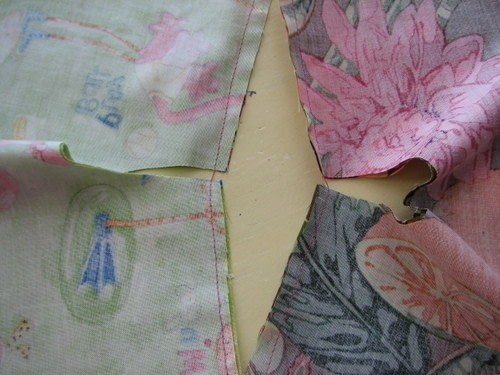
Iron to remove wrinkles and place a fold line down center. Open and lay ruler on the crease line and cut with rotary cutter(using a self healing mat below) or just cut in half with scissors if you don't have a rotary cutter and mat.
-
 Step 8
When you iron the crease in the center it helps guide your cut.
-
 Step 9
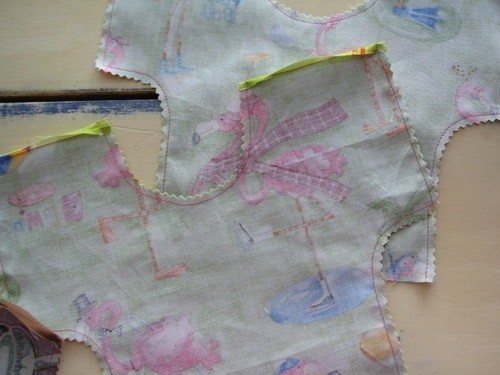
If you are working on several pieces then it is easy to sew them one after another to waste less thread. After you have sewn shoulder seams together then iron seam open.
-
 Step 10
Sew top of shoulder together.
I sew both sides then clip them apart. It helps to save a little thread. -
 Step 11
Leave the bottom open. Sew using a 1/4 inch seam allowance. After sewing press with iron then trim with pinking shears or clip into curves; trim corners on the diagonal to make sharp corners. Turn right-side out and use a chopstick or sharpened dowel to push out corners to make nice and square. Press again. Turn under raw edge at the bottom 1/4 inch and press to crease and hold.
-
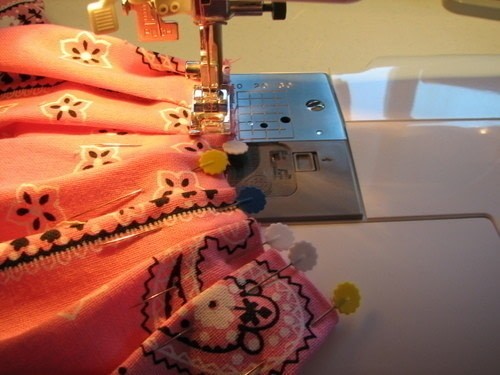
 Step 12
This is one design element that gives you several options. The towel will need to be gathered to fit into the dress opening. I have machine gathered it , by stitching two straight lines using a wide stitch length then pulling the end threads to gather. I also just eyeball it and make pleats and pin then sew a basting stitch close to edge to hold. The raw edge will be on the inside of dress bottom and then a ribbon will be sewn on top of that.
-
 Step 13
Decide which gathering technique is best for your dress and then run over to the sewing machine and do a basting stitch no wider than 1/4 inch. I remove the pins as I go, after breaking enough needles I don't even try to sew over them anymore.
-
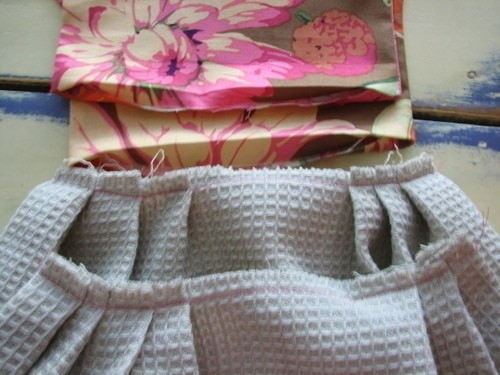
 Step 14
This shows fewer pleats evenly spaced on sides with center smooth.
-
 Step 15
The width of the towel needs to be just slightly smaller than the opening at bottom of dress.
-
 Step 16
You're halfway finished!! Yippee!!
-
 Step 17
After you have basted edge of towel insert it into dress and pin.
-
 Step 18
Check the back before you start to sew to make sure towel is inside between the layers of the dress. Stitch down. Check back again. It is a good idea to stitch this twice so that any small rug rats pulling on the towel after it's hanging on the stove handle won't rip it apart. Or maybe there is a "bad dog" at your house, like my Mom's poodle who likes to ... oh sorry, that's a sock story.
-
 Step 19
Sew 1/4 inch seam at shoulders then press open. A bit of lace or rickrack will be added along edge of neck.
-
 Step 20
I like to iron everything after each step to keep it nice and flat.
-
 Step 21
You can hand sew this or machine stitch. You could use a bias tape or just embroider a decorative stitch also. You're only limited by your own imagination.
-
 Step 22
Here again is another opportunity for you to get creative! You can use any trim you choose: lace, rickrack, prairie points, yoyo's, beads. I save small scraps and sew them down on a ribbon and then give it a tea-dye and a bit of dog brushing and it ravels just a bit for a shabby look. Have fun with it or opt for the simple plain amish look and use no trim. Whatever.
-
 Step 23
Audition different things at front neckline to see which you like best. You could even sew a small pocket for a fancy teabag to fit in. Or you could make a bib like an apron and go back a few steps and add to dress top before inserting towel.
-
 Step 24
The final element is the ribbon tie. Choose something that contrasts nicely. Any ribbon: Grosgrain, striped, printed, sheer, gingham, swiss dot or any material that you choose for the ties. They need to be long enough to make a nice bow after the dress is hung over handle on stove or bathroom towel bar. If using something that ravels, I often use a candle or lighter to just melt the ends, lightly, so that it stops raveling.
-
 Step 25
Ta Da!!! I hope you enjoyed this little Calamity Kim Workshop. Please email or use the comment area for any questions. Happy Sewing!!


by clicking the "Pleasch check out my website" button