

About
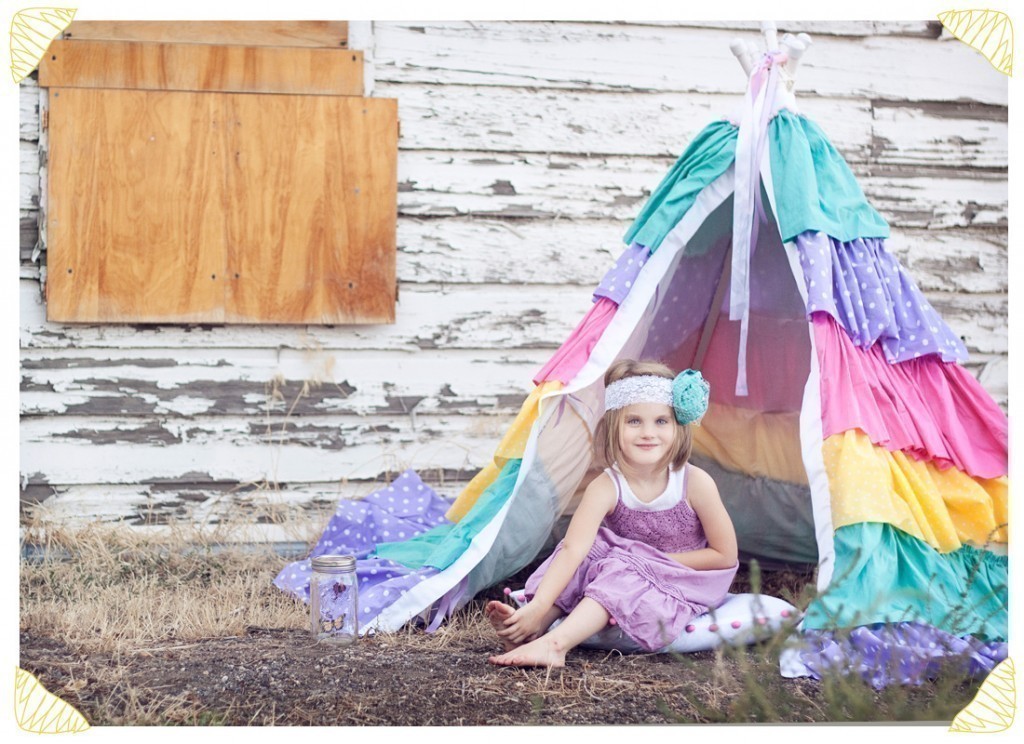
Sew a Dreamy Teepee
I love love love over the top dramatic things... um, well except for when my two year old goes that way, although sometimes that can be funny. But, when it comes to photo shoots and said two year old's room the more over the top the better. I have been wanting one of the ruffle teepees that I have seen online and in gorgeous boutiques for a while but had yet to find one for under 200 dollars. Since I don't have that kind of mola, I decided I would have to try making my own. While it isn't "difficult" per-say it is time consuming, and a bit of an exercise trying to harangue all that fabric while sewing ha! The secret to keeping this affordable is sheets. Yup, sheets. All of the ruffles you see before you were once a flat bed sheet from Pottery Barn. I bought mine in a factory reject store, but you can use any sheets. As I mentioned before this is not technically advanced sewing but it does take a good chunk of time to do. It is a hefty amount of gather stitching with a lot of pinning and re-pinning. If you are up for it lets make a Dreamy Teepee!
-
 Key West Witch added Dreamy Teepee Tutorial to DIY Home Projects
29 Jun 15:26
Key West Witch added Dreamy Teepee Tutorial to DIY Home Projects
29 Jun 15:26
-
Key West Witch added Dreamy Teepee Tutorial to Crafts General
20 Mar 21:38
-
 Harmonee.seal added Dreamy Teepee Tutorial to Gardening Fun
09 Jul 23:06
Harmonee.seal added Dreamy Teepee Tutorial to Gardening Fun
09 Jul 23:06
-
Harmonee.seal favorited Dreamy Teepee Tutorial
09 Jul 23:05
-
 Sarah C. favorited Dreamy Teepee Tutorial
20 Jun 03:23
Sarah C. favorited Dreamy Teepee Tutorial
20 Jun 03:23
-
 Writing M. added Dreamy Teepee Tutorial to Summer Party
19 May 13:48
Writing M. added Dreamy Teepee Tutorial to Summer Party
19 May 13:48
-
 Sarah-louise R. favorited Dreamy Teepee Tutorial
19 Sep 22:30
Sarah-louise R. favorited Dreamy Teepee Tutorial
19 Sep 22:30
-
 distel d. favorited Dreamy Teepee Tutorial
28 Apr 17:37
distel d. favorited Dreamy Teepee Tutorial
28 Apr 17:37
-
 xcreepylicious favorited Dreamy Teepee Tutorial
24 Jan 20:23
xcreepylicious favorited Dreamy Teepee Tutorial
24 Jan 20:23
-
Danette C. favorited Dreamy Teepee Tutorial
30 Nov 21:03
You Will Need
-
 Step 1
There are several great tutorials out there on how to make a plain 'ole teepee and the choice is totally yours. Originally I planned on actually cutting several triangles and sewing them together but then I was concerned about how the square bottom would be with the ruffles. In the end I made my Teepee a lot like Meg's on Sew, Mama, Sew. This used the least fabric and was super quick and easy. I used two twin sheets sewn together and ended up with a bunch of extra fabric. Once you have your "half circle" cut out is where I deviate from that tutorial. I had previously cut all my sheets into as long of strips as possible. I wanted my ruffles to be wide so that I didn't have too many tiers (not that I don't think this could be adorable, I would love to see one with 20 tiers I would just pull my hair out doing it). Once cut I laid made a long chain by sewing them all together. I would match up two ends, right sides together, sew down the edge then open them up and repeat the process on the new end until I had a looooong snake of fabric. After this process I did a gathering stitch all along the very long top. I did sew with one hand while holding the thread a bit taught as seen in this ruffling tutorial. I wanted it to REALLY be noticeably ruffled and the machine needed a little help with this. I did NOT hem the bottom. You totally can and maybe one day I will regret this decision AND if I were selling these I totally would. But since it will mainly be used as a photo prop and toy I really like the frayed unfinished look, plus it probably saved me a good hour of monotonous sewing.
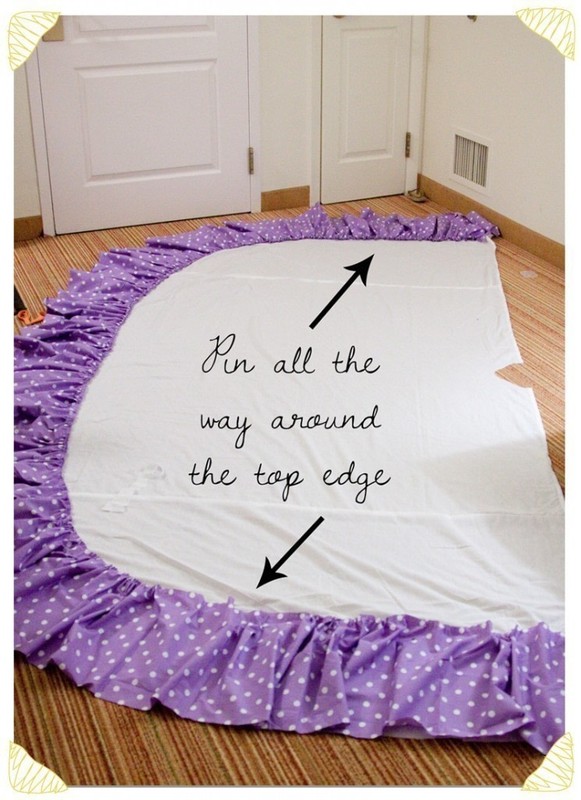
Once all your ruffle tiers are prepped, lay out your teepee half circle on the floor.
-
 Step 2
Letting the bottom of the ruffle overhang the bottom of your teepee slightly pin your gathered edge to your half circle alllllll the way around, following the curve. Do NOT skimp on the pins, it is near impossible to keep this straight otherwise. Once you reach the end reposition your "ruffling" and cut off the extra to be used at a later tier or for making embellishments :) With the ruffle well pinned head over to your sewing machine. Now topstitch the ruffle into place. It can be tricky managing so much material in a small space. I pulled an extra chair right next to me so I could rest the extra fabric there and not have it hanging down pulling on the stitches as I went. Once you are done head back to your floor and spread it out. Remove all the pins (this can take a while but make sure you get them all). Grab your next tier. Again pin the gathered edge to the half circle only this time the bottom edge should over lap by at least 2 inches with your bottom ruffle.
-
 Step 3
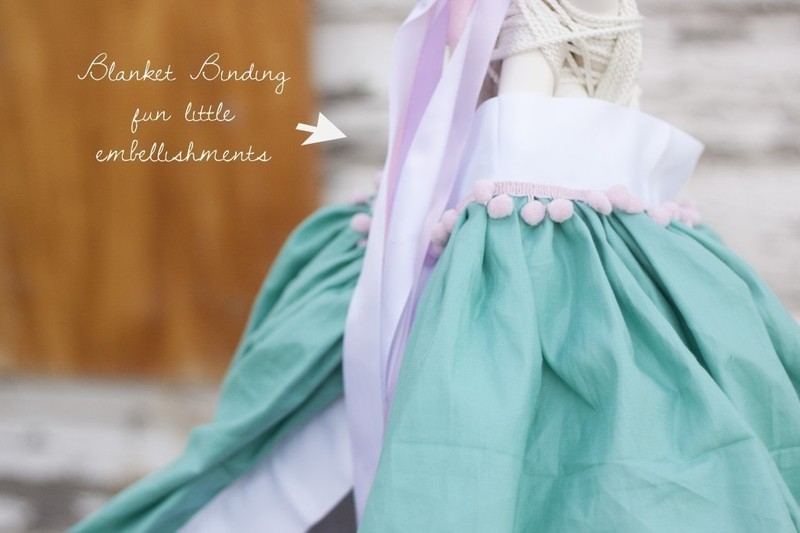
Again pin all the way around, remove excess then topstitch. Continue this process until you are right up next to your semi-circle at the top. You should have a very heavy, somewhat awkward teepee cover. I guess you could finish off the semi circle and call it done but I think this next part really adds a professional looking touch. Using pins, pin down the ruffles at the opening edge so that they stay nice and in place. Do this about 2 inches in from the edge. Now take your quilters binding and starting at the bottom of one side, slide it over the ruffles (it is already nice and folded for your) and topstitch it in place, going up one side, around the small semi-circle and down the other side. If you prefer you can stop at the top, cut the binding, sew a second piece down the other side then finish it off with a third piece around the semi-circle top. It is totally up to you. I then sewed on some fun puff ball embellishments, though I think a over sized ricrac would be pretty darn cute as well.
-
 Step 4
This gives it a nice clean edge and a great place to sew the ties for keep it together. In keeping with my "unfinished" look I sewed ripped strips of fabric one across from the other to tie the top of the teepee. I ended up sewing 6 strips so that I could tie three knots but again this is up to you. I then grabbed some ribbon and on the inside of the quilters binding, every 8 inches or so sewed some ribbon used to tie the edge to one of the PVC pipes.
-
 Step 5
I finished off the look with a giant oversized fabric rosette with birdcage netting over it. If I hadn't been pressed for time this is the part I would have gone hog wild on with lots of rosettes and ribbon etc. I also had fun making the massive, over the top rosette head band and butterflies in a jar.


Comments

