


About
Draw a Fashion Figure Lady
Draw a basic stylized fashion figure for all your fashion design needs!
Tags
-
 Naida H. commented on Draw A Basic Standing Lady
10 Sep 19:34
Naida H. commented on Draw A Basic Standing Lady
10 Sep 19:34
-
 Charyawn221 commented on Draw A Basic Standing Lady
07 Aug 21:08
Charyawn221 commented on Draw A Basic Standing Lady
07 Aug 21:08
-
 Amanda P. added Draw A Basic Standing Lady to Drawing Tutorials
17 Jun 21:38
Amanda P. added Draw A Basic Standing Lady to Drawing Tutorials
17 Jun 21:38
-
 Shelly S. favorited Draw A Basic Standing Lady
07 Mar 01:30
Shelly S. favorited Draw A Basic Standing Lady
07 Mar 01:30
-
Sandy J. favorited Draw A Basic Standing Lady
20 Sep 07:55
-
May L. added Draw A Basic Standing Lady to Drawing
13 Jul 09:50
-
 Allen P. favorited Draw A Basic Standing Lady
24 Jun 10:18
Allen P. favorited Draw A Basic Standing Lady
24 Jun 10:18
-
Deepak J. favorited Draw A Basic Standing Lady
22 Jun 10:02
-
Deepak J. commented on Draw A Basic Standing Lady
22 Jun 09:40
-
Deepak J. commented on Draw A Basic Standing Lady
22 Jun 09:40
You Will Need
-
 Step 1
First, we need some guidelines. Draw 8 sections equal in length.
-
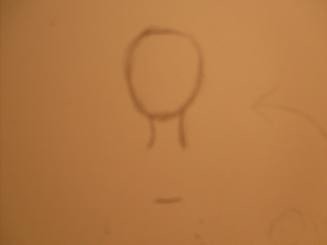
 Step 2
Draw an oval that takes up one section of the eight. The oval should be slightly longer than it is wide. Next draw two lines for a neck. The lines should be slightly curved inward. They should extend to the middle of the second section. This isnt exactly anatomically correct, but what we're drawing is stylized.
-
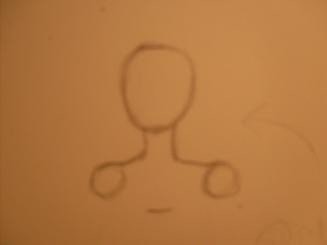
 Step 3
Draw two circles for the shoulders. The figure is turned slightly, so the circle on the right should be a bit farther than aligned with the right side of the head. The left circle should be aligned with the left side of the head.
-
 Step 4
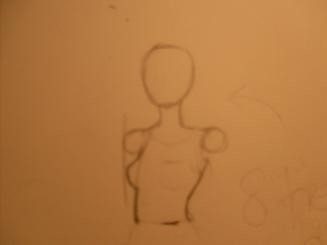
Extend the curve of the left circle to about the same distance as the edge of the circle. Curce back in, but stop at halfway through the circle. I hope that wasnt to confusing.
-
 Step 5
Bring the line down in a gentle outward curve to the end of the third section. Now draw a curving line from the left edge of the right circle. Start the curve as an outward curve, and then change it to an inward curve.
-
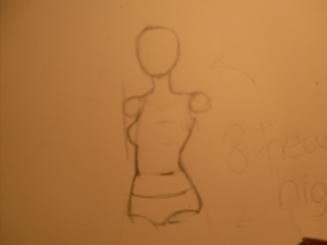
 Step 6
Now draw outward curving lines that extend to half of the next section. You can make the tummy wider or thinner, whatever. This ones about as wide as the widest part of the upper chest, not including the shoulders. Coolio! Now you're done with the torso.
-
 Step 7
Extend the lines of the tummy down to just above the end of this section. Curve inward on the right side for the butt. You can add some underwear-shaped guidelines to help place the legs. The crotch should reach the end of the fourth section.
-
 Step 8
Time for the legs! Fashion drawing legs are long, so make the thighs extend one and a half sections. If you're drawing a longer skirt, you dont have to worry about making the legs perfect. Keep the left edges of the thighs straighter and curve the right sides toward the right a bit.
-
 Step 9
O.K. Time for the bottom part of the legs. Femur? Anyway, draw some long ovals at the bottom of the thighs. those are the knees. draw some long ovals that go a bit longer than the halfway through the very last section. Now alter the shape of the legs. Curve the inner sides of the legs, making the peaks of the curves on the higher side.
-
 Step 10
Dang! I forgot to photo the feet before I put shoes on them. Well, you only need the basic shape if you're putting shoes on. Put a circle slightly to the right of the end of the left leg. That is the heel. I'm putting her in some really high heels, so the balls of her feet are almost directly under the heels. Now connect the lines of the legs to the heels and balls of the feet. On the right leg, draw the heel right underneith the end of the leg. We'll have this leg facing forward, so the ball of this foot is going to be right under the heel. When you connect the lines in this one, make both sides curve to the right, in sort of a macaroni shape, as shown. Now you can add shoes if you want to, or save them until you have the outfit down at the end.
-
 Step 11
Legs are done!
Arm time.
To save space I did a few small steps in one picture. Dont get scared though!
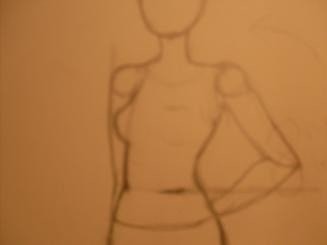
We'll put the right (our right) arm on her hip. Classic fashion pose, right? The hand is kind of hard to get right in this pose, so if you want to make the arm hang straight down, go for it!
Allright. Draw a long diagonal shape for the upper arm, extending from the shoulder circle. You might want to draw some stick figure lines first to make sure you get the angle right. Each section of the arm should be a little longer than one section. Draw the forearm connecting the the edge of the hip. Make the bottom edge of the forearm in an even, very gentle curve. Draw a small curve on the inside edge of the arm, that flattens out as it reaches the hip (As shown).
For the left arm, just draw a gently curving line that disappears behind the body at the hip. -
 Step 12
Okay my camera gets blurry close up so i outlined the basic hand shape in green.
-
 Step 13
When you drew the basic shapes for the hand, the two small shapes are the pointer and thumb. The long section account for the last three fingers. Just draw long curving shapes for the fingers.
-
 Step 14
Woah! We're done with the body!
Wasn't so hard.. Wasn't it??
Hopefully not.
Okay so now its time for the face. I could go on for a whole How-to on how to draw a face, so I'll leave it up to your and your creativity. Keep in mind, however, that the eyes should go in the middle of the head. The nose should go in the middle of the distance between the eyes and the bottom of the face. The mouth, halfway the distance from the nose to the bottom of the face. Add your own hairstyle to suit the style of clothes you're going to put on her. Make sure that you draw the shape of the hair and dont just draw individual strands. -
 Step 15
Now for the best part! Design your own outfit or draw one of your favorites. The outfit I drew is from www.modcloth.com. Depending on how tight your clothing is, draw the outline of the clothes a bit larger than the outline of the body (see how I did the skirt?).
Fashion drawings generally dont have a lot of wrinkles in them, so I wont get into that. I accidently reversed this photo so its in a different direction than the others but it doesnt really make a difference so oh well.If you're wondering why This one is darker than the other's its because I outlined the drawing in pen. This will help erasing unwanted lines a lot easier. Once you've gone over the lines you want to keep, just run the eraser over the whole drawing.
-
 Step 16
You can color, shade, and finish it any way you like. Comment any questions or concerns! I really hope it was helpful, and let me know how I can improve if it wasnt.


Versions


Comments


