


About
domo, kitty, felt, doll, kawaii, cute, plush, stuffed animal, soft
This tutorial is inspired by the famous and recently introduced DOMO KITTY. As we all know, Domo Kitty is a very rare item being made once and sold on ebay for a tremendous amount. Because of its high demand, I planned to make my own version using felt and want to share it with you guys. These Domo Kitty doesn't cost a lot to make. I include a pattern, which you can download (note: the pattern can be use to scale however, a small domo kitty could be only made from it. However, it can be rescale.)
The Domo Kitty needs patient to make. (It took me 45 minutes to make it maybe because I was taking pictures too.) Anyways, but the result was worth it.
Note: I forgot to add a template for hello kitty's whiskers and nose, but its easy to make just cut thin strips of black felt and small yellow circle for the nose.
Tags
Downloads
- DomoPattern.jpg 67.1 KB [ Download ]
- Bow.jpg 578 KB [ Download ]
- Bow.jpg 578 KB [ Download ]
- Missing file
-
 Siru N. favorited Domo Kitty Felt Doll
06 Dec 20:00
Siru N. favorited Domo Kitty Felt Doll
06 Dec 20:00
-
 MOTOX favorited Domo Kitty Felt Doll
23 Oct 13:34
MOTOX favorited Domo Kitty Felt Doll
23 Oct 13:34
You Will Need
-
 Step 1
First, download the attached templates and print it or if you are environment friendly, you can view it and draw it with your hands.
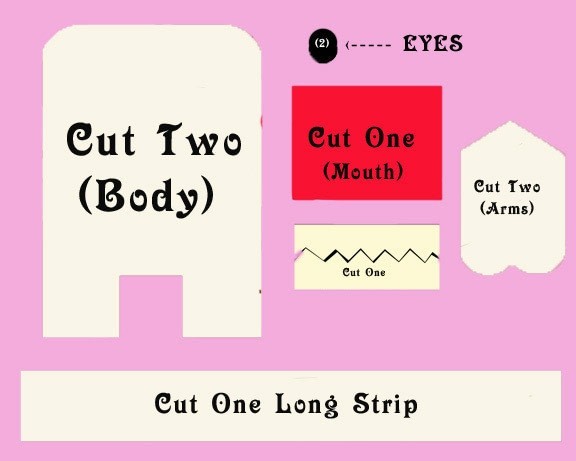
The template notes how many you should cut.
NOTE: as mentioned above, I forgot to put the nose and whiskers but its easy to make without a template.
-
 Step 2
Gather your materials, which includes felt, thread, scissors and etc.
-
 Step 3
Cut your template and place it over the felt (The color of the felt is described by the template already). Put a pin on the template and felt to secure the template position. After you finish positioning the template, cut it and lay it on a flat surface.
You should end up having 1 long stip, 2 bodies, 2 arms, One mouth, 2 teeth, 6 whiskers, 1 nose, 2 eyes, 1 bow and a strip for the bow.
-
 Step 4
Since the body is the biggest part and the longest part to make, you should do it first. To build the body, you have to stitch the long strip to the side of the body and do an whip stitch. Continue to stitch the whole sides.
-
 Step 5
After you finish stitching the sides, add the second body on top and stitch it the same like you've done in step 4. However, this time, you should leave an opening for the stuffing.
-
 Step 6
I left the bottom part open and put the stuffings inside. Before stitching and completing the body, make sure no stuffing is sticking out and also make sure that there's enough stuffings. After filling the body, stitch to close the opening.
-
 Step 7
Next is to make the arms. Whip Stitch the arms first until you reached the middle. Then add the stuffing and push the stuffing inside using a toothpick or skewer (anything that is thin is okay). After the arms has been filled up, whip stitch the remaining.
-
 Step 8
Whip stitch the arms to the body. Make sure that both arms are even.
-
 Step 9
Now the body is done, let's now focus our attention in details. For the bow, Fold the bow in four folds and insert the needle and thread in the middle of the bow and pull the thread.
-
 Step 10
After pulling the thread, make the thread go around the middle to form the shape of the bow. Stitch the end after going around for four times or more.
-
 Step 11
Lastly, take your goop glue (a craft glue that adheres fabrics very well) or glue gun and glue the eyes, whiskers, mouth, teeth and bow. Make sure that the parts are on their proper position.
Also, another way of doing this is stitching the parts. This may take a while but for sure the parts will be adhered very well. In doing this, you should stitched the parts first into the body before attaching to its base.


Comments

