


About
Super easy and a very good way to use up fabric scraps.
I am feeling very smug that I didn’t buy the fabric button kits from Tang Hua Seng .
-
 Step 1
Find something round to use as a template . Trace and cut out so that the hole remains intact.
-
 Step 2
Use the pattern with the hole as a viewfinder.
-
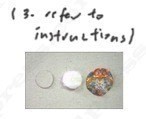
 Step 3
Now place the button into the hole, remove the pattern and draw a circle about 1 cms away from the circumference. Use the button to make exact size patterns on a piece of thick cardboard and polyester batting.
-
 Step 4
Sew around the fabric scrap, about 1/2 cms away from the edges. Do not secure the last stitch and leave the needle threaded.
-
 Step 5
Put the batting inside the back side of the fabric scrap, top it with the cardboard piece, and pull . It should look like a bottle cap.
-
 Step 6
Secure by sewing zigzag all around. ( This is the tricky part as to whether the button will turn out round or not. )
-
 Step 7
Ta-ta !
-
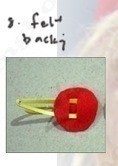
 Step 8
Now place the newly sewn button on top of some felt. Trace and cut out. Fold the felt in half, and make 2 snips vertically. This will become a slot to put the hair clip in.
-
 Step 9
Glue the button onto the clip.


i cant wait to try it out!