About
Rewarding and easy project to make the perfect gift, or treat for yourself!
I know you've seen these before, but you've probably not guessed just how fast and easy these would be to put together am I right? Well they are! Just a few little household supplies and some hot glue and you'll have them put together in no time flat.
Here's what you'll need:
-
 Key West Witch favorited Diy: Mason Jar Pin Cushions
04 Aug 08:51
Key West Witch favorited Diy: Mason Jar Pin Cushions
04 Aug 08:51
-
 Pimke added Diy: Mason Jar Pin Cushions to Nähmuster
01 Feb 09:49
Pimke added Diy: Mason Jar Pin Cushions to Nähmuster
01 Feb 09:49
-
 Rebecca M. favorited Diy: Mason Jar Pin Cushions
05 Jan 16:43
Rebecca M. favorited Diy: Mason Jar Pin Cushions
05 Jan 16:43
-
 sharplittlebyrd favorited Diy: Mason Jar Pin Cushions
01 Jun 00:44
sharplittlebyrd favorited Diy: Mason Jar Pin Cushions
01 Jun 00:44
-
 mariatsi favorited Diy: Mason Jar Pin Cushions
20 Mar 00:03
mariatsi favorited Diy: Mason Jar Pin Cushions
20 Mar 00:03
-
 LaAlex added Diy: Mason Jar Pin Cushions to Gift Ideas
25 Feb 02:12
LaAlex added Diy: Mason Jar Pin Cushions to Gift Ideas
25 Feb 02:12
-
LaAlex favorited Diy: Mason Jar Pin Cushions
25 Feb 02:11
-
 Roughwaters44 favorited Diy: Mason Jar Pin Cushions
24 Feb 04:38
Roughwaters44 favorited Diy: Mason Jar Pin Cushions
24 Feb 04:38
-
 Megan S. favorited Diy: Mason Jar Pin Cushions
26 Jan 16:28
Megan S. favorited Diy: Mason Jar Pin Cushions
26 Jan 16:28
-
 komomo favorited Diy: Mason Jar Pin Cushions
23 Nov 18:59
komomo favorited Diy: Mason Jar Pin Cushions
23 Nov 18:59
-
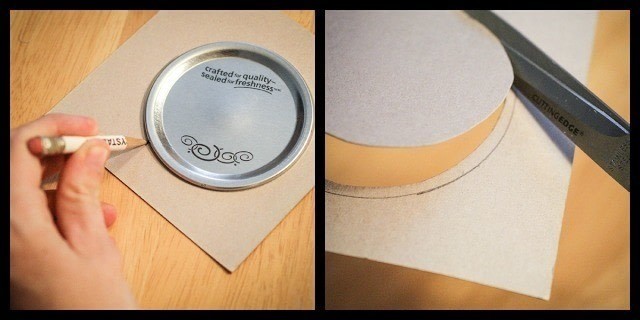
 Step 1
Step #1. Trace the metal lid onto the piece of cardstock, then cut it out about 1/8th of an inch inside your traced line.
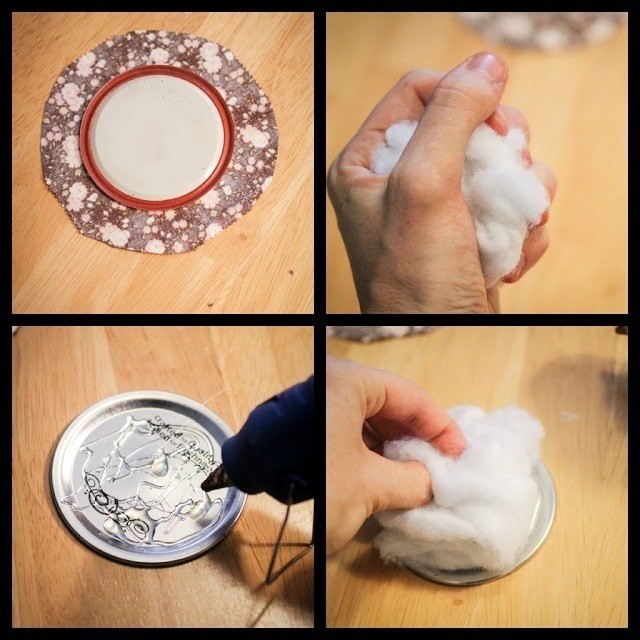
Spread a little hot glue on the top of your metal lid and press your fist-full of batting onto the lid. -
 Step 2
Now trace the metal lid again but onto the back of your fabric scraps leaning about 1 inch of space all the way around. Now start lumping the batting into your fist until you have a good fist-full and cut it off.
-
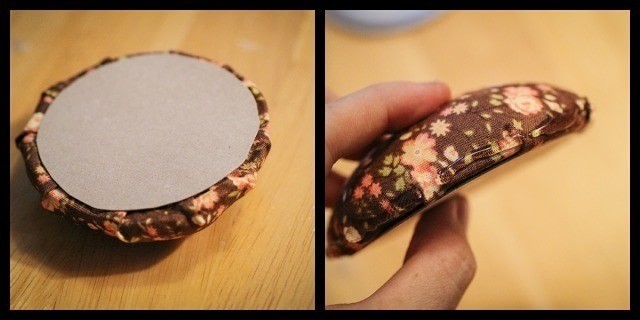
 Step 3
Turn in upside-down onto the back of your fabric circle, press down, and begin gluing your fabric to the underside of the lid (where the rim meets the lip of the jar). Work your way around the whole metal lid, securing the fabric as best you can with the hot glue while trying to avoid too much bulk.
-
 Step 4
You want your lip to seal be able to fit back on! :) Use the cardboard circle now to cover up the raw fabric edge. again make sure that your piece will fit inside the rim of the jar and not ad more bulk when you try to screw it back on. At this point you can eeither glue around the edge of your fabric, or the edge of the metal rim, but as soon as you do you'll want to screw it on hard and fast before the glue dries.
-
Step 5
And Voilà you're done!! Now just make sure your lid comes on and off, and you have a cute and functional container that you can fill with whatever sewing or craft supplies you want! Or of course you could fill it with M&Ms, but who's ever done that?? haha