About
Egg Decoration
Looking for a fun and new Easter egg decoration idea? Check out this tutorial and you'll see how easily you can emboss eggs with easily available materials.
Tags
-
 C.J. M. added Diy Gold Embossed Eggs to Art
20 Apr 13:33
C.J. M. added Diy Gold Embossed Eggs to Art
20 Apr 13:33
-
C.J. M. favorited Diy Gold Embossed Eggs
17 Apr 18:36
-
 VillainousNinja added Diy Gold Embossed Eggs to Make this
12 Oct 22:41
VillainousNinja added Diy Gold Embossed Eggs to Make this
12 Oct 22:41
-
Lex R. favorited Diy Gold Embossed Eggs
23 Mar 21:24
-
Maya E. favorited Diy Gold Embossed Eggs
14 Mar 22:03
-
 Penny F. added Diy Gold Embossed Eggs to COSTUME ideas!
27 Apr 10:43
Penny F. added Diy Gold Embossed Eggs to COSTUME ideas!
27 Apr 10:43
-
 miss m. added Diy Gold Embossed Eggs to pink list
03 Apr 17:36
miss m. added Diy Gold Embossed Eggs to pink list
03 Apr 17:36
-
miss m. favorited Diy Gold Embossed Eggs
03 Apr 17:36
-
 craftylilred favorited Diy Gold Embossed Eggs
26 Mar 16:07
craftylilred favorited Diy Gold Embossed Eggs
26 Mar 16:07
-
 Leah. favorited Diy Gold Embossed Eggs
15 Mar 11:48
Leah. favorited Diy Gold Embossed Eggs
15 Mar 11:48
-
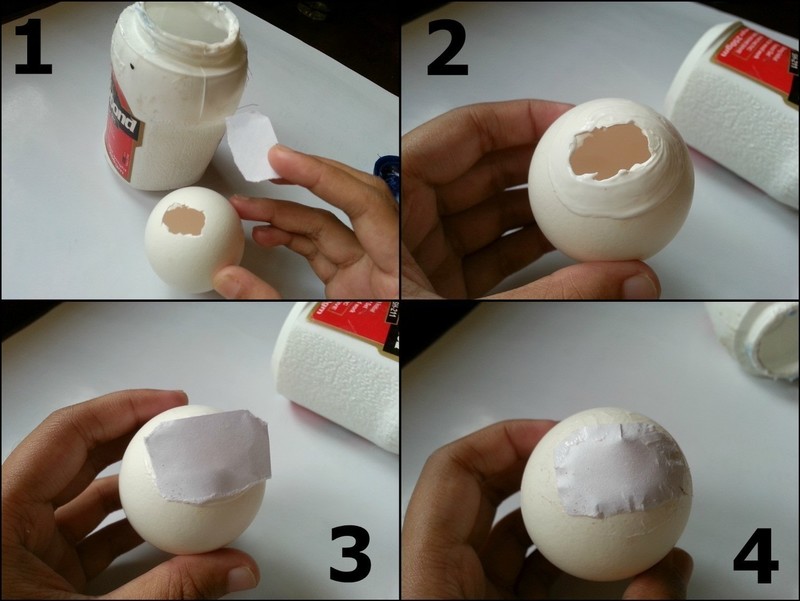
 Step 1
You can use any kind of egg (any size or color) but I think it's better to empty the egg with its yolk drained for this egg art. Poke a tiny hole on the egg to drain the yolk. Make sure to clean and dry the egg.
-
 Step 2
After the egg dries take a small piece of paper, glue the area around the tiny hole on the egg and stick the small paper on it (for covering the hole).
-
 Step 3
Use black fabric paint for the base coat of the egg. One layer of base coat should work. You'll have to color the base coat carefully as you won't be able to color the whole egg at once. Color half of the egg at first and after it dries, color the other half of the egg. Allow the color to dry. Keep something near hand to keep the egg after coloring or designing as the egg would roll on plain surface.
-
 Step 4
Take a piece of thick polythene paper and cut it into a square shape. Roll the paper from one corner to form a cone shape and tape the edge. Make sure that the hole on the cone isn't too big nor too small, otherwise you won't be able to make good designs. Fill half of the cone with white glue. Fold and tape the open end to make sure that the glue doesn't come out of the cone.
-
 Step 5
Before designing the egg it's better to draw some designs on a piece of paper. If you're not used to making designs using cone, then you should practice a little. Carefully and slowly press the bottom of the cone and start designing the egg as you want. Too much details might smudge the whole design, so be careful. You won't be able to design the whole egg at once.
-
 Step 6
Design half of it at first, allow the glue to dry and then design the rest. Once you're done designing, allow the white glue to dry. This is how the gg would look after the glue dries.
-
 Step 7
After the white glue dries you can apply the final gold coat using finger tip. Dip your finger tip into the paint and apply it over the designed egg. After the first coat dries apply another coat of gold fabric paint evenly on the designed egg. Be careful while applying the gold paint coat, too much color might smudge the design. Done!