


About
for home hair creativity and busy bodies!
love 'em or hate 'em, glitter clips are everywhere. whether you're a crown and glory fan like me, or prefer your high street equivalents, over time, any hair accessory collection can cost quite a bit - regardless of how good a quality they are. with this in mind, i was determined to find a way to recreate my favourite clips at home, for a fraction of the price...
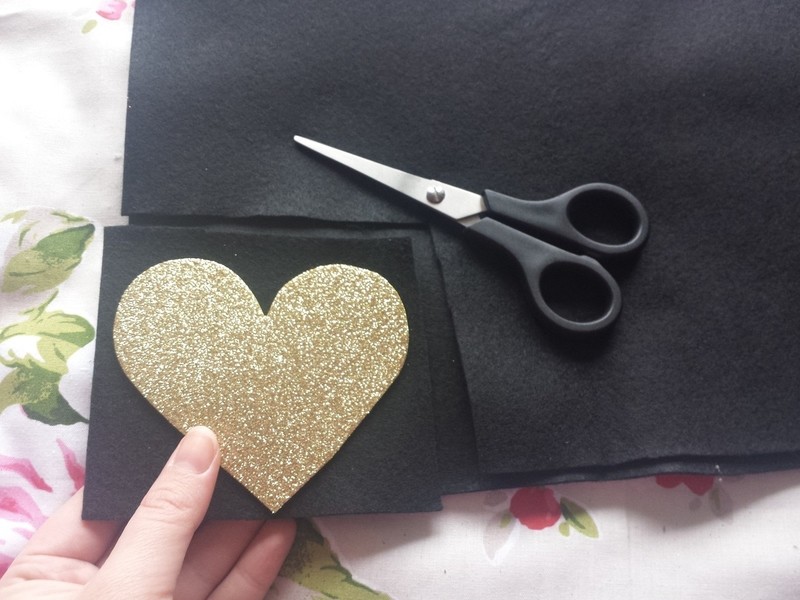
i've tried to use loose glitter and card in the past, but the result was unfinished and patchy. on my travels through my local shopping centre, i found some glitter foam in "the works" craft supplies shop. at the time, it was only available in red, gold and black, but recent visits have proven they now stock pink and silver foam too - excited much?!
the foam is fairly thick, which means it doesn't need a backing to keep it's shape, any scraps of fabric or felt will work. the only thing you may not have laying around is crocodile clips; in the past i've used clips from old accessories that i no longer use, but they're fairly affordable from good old ebay...
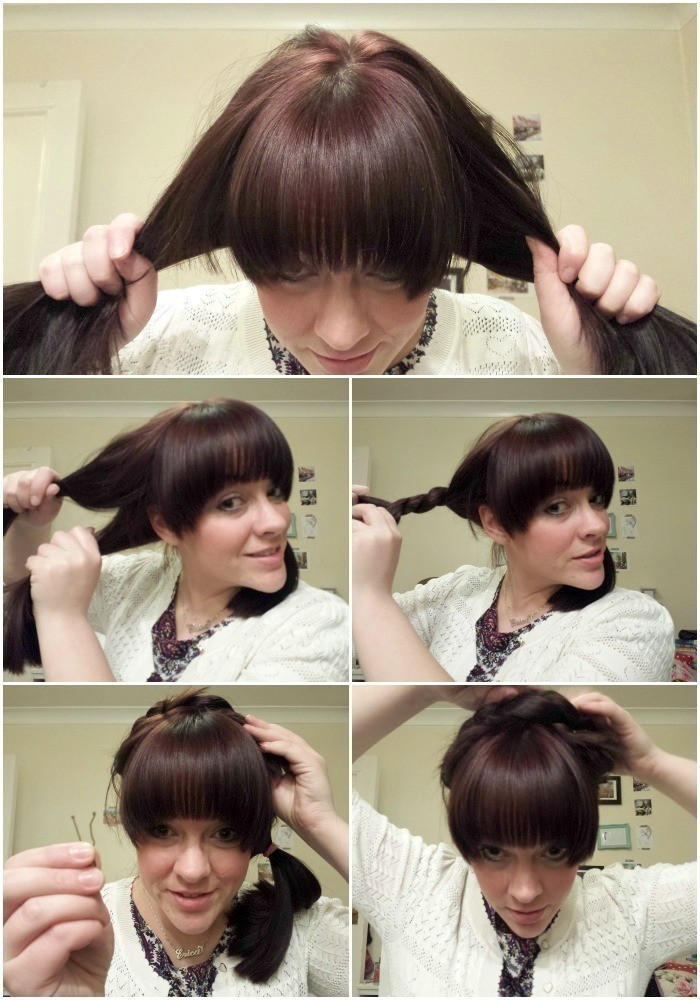
as for the hair, well, i often get asked how i do my hair in those scrappy milk braids that seem to be my go-to style lately (can you call months of wear 'lately'?), so i thought it was about time i shared my secrets with you all... to be fair, they're not even my secrets; i stole them from kim who stole them from kate who's tutorial is far better than mine ever could be. so, go watch hers. or, look at my daft pictures, whichever you do, start with brushed hair!
when i'm done pinning, i normally throw on a floral crown or glittery clip (see previous post!) to hide the sticky-outty bits - especially now my hair is so short and there are so many of them! failing that, you can absolutely get away with a naked head, especially as the braids are sort of... interesting enough without more accessories.
although ... that's kinda boring, right?
Tags
-
 Katt C. favorited D.I.Y Glitter Hair Clip + Hair Hack Tutorial!
23 Aug 20:20
Katt C. favorited D.I.Y Glitter Hair Clip + Hair Hack Tutorial!
23 Aug 20:20
-
 Emma H. favorited D.I.Y Glitter Hair Clip + Hair Hack Tutorial!
19 Apr 23:03
Emma H. favorited D.I.Y Glitter Hair Clip + Hair Hack Tutorial!
19 Apr 23:03
-
 Nina H. added D.I.Y Glitter Hair Clip + Hair Hack Tutorial! to To Do list
13 May 21:29
Nina H. added D.I.Y Glitter Hair Clip + Hair Hack Tutorial! to To Do list
13 May 21:29
-
 missjojangles favorited D.I.Y Glitter Hair Clip + Hair Hack Tutorial!
20 Jan 18:26
missjojangles favorited D.I.Y Glitter Hair Clip + Hair Hack Tutorial!
20 Jan 18:26
-
 Crafty Pirate favorited D.I.Y Glitter Hair Clip + Hair Hack Tutorial!
08 Jan 22:55
Crafty Pirate favorited D.I.Y Glitter Hair Clip + Hair Hack Tutorial!
08 Jan 22:55
-
 imbeingerica published her project D.I.Y Glitter Hair Clip + Hair Hack Tutorial!
30 Dec 12:32
imbeingerica published her project D.I.Y Glitter Hair Clip + Hair Hack Tutorial!
30 Dec 12:32
-
 Step 1
1// on the back side of the foam, draw out your shape. don't worry if you mess it up, you'll be covering it up with felt later on. once you're happy with the size and shape, cut that bad boy out.
-
 Step 2
2// sit your cut-out on top of your felt and cut a square out around it - make sure the square is big enough to easily cut around your foam later on.
-
 Step 3
3// starting at the edges, apply a thick layer of fabric glue, working inwards. once the back is covered with glue, firmly attach the felt to the back of the foam. press it down around the edges to make sure there are no spots that aren't stuck down. leave that to dry for about half an hour.
-
 Step 4
4// once it's dry, use your hot glue gun to attach the clip across the back. that will dry and be ready to use in minutes!
-
 Step 5
1// separate hair down the middle into two bunches; keep them separate.
2// with one bunch tied away, separate the other bunch at ear level. as in, a top half and a bottom half.
3// twist them around each other, starting again at ear level (for short hair, otherwise you'll run out of hair!).
4// pin the ends of the twist to your head.
5// repeat with the other bunch of hair, using extra pins as necessary to hold all the fly-aways in place.