


About
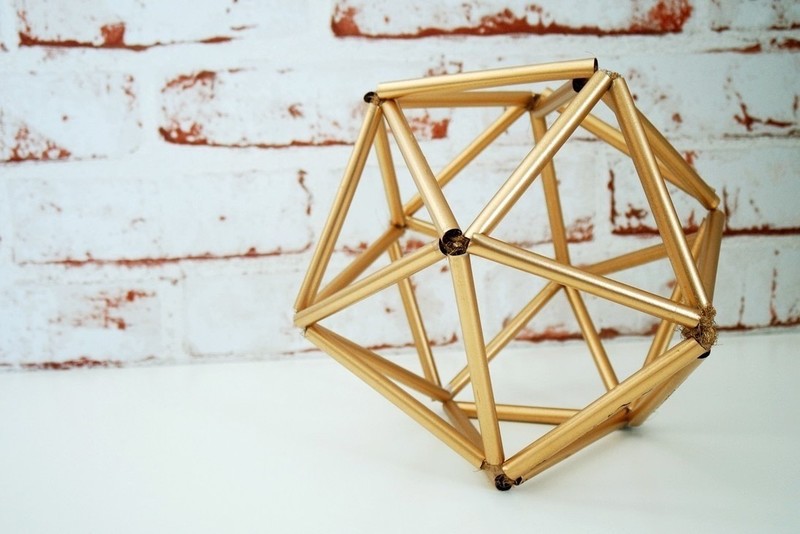
A beautiful decorative accessory for your home made out of straws!
Make plastic straws look super glamorous with this easy tutorial on making a faux brass accessory for your home.
Tags
-
 Rachel favorited DIY Faux Brass Geometric Ornament
22 Dec 16:58
Rachel favorited DIY Faux Brass Geometric Ornament
22 Dec 16:58
-
 Maya E. favorited DIY Faux Brass Geometric Ornament
14 Mar 22:04
Maya E. favorited DIY Faux Brass Geometric Ornament
14 Mar 22:04
-
 Southern Crafter added DIY Faux Brass Geometric Ornament to Christmas
13 Sep 00:32
Southern Crafter added DIY Faux Brass Geometric Ornament to Christmas
13 Sep 00:32
-
Southern Crafter favorited DIY Faux Brass Geometric Ornament
13 Sep 00:31
-
Suzi T. favorited DIY Faux Brass Geometric Ornament
27 May 12:34
-
 Kay Bay favorited DIY Faux Brass Geometric Ornament
27 May 11:56
Kay Bay favorited DIY Faux Brass Geometric Ornament
27 May 11:56
-
 Julia favorited DIY Faux Brass Geometric Ornament
23 May 07:32
Julia favorited DIY Faux Brass Geometric Ornament
23 May 07:32
-
Shehzeen R. published her project DIY Faux Brass Geometric Ornament
23 May 06:00
You Will Need
-
 Step 1
Himmeli ornaments have been around for quite some time but I finally got around to making one and realised there were no full instructions on getting it done in this shape. So I decided to list all the steps within this tutorial.
BUT. Before we progress, some gentle directions:
1. Keep the thread PULLED TIGHT at all times. You need tension in the situation to keep things looking good in the end so pull. Keep knotting at points (even if I don't mention it) to lock things into place and keep it all nice and tight.
2. If you're using thread, it may feel like it's never going to get into shape. I thought it would be a disaster. But it all shaped up in the end and turned out super firm. Give it a chance.
3. Don't cry. It takes one time to figure it out and then you can produce 5 million pieces an hour once you get a hang of the pattern. -
 Step 2
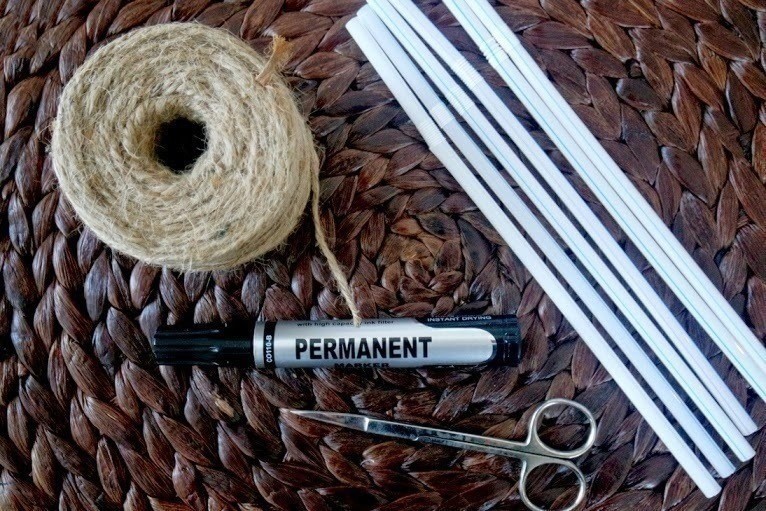
What you need: Straws (6), Thread/Twine, Market, Scissors.
I made two ornaments and used twine for the bigger one and thread for the smaller one, just to test both out. Both hold up great but thread hides better. Twine's thicker but needs less pulling to get things tight and doesn't become loose as easily as thread so you've got to keep a firm hand on it.
-
 Step 3
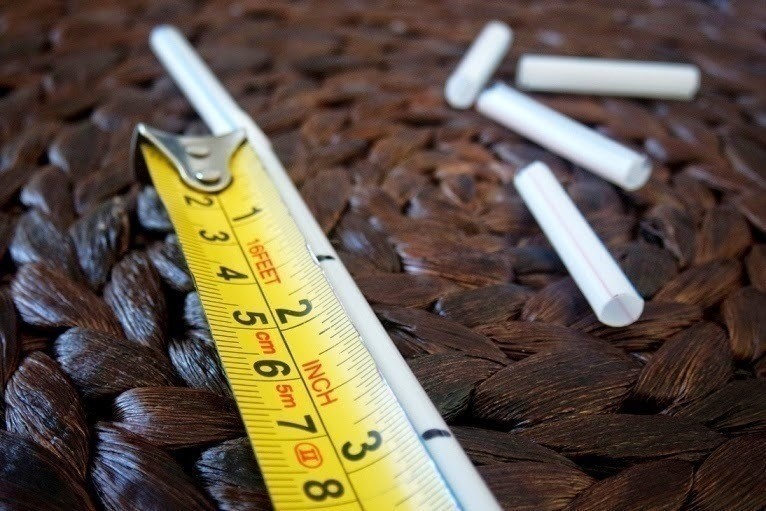
I marked off each straw at every 1.5 inches. This gave me 5 pieces per straw. If you want a bigger sized ornament, mark off at every 3 inches.
-
 Step 4
You'll need 30 pieces. To make things easy, mark off each piece from 1 to 30.
-
 Step 5
Cut off a piece of thread at about 3-4 feet. Pick up the first 3 pieces and pull the thread through them to form a triangle of sorts. From the longer end of the thread, go back through straw #3 again.
-
 Step 6
Pull things tight and lock it off with a knot. Now you should have a tight triangle on your hands. Ignore the small end of the thread from hereon. You're not going to need it and can easily chop it off at this point if you want.
-
 Step 7
Now take the loose end that you just pulled out of straw no. 3, and add two more pieces.and take it through straw #3 AGAIN.
-
 Step 8
Pull things tight again and you'll see these twin triangles forming right in front of your eyes like a happy little miracle. Take the end that you pulled out of straw #3 and take it through #2.
-
 Step 9
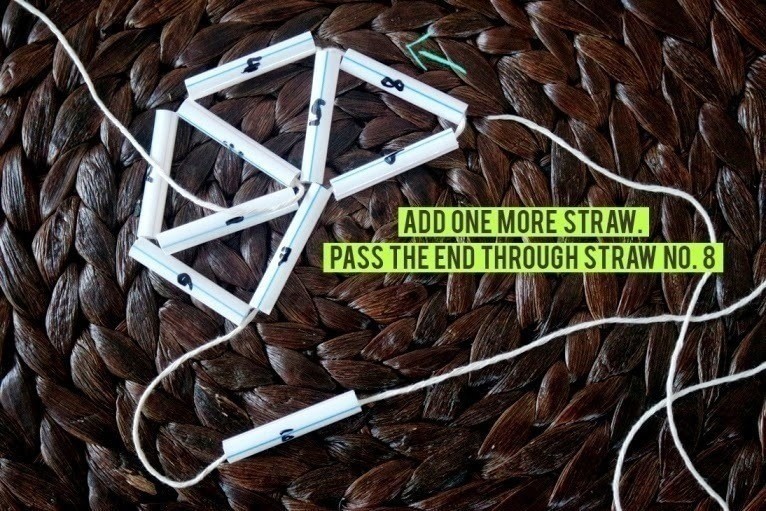
Add two more pieces (6 &7) and take the loose end through #5.
-
 Step 10
Now you have these three triangles on your hands. To form one more, add on two more pieces (8 & 9) and take the loose end through #7.
-
 Step 11
Four triangles on your hands. This time, add one more piece only (10) and take through #8.
-
 Step 12
As soon as you pull the thread through #8 and pull tight, you'll see this pyramid. Have a cookie at this point because life would be feeling so great right now.
-
 Step 13
Now repeat everything I taught you and come back to me with one more shape, just like the first one.
-
 Step 14
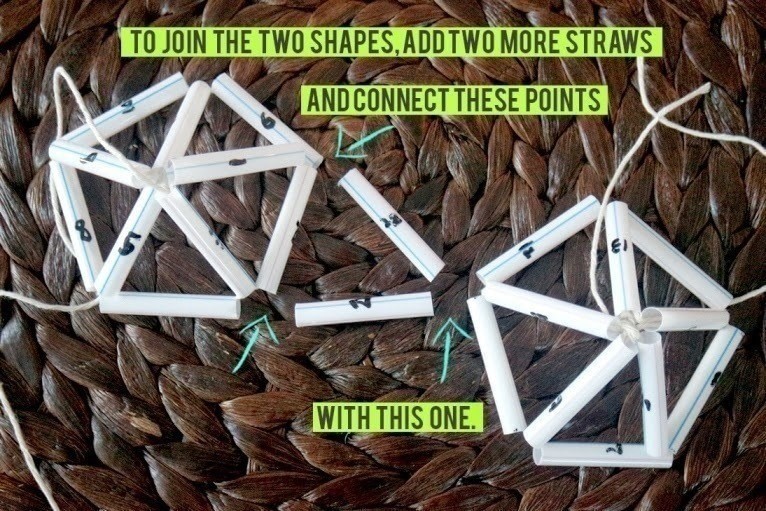
Once you have the two pyramids on your hands you're next assignment is to connect the two. Your goal in life at this point is to connect the base of each triangle from SHAPE ONE, to the JOINT of each triangle from SHAPE TWO. See the picture.
-
 Step 15
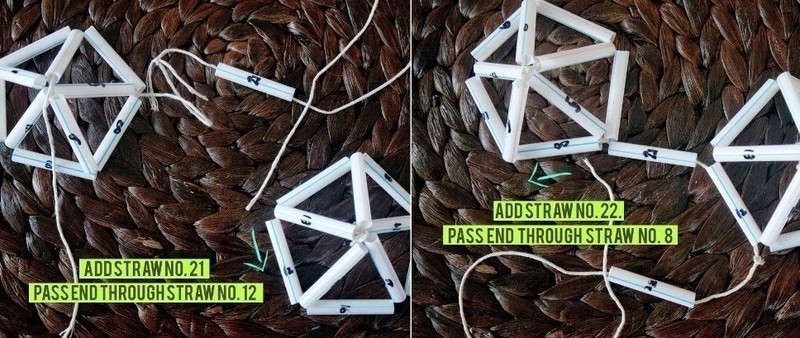
So basically, cut off a piece of thread at about 3-4 feet, knot it onto the loose end hanging off from the base of Pyramid 1. In the picture it's hanging off from straw #8. Slip straw #21 through it and approach Pyramid 2. Now you can take it through any side from Pyramid. I chose to go through straw #12 and you can choose to copy me. Then take the end coming out of #12 and take it through #8, from the same place where you started. See image for clarity.
-
 Step 16
Pull tight and knot it up.A triangle would have formed and if you lift the whole thing up, you'll see it's slowly coming to life.
-
 Step 17
Now repeat the triangle action again. Only this time when you do the same steps, two triangles will form. Follow the image and everything will be fine.
-
 Step 18
See what's happening. You get two triangles and overall THREE, because you made one before that. Your job now is to keep going in the same way until....
-
 Step 19
...it's all connected and your life is complete.
-
 Step 20
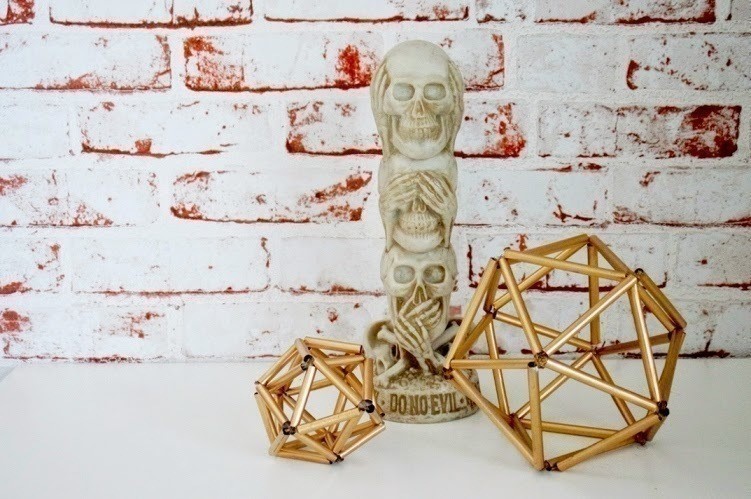
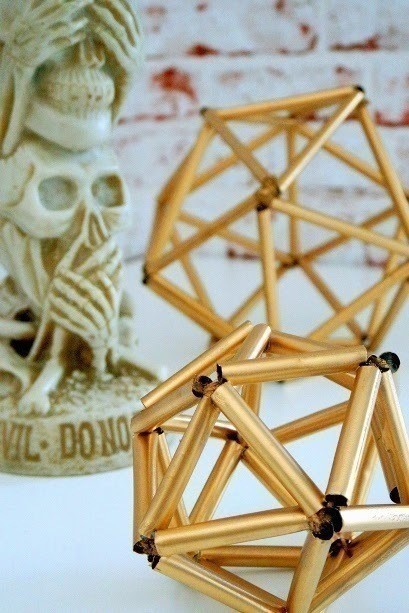
Now bring out your spray paint and cover them up. I chose gold but you could do black or neon as well which would also look super cool. Let it dry and you're done!