About
DIY Fall Wreath for FREE
Fall is one of me favorite times of year!! I love the cooler weather and the changing of the leaves. Come see how I used my thrifty skills to make this super cute wreath for FREE!!
-
 Adrienne S. added DIY Fall Wreath to RECYCLE PROJECTS
30 Apr 01:20
Adrienne S. added DIY Fall Wreath to RECYCLE PROJECTS
30 Apr 01:20
-
 shonee s. published their project DIY Fall Wreath
08 Apr 11:00
shonee s. published their project DIY Fall Wreath
08 Apr 11:00
-
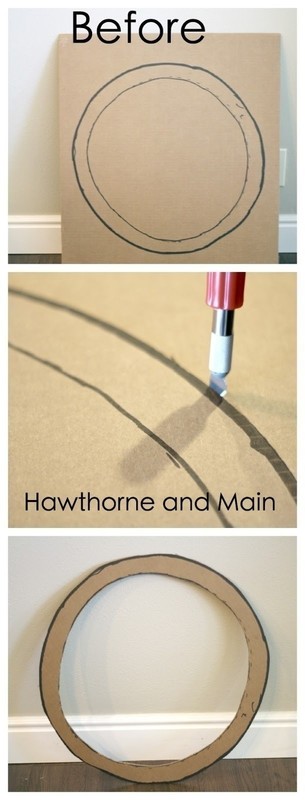
 Step 1
To start off you will need a box that is as big as the size you want your wreath base to be. I think mine ended up being about 2 feet across. For the outer circle I used my basket as a guide to draw my circle. The inner circle I just eye balled and free handed it. If yours ends up not being perfect like mine, it's ok, it will still work out. I used an X-Acto knife to cut around the lines. Once I had my frame all done it was time to make the leaves.
-
 Step 2
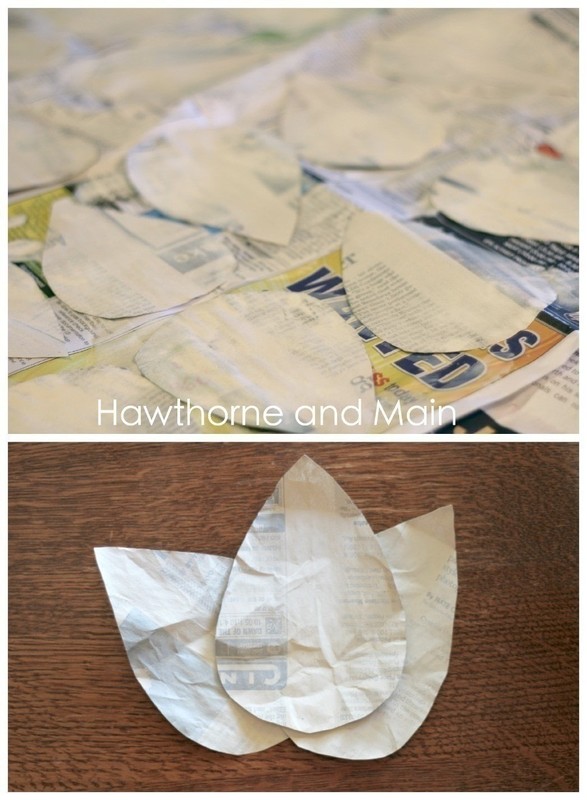
I happen to be a part-time couponer and so I have A LOT of news papers laying around. If you don't get the paper, chances are, one of your neighbors does. Try going outside early on a Sunday morning and look down the street to see who has a newspaper sitting in their driveway. Ask them if you can have it when they are done reading it.
In order to make the process of cutting out the leaves faster, I only used the fold of the paper. Below is a picture of what I mean. I kept the original fold of the news paper and just cut out a half tear drop shape, once opened it looked like a leaf. You can totally customize how big or small you want the leaves to be. My leaves are about 4.0 inches long and 4.5 inches tall. I was able to cut out 4 leaves from each fold. -
 Step 3
I really like the look of just plain newspaper but I ended up deciding to paint the leaves. I had some left over paint samples from when we painted the inside of our house. I grabbed one of those and added about 1/2 cup water to 2 tablespoons paint. I basically wanted to make a white wash. This is the same process that I used when I made my DIY Barn Wood. The white wash made it so that I can still see some of the words on the newspaper. It worked very well. Once they were all dry I gather them up. As I picked up each one I gently crumpled it into my hand to give the paper some dimension.
Next I needed to decide how to arrange them on the wreath. I ended up grouping three together like the picture below. Once I made all of the leaf groups it was time to assemble.
-
 Step 4
I laid them all out on the wreath and used my double sided tape to attach them to the card board. I overlapped each leaf group about half way. I really love how this turned out! It matches my
DIY barn wood picture frame so nicely and it just has a fun fall feel. Plus the thing was FREE to make, a total bonus!!! What do you think of this FREE fall wreath? I would love to chat with you on Instagram, Facebook or the comments section below.