About
The DIY version of Nasty Gal's Decay Starburst Earrings
Tips:
-When picking your cardboard, try to choose something that won't bend too much when you poke a hole in it and isn't too thick to poke your file through easily.
-If you have a lot of files to choose from, try poking test holes in your cardboard. Ideally, the hole in your cardboard should have a lot of distressing.
The project probably won't take you three hours, I just put that to allow for the drying time of the sealer and glue.
This is what I'll be DIY-ing: http://www.nastygal.com/accessories/decay-starburst-earrings
Tags
-
 Jennifer B. favorited Diy "Decay Starburst" Earrings
04 Jan 04:14
Jennifer B. favorited Diy "Decay Starburst" Earrings
04 Jan 04:14
-
 sam.apel.9 added Diy "Decay Starburst" Earrings to Accessories
11 Dec 14:33
sam.apel.9 added Diy "Decay Starburst" Earrings to Accessories
11 Dec 14:33
-
 Caroline C. favorited Diy "Decay Starburst" Earrings
28 Jul 06:25
Caroline C. favorited Diy "Decay Starburst" Earrings
28 Jul 06:25
You Will Need
-
 Step 1
Draw stars on your cardboard and cut them out. (One of your stars should be bigger than the other)
-
 Step 2
Cut pieces of foil tape to fit over your stars. (the tape is really sticky)
Cut out the tape between the points of your stars, making sure to leave a bit of tape to cover the sides.
Use your bone folder or your fingers to push the tape around the sides of your star until the whole thing is covered.
Use your file (the one you'll use for poking holes) to sand the tips of the stars so that they don't poke you while you wear your earrings.
-
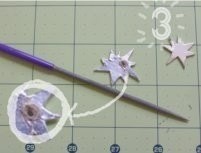
 Step 3
Flip your larger star over and poke a hole in it using your file. (It's important that you flip the star over so the cardboard pokes through to the front of the star)
-
 Step 4
Distress both of your stars with a sanding block (or fine grit sand paper)
Use your leafing pen to color the hole on the larger star so it matches the rest of the star.
-
 Step 5
Seal the top of your stars and let dry. When they are done drying, flip the stars over and seal the back.
-
 Step 6
Glue post earring bases to the backs of your stars. If you leave your stars with the silver sides down, your posts won't slide around when the glue is drying.
-
 Step 7
After the glue dries, your earrings are ready to wear or give to a friend.
Enjoy! :)