About
A cost effective way of creating your own craft labels.
This is a cost effective way of making your own craft labels. Its quick and easy to do and gives you the freedom to make the labels exactly how you want them.
Tags
-
 Leonor R. favorited Diy Craft Labels
21 Feb 01:39
Leonor R. favorited Diy Craft Labels
21 Feb 01:39
-
 Sarah Sylvia S. favorited Diy Craft Labels
20 Jul 21:01
Sarah Sylvia S. favorited Diy Craft Labels
20 Jul 21:01
-
 craftymomjenlan favorited Diy Craft Labels
10 Jan 11:46
craftymomjenlan favorited Diy Craft Labels
10 Jan 11:46
-
enkha b. added Diy Craft Labels to craft
28 Jul 23:01
-
 alison.stephens.315 favorited Diy Craft Labels
20 Jun 18:49
alison.stephens.315 favorited Diy Craft Labels
20 Jun 18:49
-
 Amanda Wicked favorited Diy Craft Labels
09 Apr 01:02
Amanda Wicked favorited Diy Craft Labels
09 Apr 01:02
-
 OhSillyMeXD favorited Diy Craft Labels
21 Mar 05:03
OhSillyMeXD favorited Diy Craft Labels
21 Mar 05:03
-
 tessie.bonilla.7 favorited Diy Craft Labels
17 Mar 20:38
tessie.bonilla.7 favorited Diy Craft Labels
17 Mar 20:38
-
 Krisandra added Diy Craft Labels to business needs
04 Mar 20:55
Krisandra added Diy Craft Labels to business needs
04 Mar 20:55
-
Krisandra favorited Diy Craft Labels
04 Mar 20:54
You Will Need
-
 Step 1
Things you will need:
1) Inkjet iron-on transfer paper
2) Iron
3) Matt ribbon of your choice (ribbon must be matt, shiny ribbons will not take the transfer as well.)
4) Scissors -
 Step 2
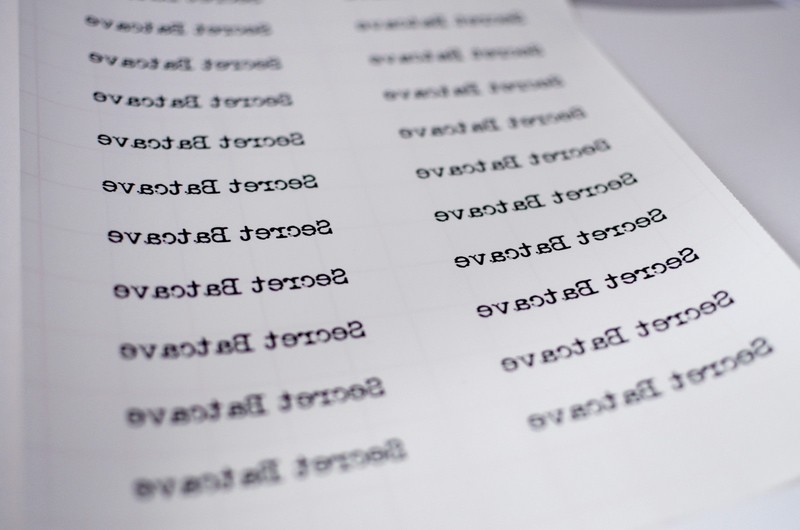
Step 1: Create your craft labels document.
The image printed must be a MIRROR IMAGE of what you want to transfer. I found that the easiest way of doing this was to open your word document into image processing software such as Gimp (free software available online) or photoshop.
Print onto the transfer paper as directed by the packet instructions.
-
 Step 3
Step 2: Cut out the images for transfer. Try to cut as close to the lettering as possible as the white space will also be transferred.
-
 Step 4
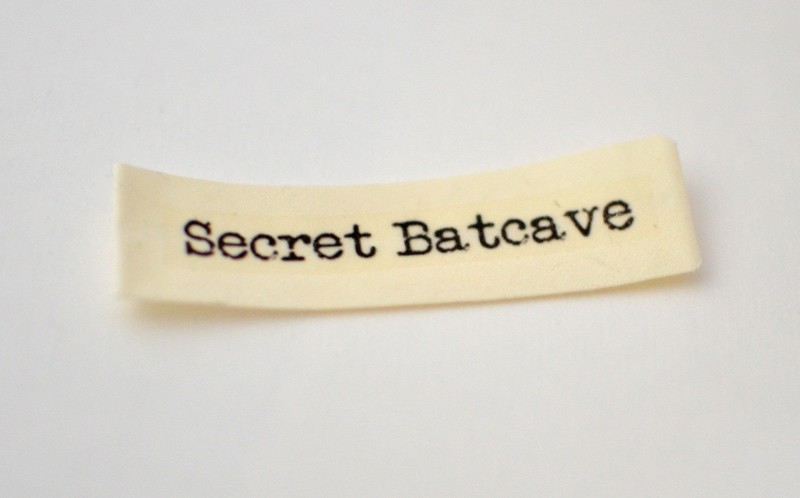
Step 3: Iron the image onto the ribbon as per packet instructions (I actually used bias binding tape instead of ribbon).
-
 Step 5
Step 4: Stitch Cut the Label to size and press the raw edges to the wrong side and your label is ready to be used!