About
A cute card made with colorful tissue paper
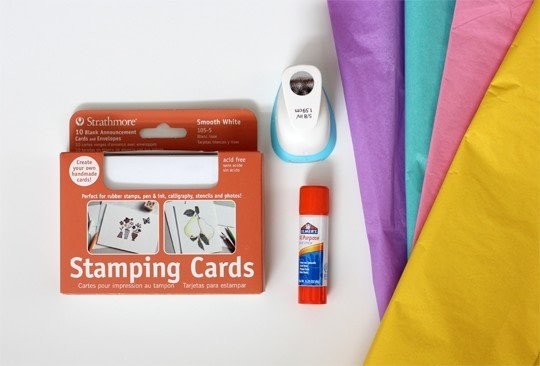
I agreed to participate in a little snail mail project recently, so you know what that means, time to make more cards! Since my last card DIY involved a fair amount of supplies, I paired this one down to just four--simple and easy.
-
 Lee Rose added Diy Confetti Card to papercraft
30 Jun 03:23
Lee Rose added Diy Confetti Card to papercraft
30 Jun 03:23
-
 Xx13.CrowsxX added Diy Confetti Card to Cards
10 Jun 10:38
Xx13.CrowsxX added Diy Confetti Card to Cards
10 Jun 10:38
-
 Katrina P. favorited Diy Confetti Card
16 Feb 05:04
Katrina P. favorited Diy Confetti Card
16 Feb 05:04
-
 MamaMindy added Diy Confetti Card to Stationary Tutorials
11 Nov 22:54
MamaMindy added Diy Confetti Card to Stationary Tutorials
11 Nov 22:54
-
 Ashley W. favorited Diy Confetti Card
19 Jul 03:16
Ashley W. favorited Diy Confetti Card
19 Jul 03:16
-
melinda G. added Diy Confetti Card to cards
10 May 17:46
-
melinda G. favorited Diy Confetti Card
10 May 17:44
- Quirky-Ark favorited Diy Confetti Card 09 May 00:30
-
 Toxic Cupcake Killjoy favorited Diy Confetti Card
23 Apr 16:32
Toxic Cupcake Killjoy favorited Diy Confetti Card
23 Apr 16:32
-
Pandora v. favorited Diy Confetti Card
18 Apr 08:21
You Will Need
-
 Step 1
What you'll need:
- blank cards. I used Strathmore Stamping Cards, but you can use card stock cut to the size of your envelopes. The most important thing is just that the surface of your paper is smooth, rather than textured (as in watercolor cards or canvas cards).
- circle punch. I used a 5/8" Recollections brand circle punch from Michaels. (To be honest, there are probably better brands out there, but for my purposes, this worked just fine.)
- tissue paper. I used a multi-color pack that I already had. I don't know what brand it is since the packaging is long gone, but it doesn't matter what type you use.
- glue stick. I used Elmer's All-Purpose Glue Stick. You could try liquid glue with this project, but I thought it would be too messy and soak through the tissue paper. -
 Step 2
Use your circle punch to cut out a bunch of circles. This part is self-explanatory. The only tip I can give you is to make sure you have several layers of tissue paper stacked up before you try to press down. If your layers are too thin, they will get caught in the punch and tear your paper.
-
 Step 3
Start gluing your circles in whatever pattern floats your boat. I did rows of overlapping circles, starting about 3/4 of the way down the paper and layering as I worked to the right. After I finished a row, I started on the next row above it, again overlapping. Also, I only glued the top half of each circle. You really don't need a lot of glue and leaving the bottom half unglued gives the overall card more texture.
-
 Step 4
I finished my card by adding a little "HELLO" to the front, but you can write whatever message you like or leave it blank.
Wouldn't this card brighten your day up a bit if it was waiting for you in your mail box? :)