


About
Why waste money on an expensive but inferior store-bought post? Make a better one!
Store-bought cat scratching posts are often poorly made and cost a lot of money. Tired of spending $40+ for something that only lasts a few months at best I took myself to the hardware store to make something better.
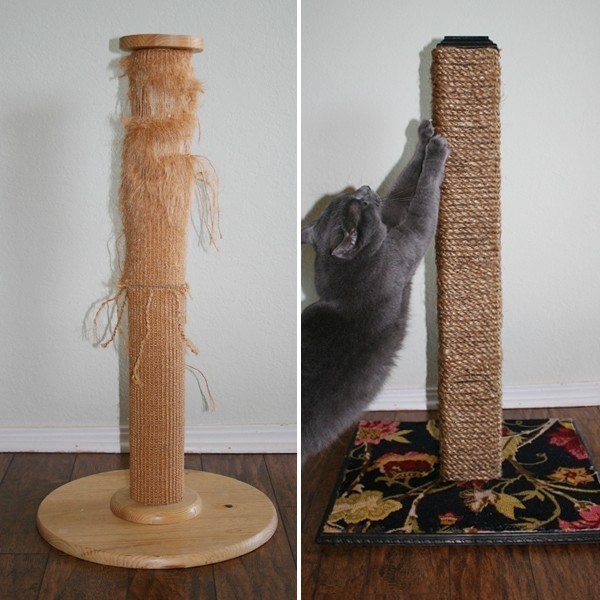
Check out the side by side of the old store bought post against the new one. The difference in quality is huge!
f you want to quell your cat's urge to scratch for the long haul, you will need:
3/4 inch plywood, 18 x 18 inch square
4x4 wood post, 2.5 feet long
3/4 inch decorative wood trim, at least 3.5 feet
mitre box
hack saw
wood glue
trim nails
hammer
long wood screws
100 ft sisal rope (not synthetic)
wood bit a smidge smaller than your screws
power drill
4x4 decorative cap
wood stain
rug (optional)
Tags
-
 Elin H. favorited Diy Cat Scratching Post
02 Apr 08:58
Elin H. favorited Diy Cat Scratching Post
02 Apr 08:58
-
 Lily O. favorited Diy Cat Scratching Post
04 Mar 20:42
Lily O. favorited Diy Cat Scratching Post
04 Mar 20:42
-
 Brianna E. favorited Diy Cat Scratching Post
09 Nov 04:32
Brianna E. favorited Diy Cat Scratching Post
09 Nov 04:32
-
 Katelyn T. favorited Diy Cat Scratching Post
23 Aug 00:04
Katelyn T. favorited Diy Cat Scratching Post
23 Aug 00:04
-
 Polly C. favorited Diy Cat Scratching Post
20 May 04:34
Polly C. favorited Diy Cat Scratching Post
20 May 04:34
-
 Anna N. favorited Diy Cat Scratching Post
09 Apr 09:16
Anna N. favorited Diy Cat Scratching Post
09 Apr 09:16
-
 Len favorited Diy Cat Scratching Post
01 Jun 20:01
Len favorited Diy Cat Scratching Post
01 Jun 20:01
-
 RavenQuinzel added Diy Cat Scratching Post to Pet stuff
25 Jan 19:59
RavenQuinzel added Diy Cat Scratching Post to Pet stuff
25 Jan 19:59
-
 Dark Angel 71313 D. favorited Diy Cat Scratching Post
08 Dec 20:53
Dark Angel 71313 D. favorited Diy Cat Scratching Post
08 Dec 20:53
-
 stick it and fix it added Diy Cat Scratching Post to dfv
26 Sep 18:10
stick it and fix it added Diy Cat Scratching Post to dfv
26 Sep 18:10
-
 Step 1
Draw out the placement for your 4x4 post. When working with a square, I like to draw lines extending from each corner to make an "X" across the wood face. Align the square shape of your post's corners on each of the lines for a perfect center. Trace the square with a pencil.
Put a thin line of wood glue inside of the square you have drawn. Place the post inside and hold. Clean up any glue that squeezes out, if necessary.
-
 Step 2
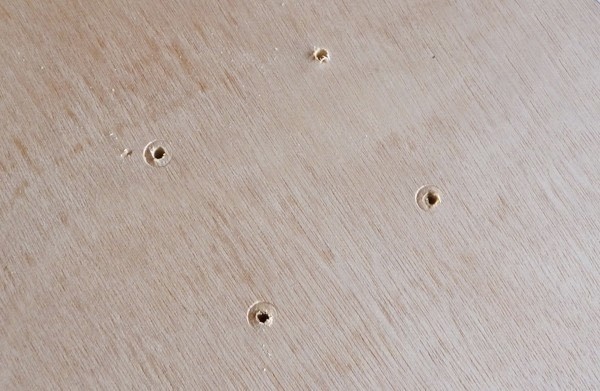
Turn the wood over and drill holes through your bottom square and the 4x4.
-
 Step 3
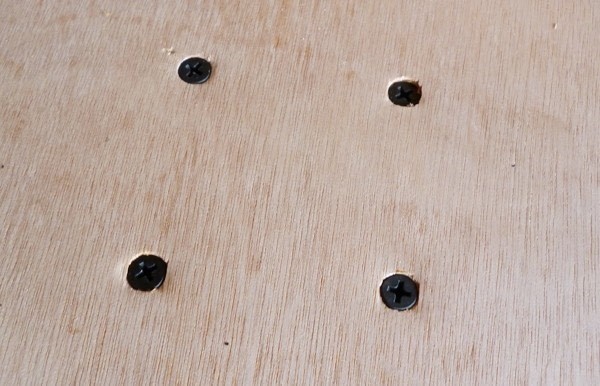
Screw into the holes to permanently affix the two pieces of wood together.
-
 Step 4
Now it time for your decorative wood trim... You can purchase this two different places. It is sold at hobby stores for about $3 a piece. You will need 4 pieces for $12 for this project. OR you can purchase a long piece from hardware stores. I purchased a piece for $6 and had about a foot and a half left.
A mitre box is used to cut uniform angles. This is particularly handy when working to make trim pieces match up really well. According to my dad, I do this totally backward, but also according to my dad I do a really good job matching pieces up. Here is my method:
Make the first angled cut on your trim. You'll want to have your angles pointing away from the piece of wood instead of inward so that it matches up on the corners. The saw fits snugly into lines cut to guide the saw for perfect cuts.
Take your piece with its first cut made and place against the plywood bottom. Put the straight line just inside of the angle and mark the edge of your wood. This is where your next cut will start. Line up your mark in the mitre box and cut your next angle, taking care that it will be pointing away from the wood before you begin to saw.
-
 Step 5
Apply wood glue to the edge of the base and press your cut trim piece up against the plywood.
-
 Step 6
Use trim screws to permanently affix.
-
 Step 7
If your decorative cap is wood, attach it now. Stain the entire piece and allow to sit overnight.
-
 Step 8
At this point I decided to add carpet to the plywood to make it a bit prettier. I didn't take pictures of the process and for that I am sorry. It was basically cutting up a rug to size with a 4x4 square in the middle and with a slit at the back to wrap on the plywood and around the 4x4. Use wood glue to affix.
-
 Step 9
Take the end of your sisal rope and using your hammer and trim screws, attach to the 4x4 at the bottom. Wrap the rope snugly around the post occasionally using a nail to tack down, or as necessary.


Comments


