


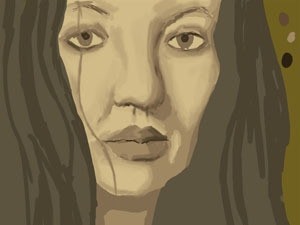
About
A step by step guide to my painting technique for a self portrait.
-
 Afilover47 favorited Digital Portrait
13 May 05:10
Afilover47 favorited Digital Portrait
13 May 05:10
-
 OH! Its the Domo :3 favorited Digital Portrait
25 Feb 23:37
OH! Its the Domo :3 favorited Digital Portrait
25 Feb 23:37
-
 petitefoxy favorited Digital Portrait
22 Jan 14:09
petitefoxy favorited Digital Portrait
22 Jan 14:09
-
 Nia Romadhoni added Digital Portrait to Digital Disain
21 Dec 06:56
Nia Romadhoni added Digital Portrait to Digital Disain
21 Dec 06:56
-
 Cat Morley replied to a comment on her project Digital Portrait
01 Dec 16:22
Cat Morley replied to a comment on her project Digital Portrait
01 Dec 16:22
-
Nia Romadhoni commented on Digital Portrait
01 Dec 10:05
-
Nia Romadhoni favorited Digital Portrait
01 Dec 09:53
-
 WerewolfCas favorited Digital Portrait
04 Sep 10:43
WerewolfCas favorited Digital Portrait
04 Sep 10:43
You Will Need
-
 Step 1
Either work from a mirror or a photograph for this project and use a good painting program such as Photoshop. It's best to use a graphics tablet, but can use a mouse. Start by blocking in the main shapes using 3 or 4 colours.
-
 Step 2
Using a mid-shade skin tone colour, outline the features on the face.
-
 Step 3
Working with one shade darker, add more detail to the painting. Using one shade lighter, smooth in the skin tone by using a low opacity brush and the smudge tool. Add a little bit of detail to the hair.
-
 Step 4
Add all the main highlights and shadows to the skin tones, making sure to smooth in the colours as you go. Use a thin brush and darker tone to add the details, such as the mouth and pupils of the eyes.
-
 Step 5
It's time to get colourful. Use a low opacity brush to add colour to the eyes, lips and cheeks.
-
 Step 6
Use a thin brush and scribble detail in to the hair. Use the burn and dodge tools to add further, more subtle, highlights and shadows to all areas of the portrait. Continually refine all areas of the portrait by smudging or re-painting where necessary.
-
 Step 7
In the same way, take a thin brush and a light hair colour and scribble in detail where the hair highlights. Add further shadows and saturation to the lips.
-
 Step 8
Use the push and dodge tools to add further, more subtle, shadows and highlights to the hair. Using a low opacity soft brush, add small amounts of colour around the eyelids.
-
 Step 9
Finish up all the areas of the portrait and then add a nice background.


kierstyn
Remington Plum
Hello and congratulations!
Someone you know (or don't know) is a very big fan of yours, and has nominated you for a Plummy Award for Excellence in Crafting. You have been nominated in the following category: Best Blog
Again, congratulations. The person who nominated you left the following comments:
Whip Up is full of exciting crafting news, info, articles,
interviews, and more. I enjoyed their Whiplash crafting contest so much.
If you think someone is deserving of a Plummy, please visit the website and nominate them. We're taking nominations through August 15th. http://plummies.plumofthemonth.com
Be proud! There's even a little button you can post on your MySpace, blog, or website to let visitors know you've been recognized. It's located here (feel free to hotlink) http://plumofthemonth.com/plummies/nominee.jpg
Have a plum terrific day,
Amy and Rachel of Plum of the Month