

Cutie Pie
Extract from Sewing Green: 25 Projects Made with Repurposed & Organic Materials • By Betz White • Published by Abrams


About
cutie-pie tutorial
-
 Katrina P. favorited Cutie Pie
02 May 02:46
Katrina P. favorited Cutie Pie
02 May 02:46
-
 mmotse03 favorited Cutie Pie
14 Apr 10:32
mmotse03 favorited Cutie Pie
14 Apr 10:32
-
 Serena C. added Cutie Pie to Summer Money
16 Jan 17:44
Serena C. added Cutie Pie to Summer Money
16 Jan 17:44
-
 Lotusburger favorited Cutie Pie
04 Jan 15:28
Lotusburger favorited Cutie Pie
04 Jan 15:28
-
 Step 1
Cut a circle out of the Steam-a-Seam (mine is 7" diameter). Peel off paper from one side and fuse to the solid wool felt, following product directions. ***(1/3/07
-
 Step 2
Cut the solid felt out around the edge of the Steam-a-Seam. Remove remaining paper.
-
 Step 3
Place fusible side face down onto wrong side of sweater felt. Fuse and trim out circle. Be sure your work is totally fused around the edges so it doesn't de-laminate once your start bending it around. I like to cover it with a damp press cloth and go back at it with a lot of steam.
-
 Step 4
Make a sundial...no, wait, just kidding. Place your felt balls around the perimeter to get a feel for how many you'll need. I used 14. There's is probably some kind of "pie-R-squared" formula to calculate # of balls based on circumference, but that's just not my style...
-
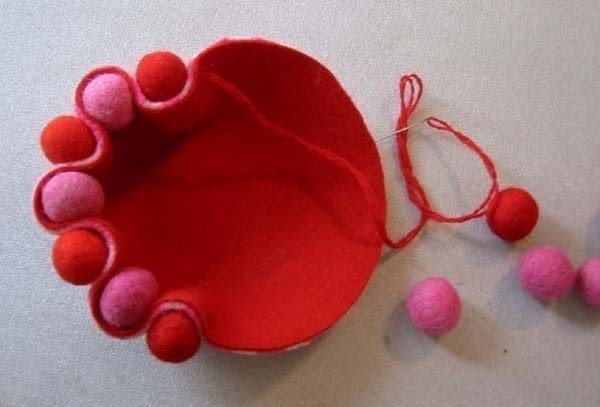
 Step 5
Thread a needle with yarn, double stranded for strength. Start to sew through the felt circle, through the ball, then back through the felt again. I started about 1/4" from the top edge of the felt and went through the center of each ball so that the tops of the balls would peek out a little.
-
 Step 6
Keep going making sure that the felt wraps about half way around each ball. Keep adding balls, alternating sides of the felt circle.
-
 Step 7
Stop and check about halfway around the circle, making sure you have used half the balls from your "sundial" estimate. Scientific, I know...
-
 Step 8
Keep going around until you're back at the beginning. When you're happy with the look, knot the yarn in an inconspicuous place. This one took me 2 tries to get it to space out right, but it went pretty fast regardless. Felt is pretty forgiving as long as you don't expect it to be perfectly uniform!
I think these would look really fun with various size felt balls or beads as well. Do me a favor and send me your photos if you make some cutie pies of your own!


xo Steph